


This is the second part of our cPanel Tutorial Series. If you are planning a new VPS, then we recommend starting with part 1.
Automated bots continuously scan IPs for vulnerabilities. To prevent this from causing problems on your VPS, setting up the security of your VPS is the first thing we do after the installation.
Given the large number of IPs used by bots, we cannot include all attacking IPs in our own firewall, nor do we receive reports of the attempts to penetrate your VPS.
Security measures
We go through the following steps to secure your VPS:
- Change your SSH port
- Fail2Ban brute force protection
- Restrict access to cPanel & WHM to specific IPs
- Anti-virus / malware protection with ClamAV
- WHM Two-Factor Authentication
- Securing localhost & mail with SSL
This is relatively complex material. If you use the steps below to secure an existing (instead of new) VPS, then always make a snapshot of your VPS first before you follow the steps below. That way you always have a snapshot to fall back on if it turns out that a change creates a problem.
Change your SSH port
Besides the root user not having SSH access to your VPS by default, we advise you to change your SSH port. This is a form of 'security through obscurity'; by changing your SSH port, you make your VPS invisible to most of the attacking bots (if not all bots). An additional advantage is that your log files remain organized and you get a clearer picture when your VPS is actually attacked directly.
Step 1
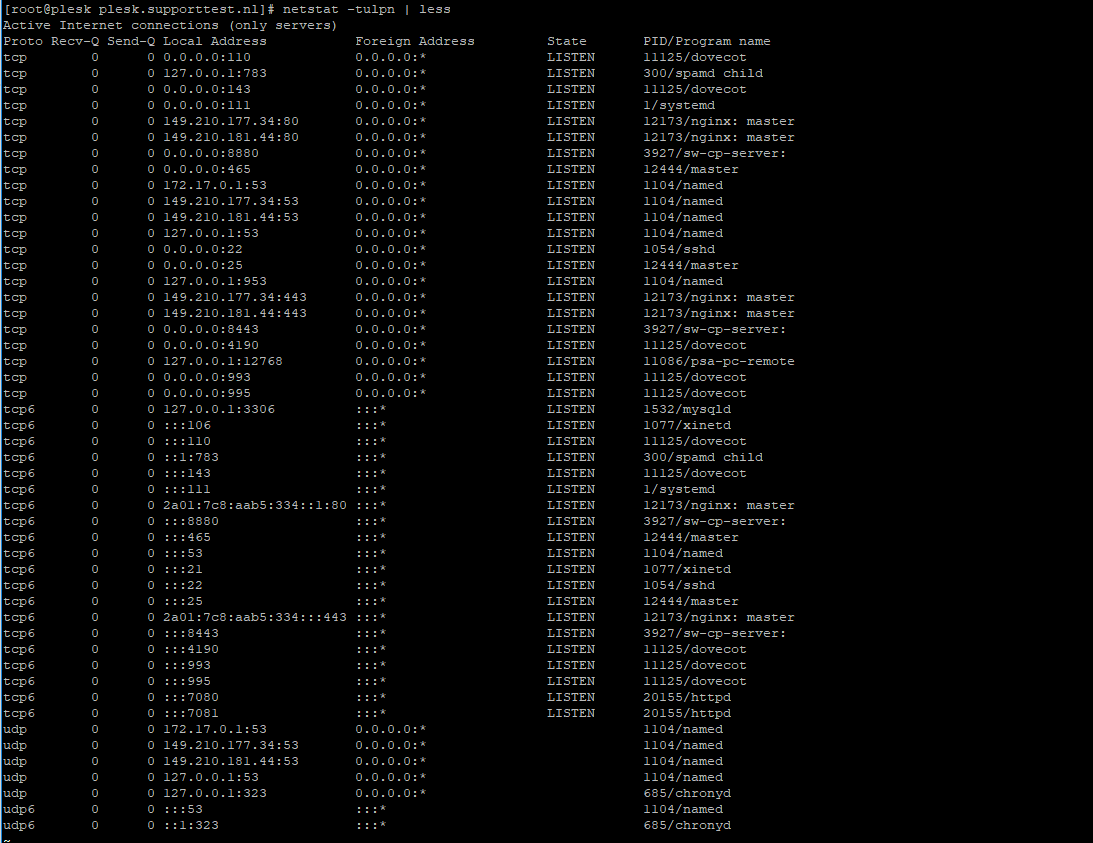
Connect to your VPS via the VPS console in your control panel or via SSH. Check your used ports with the command below.
netstat -tulpn | less
An overview as shown in the screenshot below appears. In this overview, the port numbers are the numbers in the row 'Local Address' behind the colon.
Step 2
Choose a random port number between 0 and 65535 that is not shown in the overview (for example 47592) and press ‘q’ to stop netstat.
Step 3
Open the SSH configuration file with the command below. You can also use vi(m) for this.
sudo nano /etc/ssh/sshd_config
Step 4
The configuration file opens, and you will see the code below among other things.
# If you want to change the port on a SELinux system, you have to tell
# SELinux about this change.
# semanage port -a -t ssh_port_t -p tcp
#PORTNUMBER
#
#Port 22
#AddressFamily any
#ListenAddress 0.0.0.0
#ListenAddress ::
Uncomment or delete the # in front of '#Port 22' and change the number to the number you chose under step 2, for example:
Port 47592
Save the file and close the file by pressing ctrl+ x > y > enter in succession.
Step 5
Add the chosen port to your firewall with the command below. Replace 47592 with the port number you selected in step 2.
firewall-cmd --permanent --zone=public --add-port=47592/tcp
Do you use our VPS-firewall in the TransIP control panel? If so, don't forget to add a custom rule in the firewall in which you open your new SSH port, and to close port 22 there as well.
Step 6
Next restart your firewall configuration and SSH with the following commands:
sudo firewall-cmd --reload
sudo systemctl restart sshd
You can then check that SSH uses the new port with the command:
sudo ss -tnlp | grep sshd
Fail2Ban brute force protection
Bots try to enter automatically by performing brute force attacks on your VPS in different areas, such as SSH, Postfix (outgoing mail server), and cPanel. Fail2Ban offers good protection against this.
Fail2Ban protects your VPS by banning IPs that try to abuse your VPS, for example in too many wrong password attempts, searching for exploits, etc. We therefore recommend Fail2Ban wholeheartedly.
We discuss the installation and configuration of Fail2Ban in our Fail2Ban manual.
Restrict access to cPanel & WHM to specific IPs
Our cPanel VPSs are supplied with ‘firewalld’ as a firewall. You can choose to allow only specific IPs to connect to port 2087 and / or 2083 in firewalld. Port 2087 is the port you connect to when you use WHM and port 2083 is the port of cPanel.
Please note: We recommend using these steps for port 2087 only. If you also use the steps below for port 2083, make sure to repeat these steps for all IPs used by the people who have a user on your cPanel VPS.
Alternatively, you can secure WHM using Two-Factor Authentication (see later in this article). Limiting access to specific IPs or using Two-Factor Authentication is sufficient to secure access to WHM / cPanel. It is not necessary to use both.
Step 1
Connect to your VPS via the VPS console in your control panel or using SSH. First close port 2087 with the command below (i.e. in reality remove port 2087 from the list of open ports):
firewall-cmd --permanent --zone=public --remove-port=2087/tcp
Step 2
With the commands below, you create an exception for your own IP address so that only your own IP can connect to port 2087.
sudo firewall-cmd --permanent --zone=public --add-rich-rule='
rule family="ipv4"
source address="1.2.3.4"
port protocol="tcp" port="2087" accept'
Replace 1.2.3.4 by your actual IP address. You can repeat these steps to give access to more IPs.
Step 3
Reload firewalld to process the changes:
sudo firewall-cmd --reload
Additional Tips:
- To modify or verify your configuration directly, you can use the following command:
sudo nano /etc/firewalld/zones/public.xml
You will see the overview below.
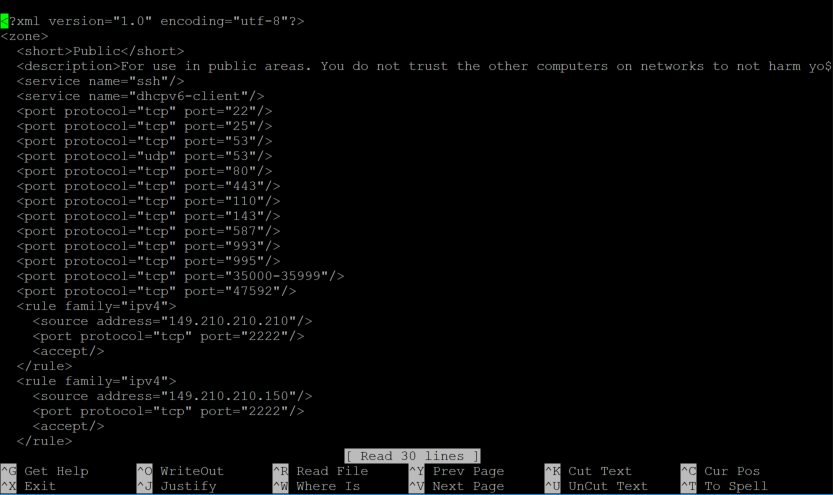
You can undo the above rules by removing the part from <rule to </rule> and adding the following line:<port protocol="tcp" port="2087"/>
- You can also use the steps in this section to close other ports. Only do this if you are absolutely sure of what you’re doing, for example, if an IP attacks a specific port.
Anti-virus / malware protection with ClamAV
ClamAV is a free, open source anti-virus program for, amongst other things, the detection of trojans, viruses and malware on your VPS.
In our ClamAV manual for CentOS 7, 8 en AlmaLinux 8, we show you how to install ClamAV, ensure that ClamAV starts automatically and scans your VPS daily.
WHM Two-Factor Authentication
CPanel offers the possibility to set the strictness of FTP(S) and password protection. We recommend being strict in this and not to allow unsecured connections. You adjust this as follows: Alternatively, you can protect WHM with an IP restriction on logging into WHM and / or cPanel (see earlier in this article). Limiting access to specific IPs or using Two-Factor Authentication is sufficient to secure access to WHM / cPanel. It is not necessary to use both options.
Step 1
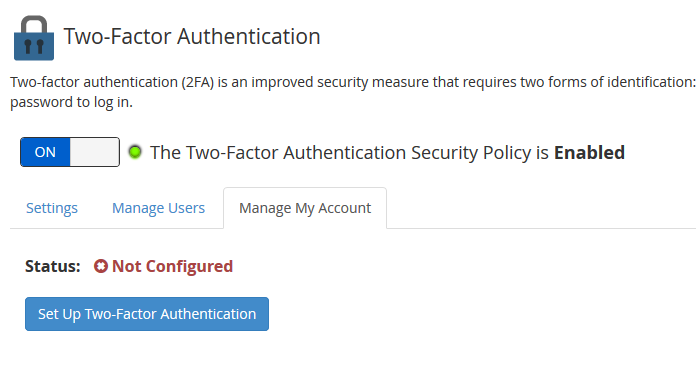
In WHM, look for 'Two-Factor' at the top left and click 'Two-Factor Authentication'. Turn the switch from 'Off' to 'On' and click 'Save'.
Step 2
Then click the 'Manage My Account' tab > 'Set Up Two-Factor Authentication'.
Step 3
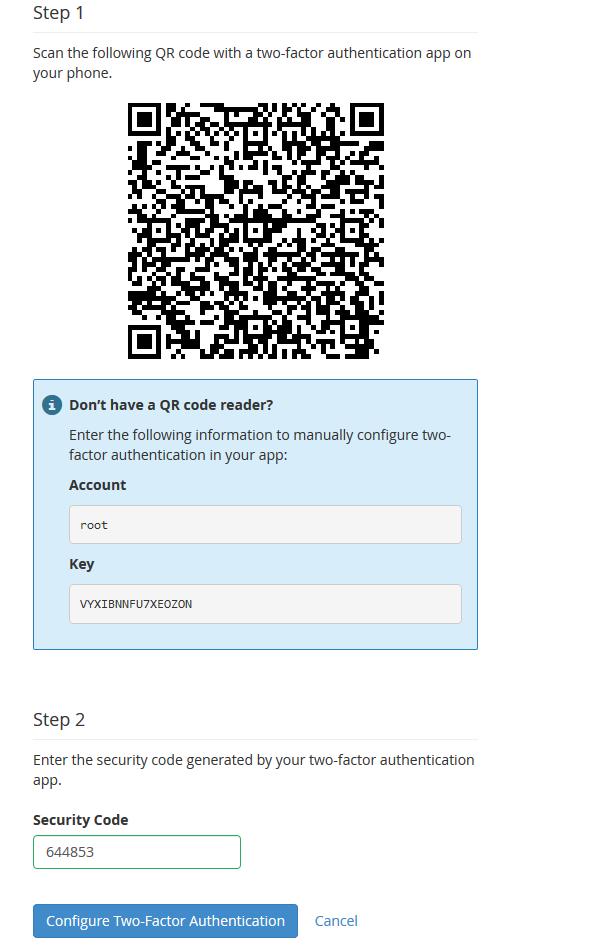
You will see the overview below. If, for example, you use Google Authenticator, scan the QR code and enter the generated code in Step 2 and click 'Configure Two-Factor Authentication'.
Securing localhost & mail with SSL
Your localhost and mail are automatically protected by a self-signed SSL certificate used by TLS v1.2. SSL is based on trust. Self-signed certificates are less suitable than Let's Encrypt or one’s own certificate, since there is no question of a CA authority issuing the certificate.
Trust in a self-signed certificate is therefore more limited in the SSL system. We therefore recommend using Let's Encrypt or your own SSL certificate. How you do this is explained in our article ‘installing an SSL certificate in cPanel’. We also explain how you secure your website in this article. We get back to this in part 5 of this tutorial series, in which you upload your website and database.
Using the above steps you have set up solid security for your VPS. Click here to continue to Part 3: updating your VPS.
Should you have any questions left regarding this article, do not hesitate to contact our support department. You can reach them via the ‘Contact Us’ button at the bottom of this page.
If you want to discuss this article with other users, please leave a message under 'Comments'.