This is the fifth part of our cPanel Tutorial Series. If you are setting up a new VPS, then we recommend starting with part 1.
Uploading your website to your VPS
In this chapter, we show you how to upload your website to your VPS. To upload your site, you can use SFTP or the cPanel File Manager. As of cPanel 86, FTP has been disabled. The differences between FTP, SFTP, and FTPS are explained in this article.
CPanel offers useful tools to quickly install a CMS system. We explain the installation of WordPress, Drupal and Joomla with these tools at the bottom of this article.
Create and import a database
Websites often use an SQL database. In this section, we show you how, in addition to uploading your website, you also create a database and import your existing database into it. Don’t use a database for your website? Then after uploading your site, directly proceed to chapter 6 to set up your email. CPanel uses phpMyAdmin for managing databases, but before you can use phpMyAdmin and import your database, you must first create a database.
Using SSL on your website
If your website processes confidential data of customers (for example a web store), it is important to secure your website with SSL. You enable SSL after you have placed your website online. CPanel offers you three SSL options:
- Use your own certificate
- Free Let's Encrypt SSL certificates
- Generating a new self-signed certificate (which has already been done with new installations)
We explain how to install your own SSL certificate or Let's Encrypt in cPanel in this article.
SFTP
WHM / cPanel is automatically configured to use SFTP. You do not need to make any configuration changes and you can start using FTPS out-of-the-box. Should you experience a problem, it's always a good idea to first check if the SSH port (by default port 22) is open and if passive ports are configured.
Step 1
We use the FileZilla program in this manual and recommend using FileZilla to follow these steps one by one.
Start FileZilla and click 'File'> 'Site Manager'> 'New Site' and then enter the following data as shown in the example below (but with your own data) and then click 'Connect'.
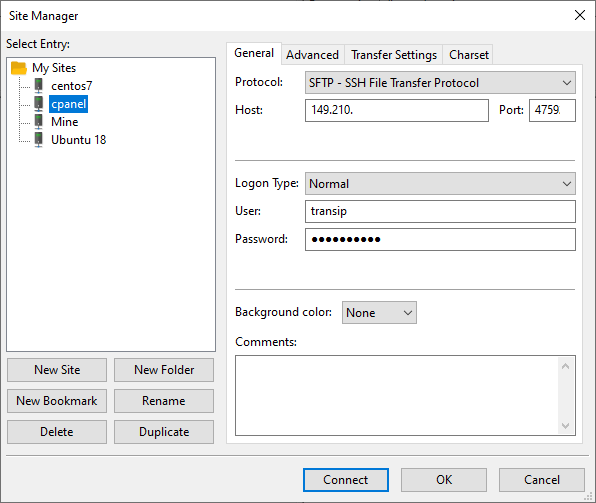
- Host: Enter the IP of your VPS.
- Port: Use port 22 for this. We recomend changing your SSH port however for seucrity reasons.
- Protocol: Select the 'SSH FTP File Transfer Protocol'.
- Logon Type: Change 'Logon Type' to 'Normal'. This allows you to enter your username and password, which is a requirement for connecting to your VPS.
- User: The moment you add a domain to cPanel you add a user (such as after logging in to cPanel for the first time or adding a new domain in WHM). You use the name and password of that user for FTPS.
- Password: Enter the password of the relevant user (see user).
Step 2
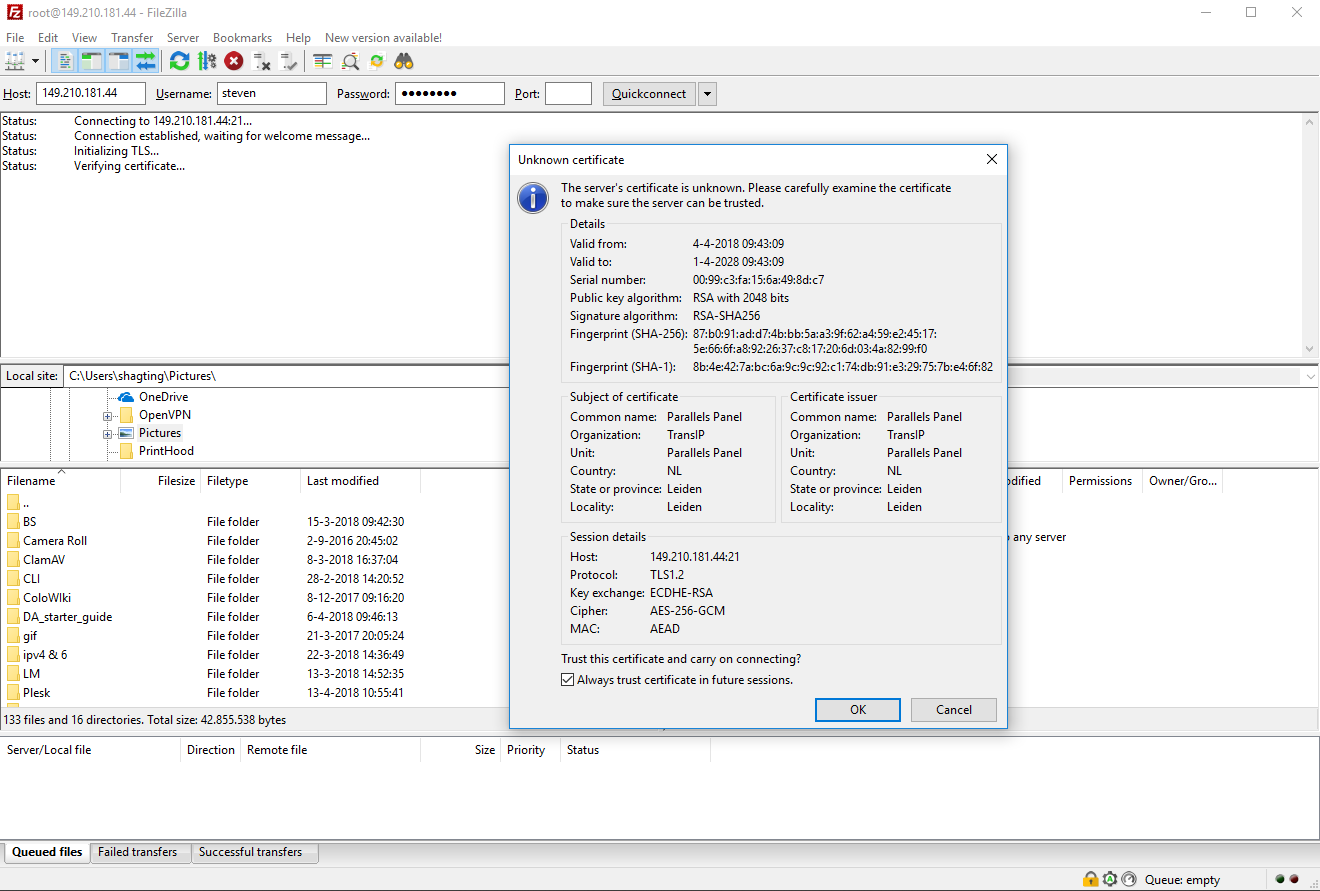
You will be greeted by a notification as shown in the screenshot below. Select 'Always trust certificate in future sessions' and click 'Ok'.
Step 3
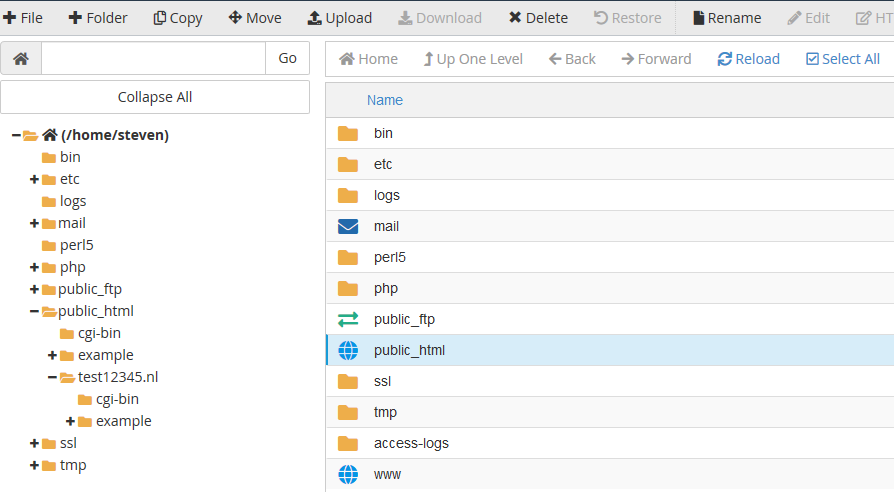
In FileZilla, under 'Local site', navigate to the folder on your computer which contains your website and under 'Remote site', click 'public_html'.
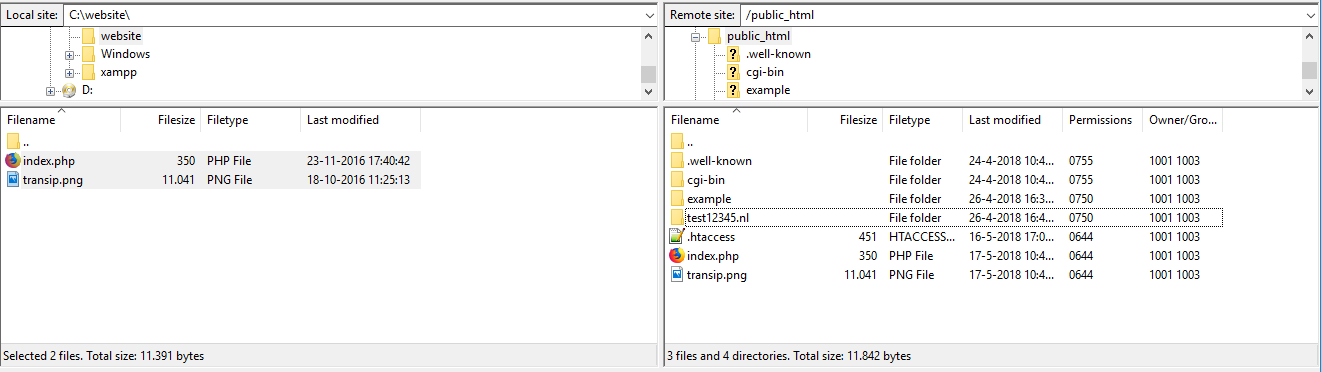
Please note: In the previous section, ‘Linking domains and subdomains to your VPS', we have indicated that a folder is created for your subdomains and addon domains in public_html by default. We recommended that you also change the directory for subdomains that you create for addon domains. For this tutorial we have linked the following (sub) domains:
- cpaneltest.com
- example.cpaneltest.com
- test12345.nl
- example.test12345.nl
In the example above you see this as follows:
- public_html: This folder contains the contents of cpaneltest.com.
- example: This folder contains the contents of example.cpaneltest.com
- test12345.nl: This folder contains the contents of test12345.nl and also an extra folder called example for example.test12345.nl
Step 4
Under 'Local site', navigate to the folder on your computer which contains your website and drag the entire contents to the 'public_html' folder.
Your website is now online! If you do not have a database linked to your website, your website is immediately visible online.
The cPanel Files Manager
The cPanel File Manager is an FTP client built into cPanel and is a great method to upload your site. You use the File Manager as follows:
Step 1
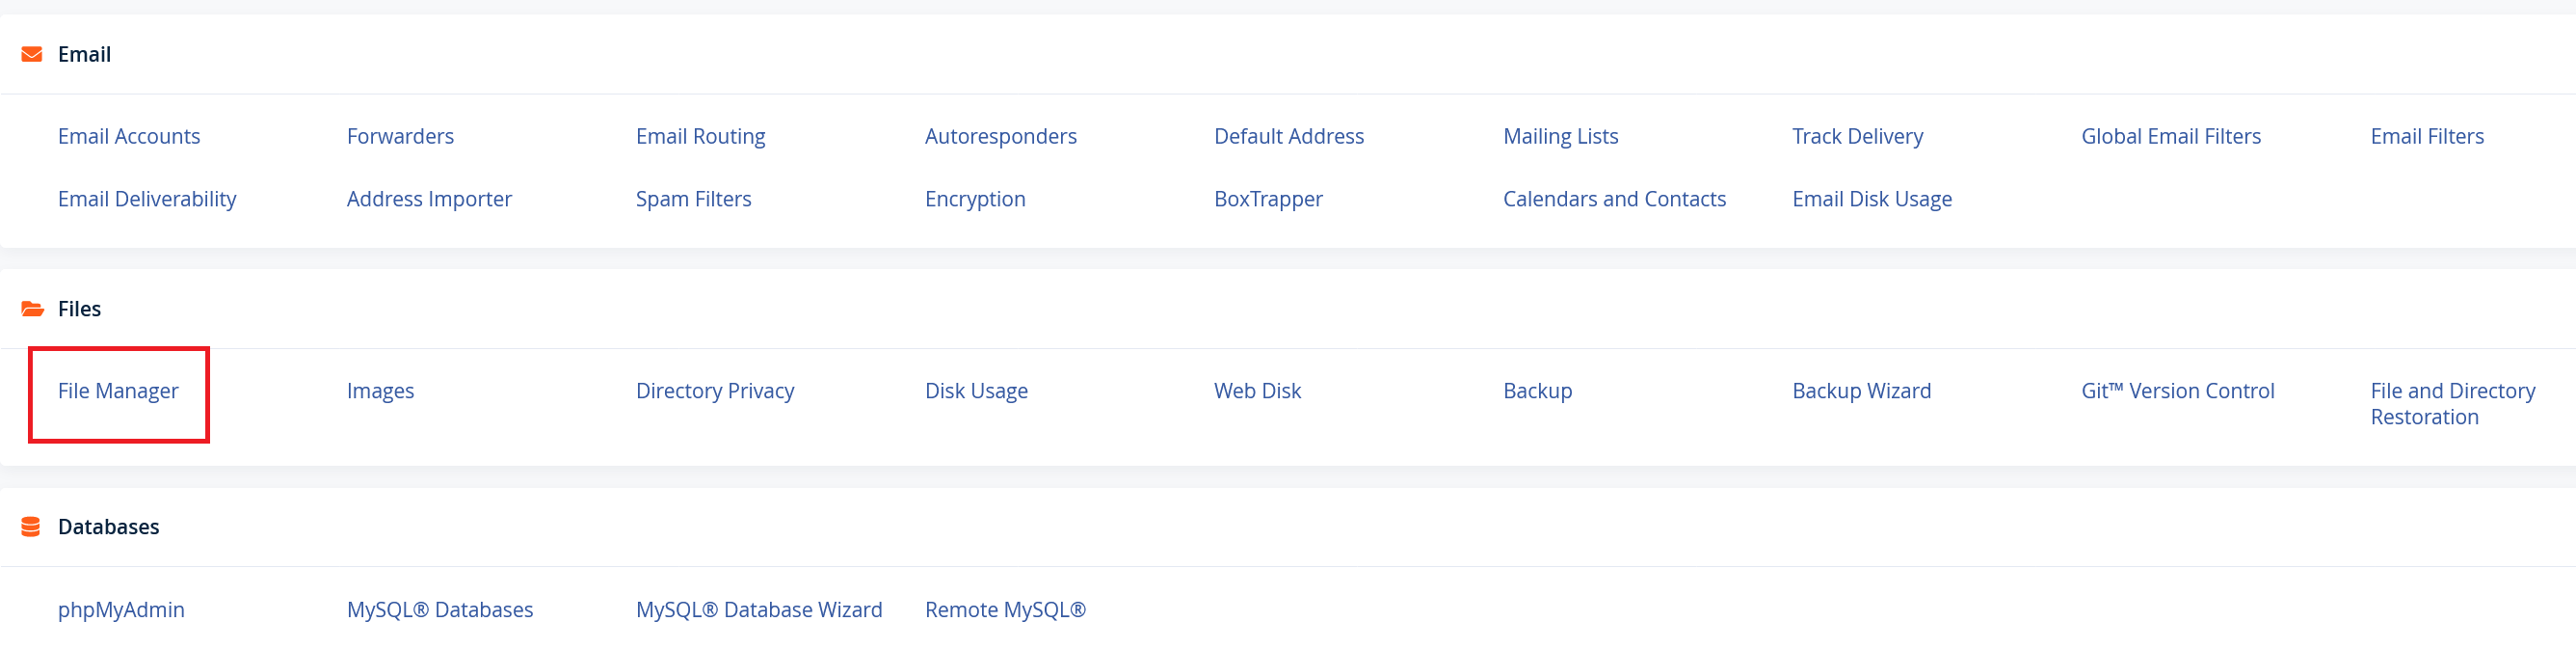
Log in to cPanel with the account of the user that contains the desired domain and click 'File Manager' under 'Files'.
Step 2
You will see an overview as below. Double click 'public_html' in the middle or click 'public_html' once in the left menu.
Please note: In the previous section, ‘Linking domains and subdomains to your VPS', we have indicated that a folder is created for your subdomains and addon domains in public_html by default. We recommended that you also change the directory for subdomains that you create for addon domains. For this tutorial we have linked the following (sub) domains:
- cpaneltest.com
- example.cpaneltest.com
- test12345.nl
- example.test12345.nl
In the screenshot above you see this as follows in the left menu:
- public_html: This folder contains the contents of cpaneltest.com.
- example: This folder contains the contents of example.cpaneltest.com
- test12345.nl: This folder contains the contents of test12345.nl
- example (in test12345.com): This folder contains the contents of example.test12345.nl
Step 3
Click 'Upload' in the middle of the top menu. You will see the following screen:

The 'Select File' option lets you upload only one file at a time. We recommend using one of the following two options:
- From Windows Explorer or File Explorer (depending on your OS), drag and drop all files to the part that says 'Drop files are here to start uploading'. If you use this option, you are done with this part and you can continue to 'Creating an SQL database'
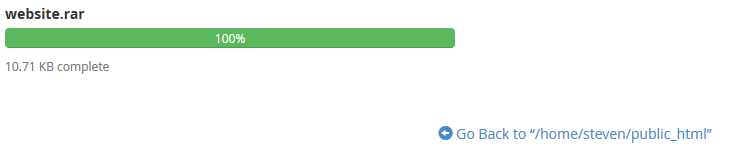
- Pack your entire website in a .zip or .rar file and upload it with the 'Select File' button. Then click 'Go Back to…’.
Step 4
If you have used the second option in Step 3, you can now extract the file from the File Manager. Select the .zip or .rar file and click on 'Extract' in the top right menu.
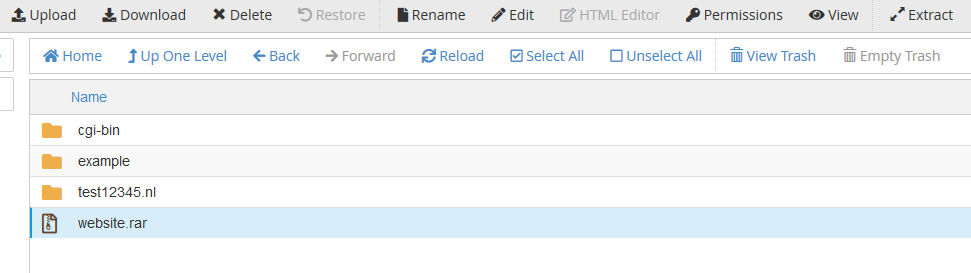
Finally, remove the .zip or .rar file by selecting it and clicking on 'Delete' in the menu at the top.
Your website is now online! If you do not have a database linked to your website, your website is immediately visible online. If you use a database, continue with the steps below.
Creating an SQL database
Many websites use a database (especially CMS systems such as WordPress). In cPanel you can easily add databases as follows:
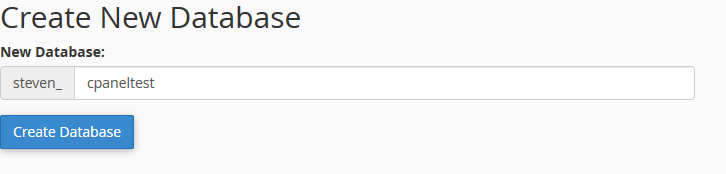
Step 1
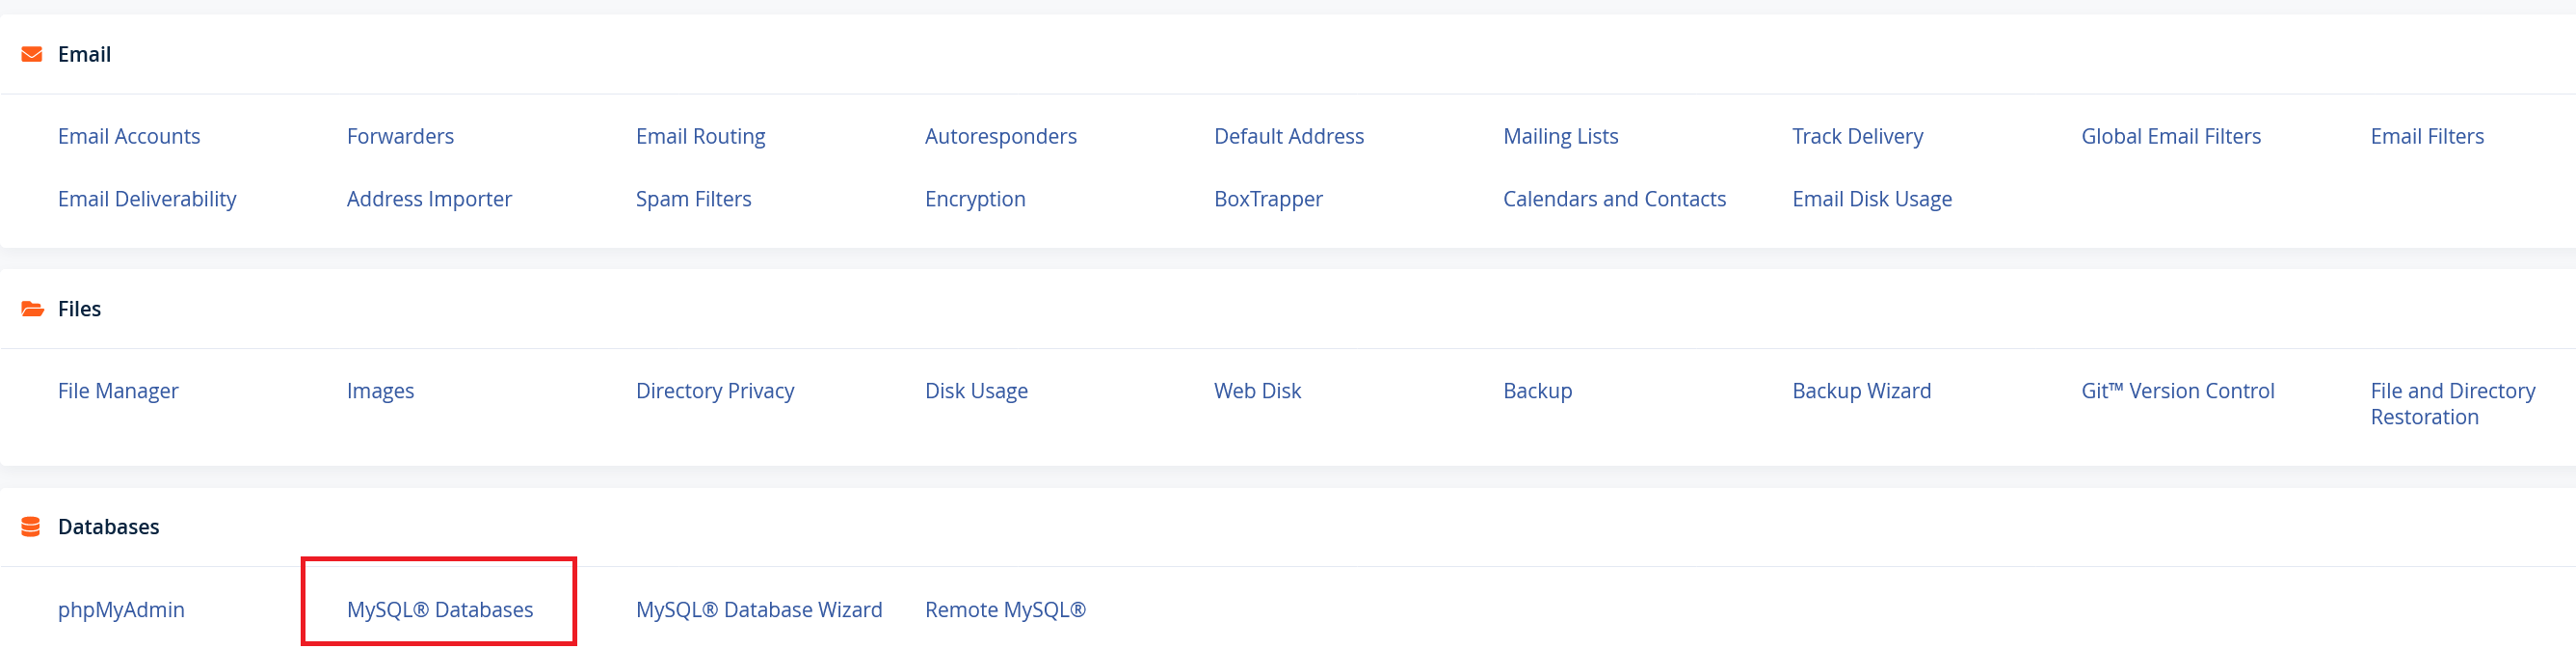
Log in to cPanel and click 'MySQL Databases' under 'Databases'.
Step 2
Enter the name of your new database under 'Create New Database' and click 'Create Database'.
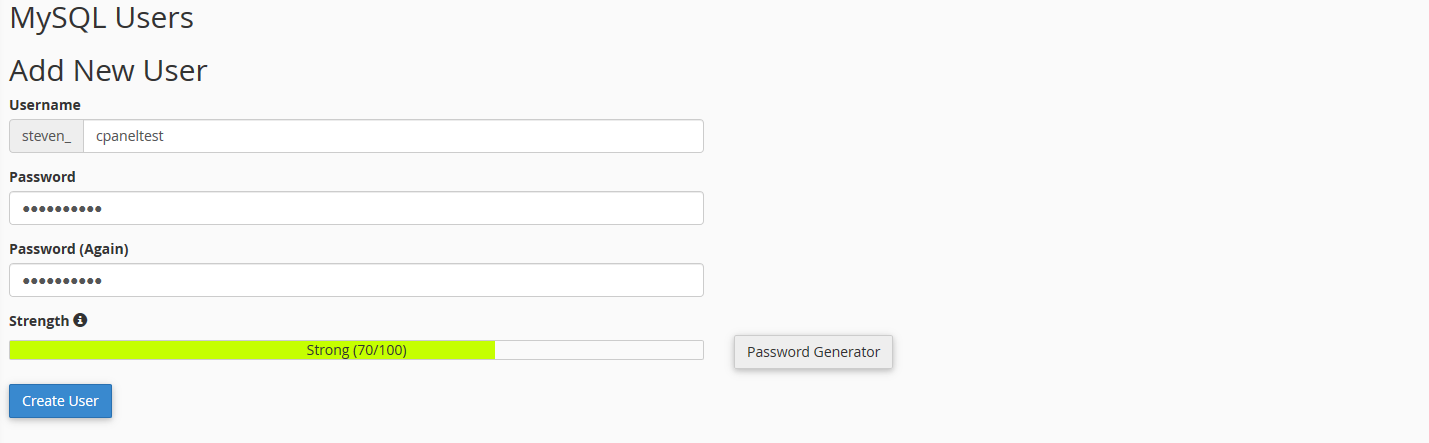
Step 3
For security reasons, we recommend that you create a new SQL user for each database. Under 'Add New User' enter the name and password of the new database user that you want to link to this database and click 'Create User'.
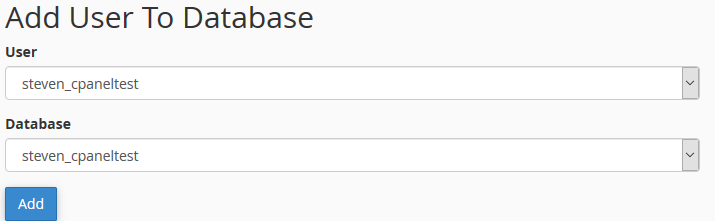
Step 4
Click 'Go Back' and finally connect the new SQL user to the database by selecting the user and database under 'Add User to Database' and clicking 'Add'.
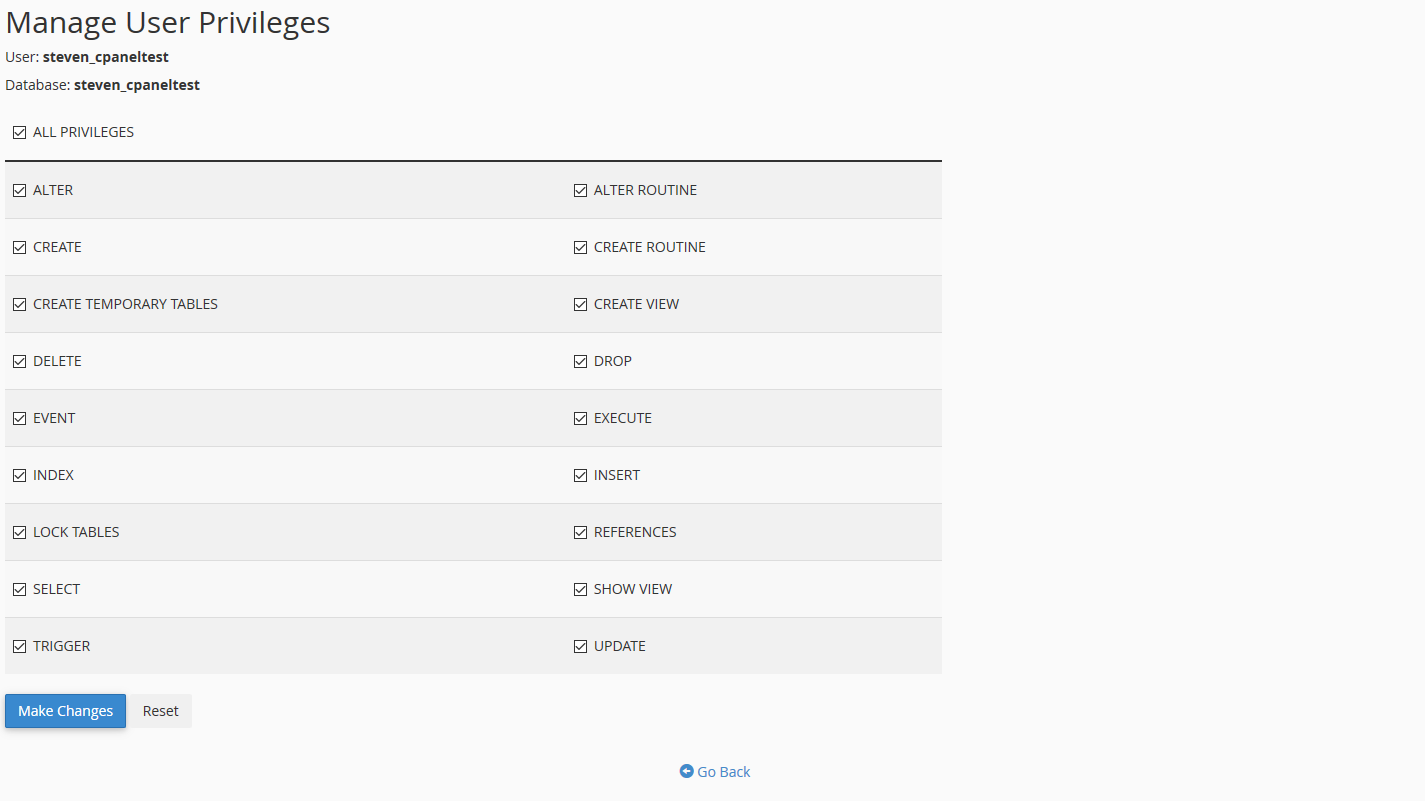
Step 5
Select 'ALL PRIVILEGES' and click 'Make Changes’ unless you are certain that, for example, select and insert are sufficient (the ins and outs of SQL privileges are outside the scope of this manual).
Importing your database
For the management of databases, cPanel uses phpMyAdmin. Follow the steps below if you want to import an existing database.
Step 1
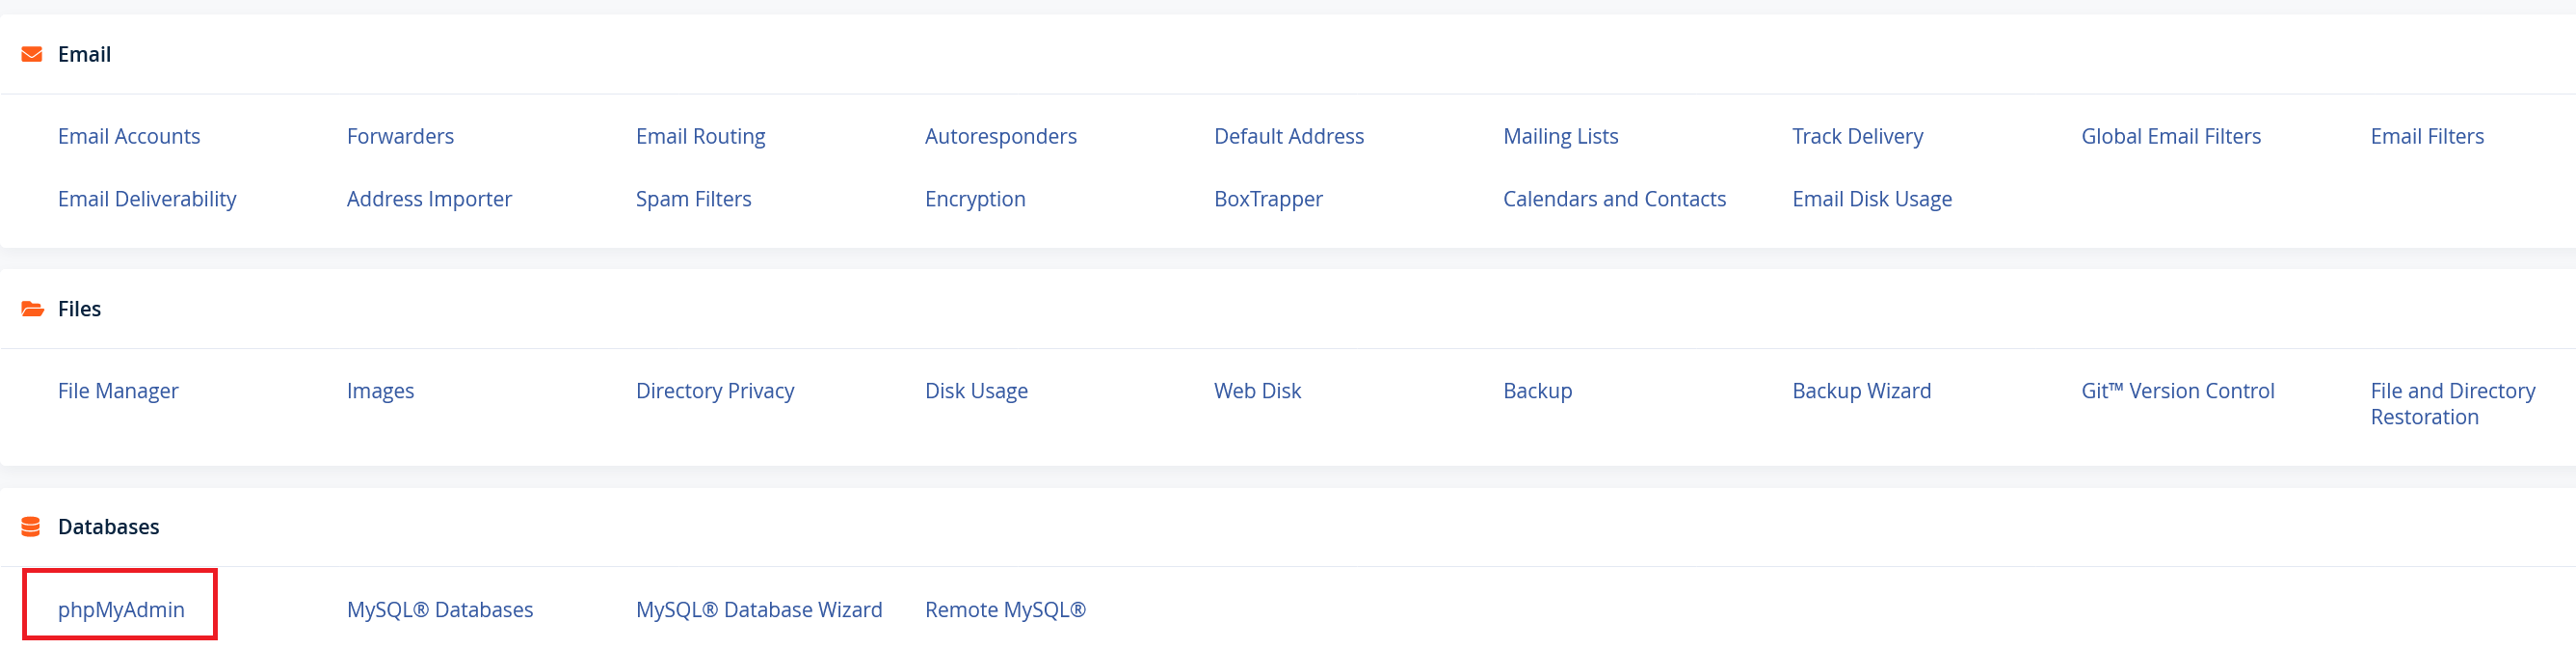
Log in to cPanel with the account that contains the domain for which you want to import the database. Then click 'phpMyAdmin' under 'Databases'.
Step 2
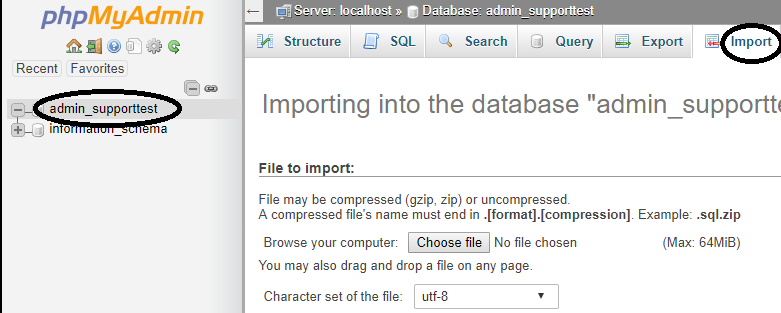
CPanel automatically logs you in when you click phpMyAdmin from CPanel. You will then enter the main screen of phpMyAdmin. Click the name of your database at the top left and then click on 'Import'. In the example below this is 'admin_supporttest'.
Step 3
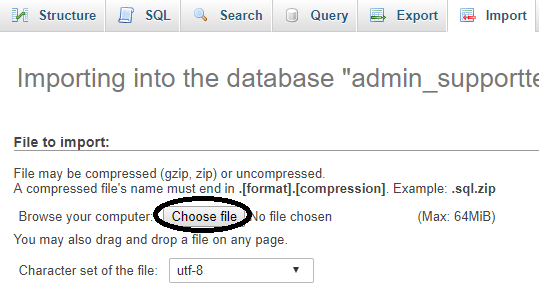
Click 'Choose file' and select your database on your computer.
Step 4
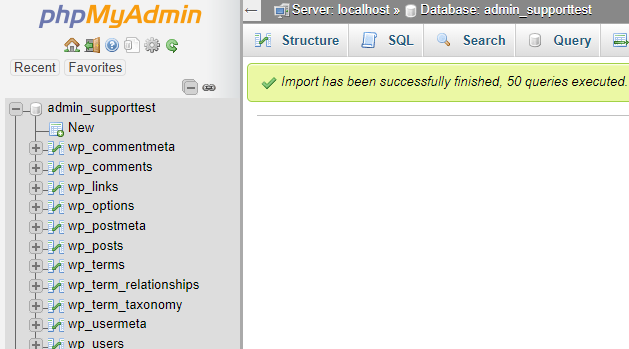
Click 'Go' at the bottom left to upload your database to your VPS.

You will see a success report and you will immediately see the tables in your database in the left view.
Please note: if your site uses a database, do not forget to check the configuration file on your site (e.g. wpconfig.php) to set the correct database name, database user, server, and password.
In the setup used for this manual, it looks like this:
$servername = "localhost";
$username = "steven_cpaneltest";
$password = "**********";
$db = "steven_cpaneltest";
Installing a CMS system in cPanel (WordPress, Joomla, Drupal)
CPanel offers an add-on for installing WordPress to simplify the installation.
For other CMS systems such as Drupal and Joomla, paid add-ons are available (e.g. Softaculous) to simplify the installation process. For this manual, we assume that you do not want to incur extra costs and only show the manual installation procedures of Drupal and Joomla. These installations are covered in the following two articles:
WordPress
To install WordPress, you use the WordPress addon within cPanel. This addon is not enabled by default and you first enable it in WHM (in the steps below).
Step 1
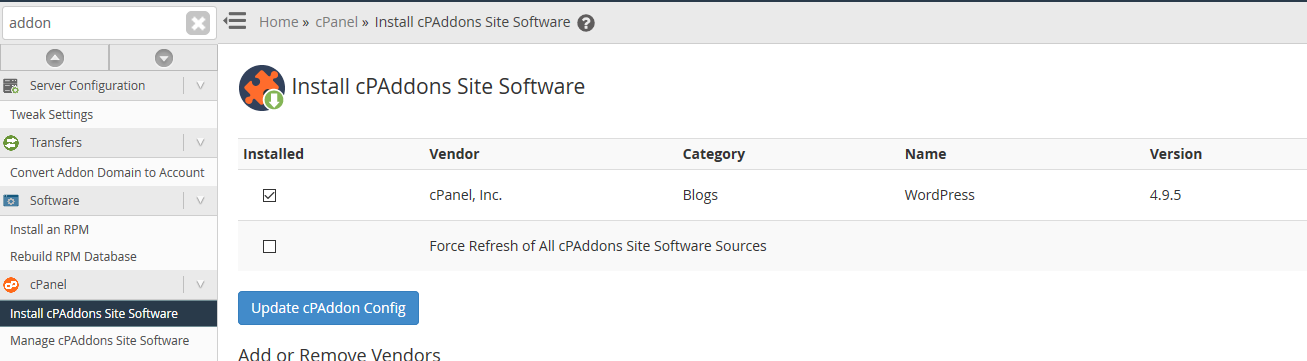
Log in to WHM and find 'AddOn' at the top left of the search field and click 'Install cPAddOns Site Sofware'. On the page that appears, select the WordPress add-on as shown in the screenshot below and click 'Update cPaddon Config'.
Step 2
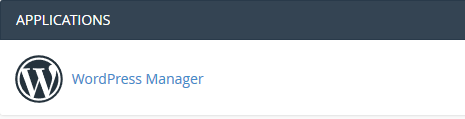
Now log in to cPanel, scroll down to 'Applications' and click 'WordPress Manager'.
Step 3
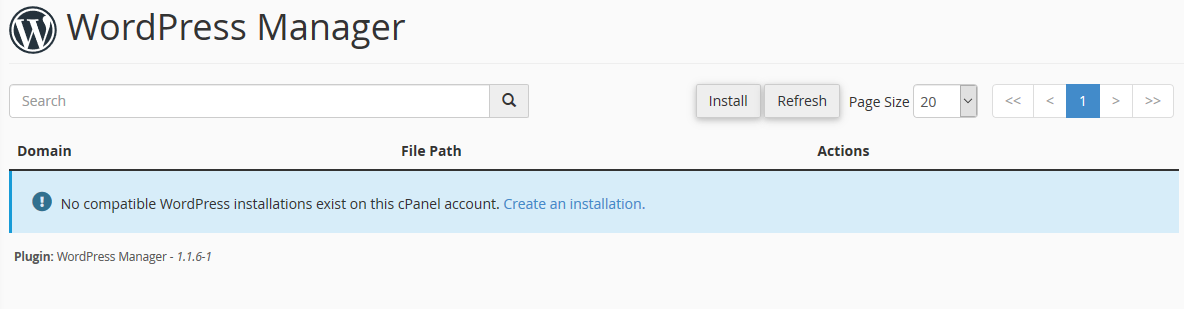
In the event of a new installation of cPanel, you will see the overview below. Click 'Create an installation' to start the installation of WordPress.
Step 4
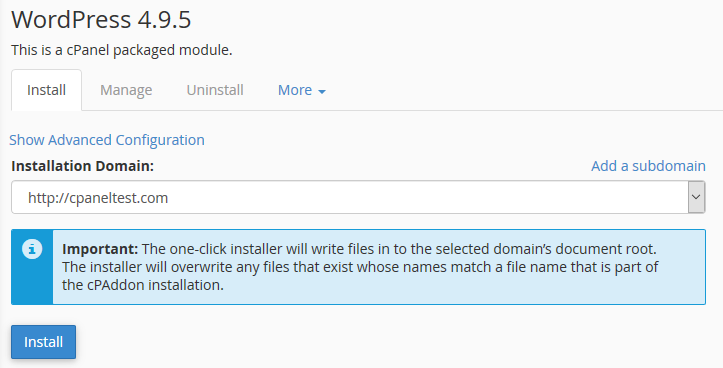
Select the domain on which you want to install WordPress and click 'Install'.
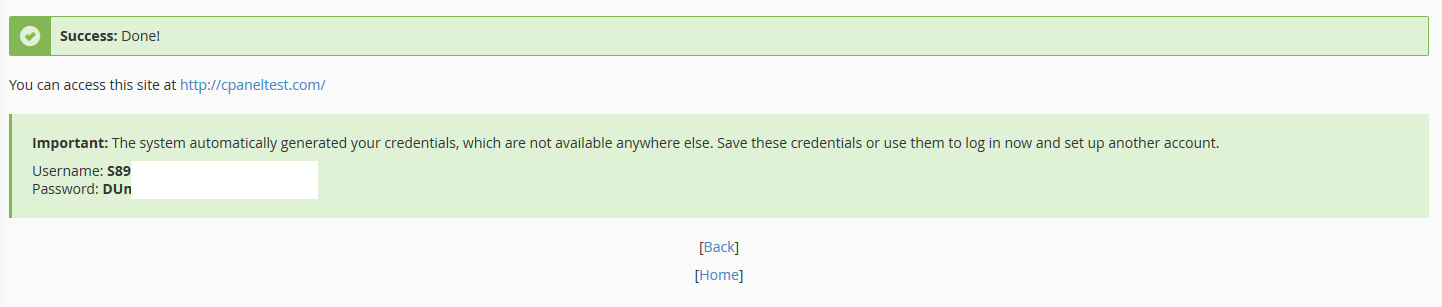
Step 5
WordPress automatically creates a new database and database user during the installation. After installation, you will see the username and password of the WordPress admin environment as shown in the screenshot below. You can now get started with your WordPress website right away!
Your website is now accessible to the entire world! Proceed to the next section ‘Part 6: Creating and using email addresses' to, amongst other things, create email addresses for your domain and to find out the email settings for your domain, or go to Part 7: Additional articles and other questions if you do not use email for your domain.
Should you have any questions left regarding this article, do not hesitate to contact our support department. You can reach them via the ‘ContactUs’ button at the bottom of this page.
If you want to discuss this article with other users, please leave a message under 'Comments'.