


In this article we'll explain how to view and configure DNS records and nameservers for the domain names you registered at TransIP.
Read the article 'DNS and nameservers' for more information about DNS and nameservers.
At TransIP we offer you full control over your domain names. This means that you are free to configure DNS records and nameservers as well!
Because DNS and nameservers are not the easiest topics, we offer you the choice to use the 'TransIP settings'. By enabling the TransIP settings, your domain name will automatically use the correct DNS and nameservers for using our Web Hosting, Email Only and Forwarding services.
If you'd rather add your own DNS and / or nameservers, we recommend disabling the TransIP settings. This allows you to fully configure any nameservers and DNS records for your domain names.
The TransIP settings & Advanced domain settings
As we mentioned, using the TransIP settings automatically configures your domain names DNS and nameservers settings to point to a Web Hosting, Email Only and Forwarding service.
The TransIP settings are enabled by default. If your domain doesn't use a Web Hosting, Email Only and Forward service, the TransIP settings will automatically point your domain to the TransIP placeholder.
You can check if the TransIP settings are activated for a domain name by visiting your control panel. Inside the control panel, click 'Domain' in the menu, and select your domain name on the left hand side (don't check the box). Now scroll down to '(Advanced) domain settings'.
If you see 'Domain settings' here, that means the TransIP settings are enabled. This means your domain name will automatically use the correct DNS and nameserver settings for Web Hosting, Email Only and Forwarding services.

If you see 'Advanced domain settings' here, that means the TransIP settings are disabled. This means you will be able to view and edit the DNS and nameserver settings of your domain name under 'Advanced Domain settings'.

Take note: You're free to enable and disable the TransIP settings at any time.
Keep in mind that the TransIP settings are disabled if 'Advanced domain settings' is shown. If you enable the TransIP settings, all DNS records and nameservers you configured previously will be overwritten by the DNS records and nameservers of the service that's linked to your domain name.
If your domain name isn't linked to one of our services, the TransIP settings will cause your domain name to point to the TransIP placeholder.
Entering DNS records in the control panel
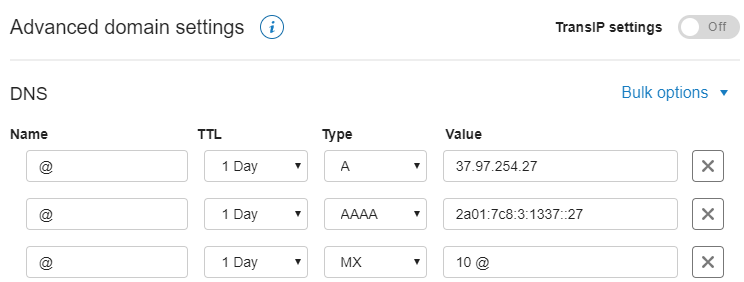
When 'Advanced domain settings' is shown, you're free to edit your domain names DNS records below the header 'DNS'.
- Read the article 'DNS and nameservers' for more information on all available DNS records and how to configure them.
- Read the article 'The DNS settings of my web hosting package' to learn more about the DNS records for our Web Hosting products.
A DNS record consists of the following components:
-
Name: The name of a DNS record is used to specify which part of the domain name the DNS record should apply to. This can either be the root domain (yourdomain.com) or subdomains (such as www.yourdomain.com).
-
TTL: The TTL tells global resolvers how long the DNS record should remain in the cache.
-
Type: This is where you define the DNS record type.
- Value: This is where you enter the value, depending on the type you're using.
-
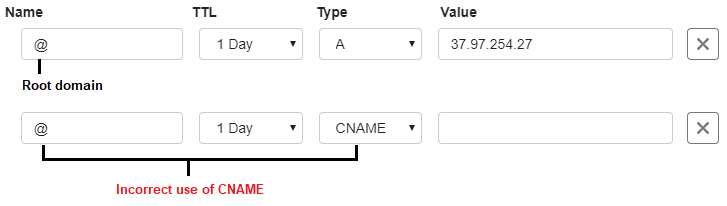
- When you want a DNS record to apply to the root domain name (i.e. yourdomain.com), enter an @ in the 'Name' field.
- At least one valid A record is required for the root domain.
- A CNAME record can only be configured for subdomains, not for the root domain.
- Use a wildcard record to specify all subdomains that are otherwise not already specified in your DNS records. Set a wildcard record by entering an asterisk (*) in the 'Name' field.
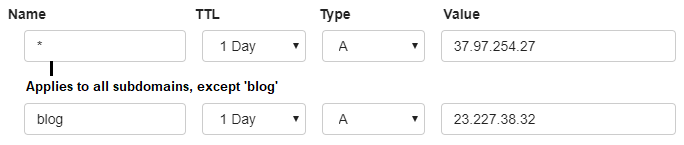
- When you want to specify a DNS record for a subdomain, enter the subdomain without adding the full domain name. Our DNS software will automatically add the full domain name in the background.
- For instance, when you want to specify a DNS record for the subdomain 'blog.yourdomain.com', you only need to enter 'blog' in the 'Name' field. See the image above for an example.
- For instance, when you want to specify a DNS record for the subdomain 'blog.yourdomain.com', you only need to enter 'blog' in the 'Name' field. See the image above for an example.
- Read the article 'DNS and nameservers' for more information on the different types of DNS records and how to configure them.
- When you want a DNS record to apply to the root domain name (i.e. yourdomain.com), enter an @ in the 'Name' field.
-
- When configuring the value of a CNAME record to point to the root domain name (i.e. yourdomain.com), enter a @ in the 'Value' field.

- When configuring the value of a CNAME record to point to a different domain name, enter the full domain name in the 'Value' field and end the value with a dot.
- This is a so called 'trailing dot', which prevents our DNS software from adding the root domain to the value.

- When configuring the value of a CNAME record to point to a subdomain of the same domain name, only enter the subdomain in the 'Value' field. Our DNS software will automatically add the full domain name in the background.
- The example below shows how to use a CNAME record to point your subdomain store.yourdomain.com to shop.yourdomain.com, which in turn points to a web server.

- Take note that some limitations apply to CNAME records. For instance, it's not possible to use CNAME records to point to other domain names registered at TransIP. Read the article 'Configuring a CNAME record' for more information.
- Read the article 'DNS and nameservers' for more information on the different types of DNS records and how to configure them.
Keep in mind that DNS changes may take up to 24 hours before they are effective. This has to do with the processing time of global resolvers. Unfortunately, we can't affect this, but the changes are usually seen long before the 24 hours have passed.
DNS - Bulk options
Next to the header 'DNS' are the 'Bulk options'. These options allow you to perform the following actions:
- Copy from: This allows you to copy all the DNS records of a different domain, your own default DNS settings and the default TransIP DNS settings.
- Restore a previous version: This allows you to restore a set of DNS records you used in the past.
- TTL for all records: This allows you to set the same TTL for all current DNS records.
Entering nameservers in the control panel
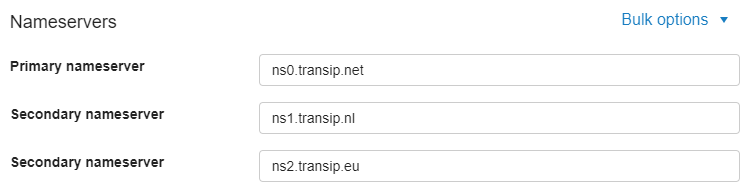
Domain names registered at TransIP use the TransIP nameservers by default. When 'Advanced domain settings' is shown, you're free to change the nameservers below the header 'Nameservers'.
When adding new nameservers, make sure you delete the existing nameservers first.
Read the article 'DNS and nameservers' for more information on nameservers and how to edit them.
Nameservers - Bulk options
Next to the header 'Nameservers' are the 'Bulk options'. These options allow you to perform the following actions:
- Copy from: This allows you to copy the nameservers of a different domain, your own default nameserver settings and the default TransIP nameserver settings.
In this article we explained how to enter DNS records and nameservers for domain names registered at TransIP. Read the article 'DNS and nameservers' for more information about the different types of DNS records and how to configure them.