


Sometimes you may need additional disk space for your VPS, either temporarily or permanently. You can expand your VPS disk via a disk space add-on, or for example use Block Storage. On a BladeVPS and PerformanceVPS, disk expansion via an add-on cannot be cancelled; on a v-VPS it can: by shrinking your VPS’s existing partition and then cancelling the disk space add-on(s).
In this guide, we explain how to shrink the disk of your v-VPS (and its filesystem) so you can safely cancel the disk space add-on afterwards. We cover: 1) shrinking in rescue mode with GParted (recommended), 2) alternatives for XFS partitions, and 3) what to do if you get a ‘Disk size is smaller than the main header indicates’ error.
- Always create a backup or snapshot. Partition resizing is a major operation and a mistake can cause data loss.
- This will cause downtime: you’ll (temporarily) boot your VPS into rescue mode.
- Not every filesystem can be shrunk. XFS cannot be reduced (it can only grow). Ext4 can usually be shrunk.
- We’re working on the option to convert your BladeVPS and PerformanceVPS to a v-VPS, and expect this to be ready in Q2–Q3 2026.
Shrinking your partition in rescue mode with GParted (recommended)
Step 1
To shrink your partition with GParted, switch your VPS to ‘Linux rescue mode’. Save your work and shut down your VPS gracefully (using a shutdown command).
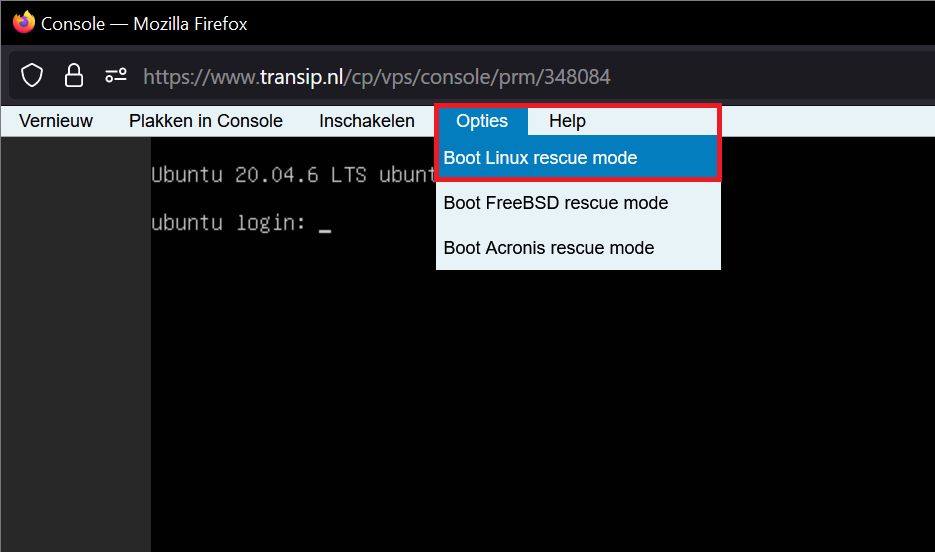
In the TransIP control panel, go to the VPS disk you want to shrink and click the pop-out button at the bottom left of the console.

Step 2
Select ‘Options’ > ‘Boot Linux rescue mode’.
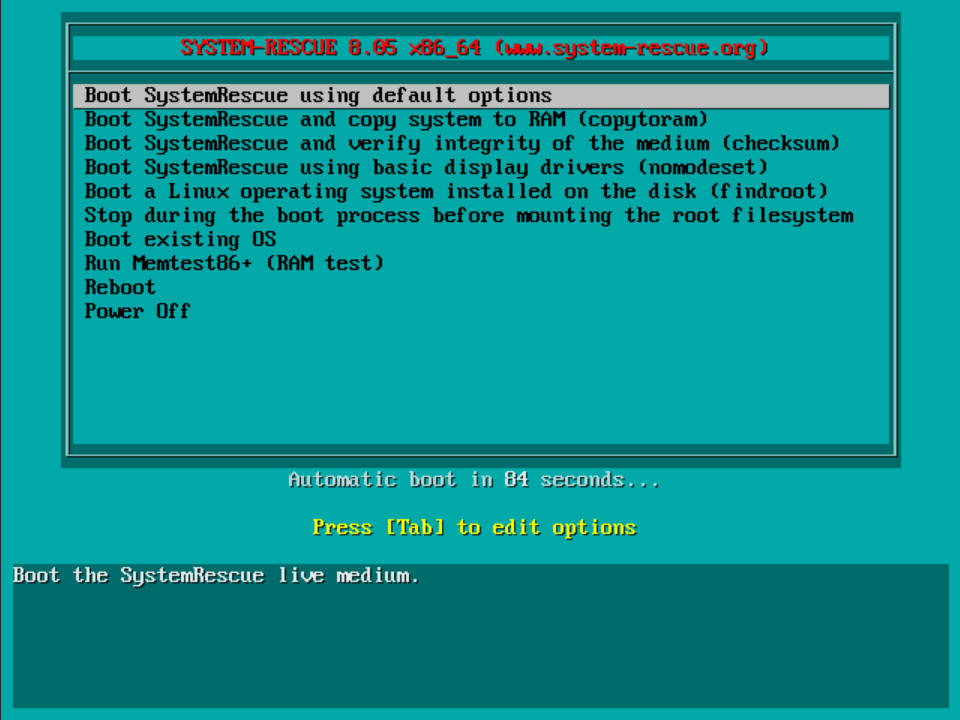
Step 3
After starting Linux rescue mode, you’ll see a menu where you can choose which SystemRescue option you want to use. Don’t change anything and press Enter to continue (or wait for the timer to expire).
Step 4
You’ll now enter the rescue environment, which you can recognise by:
sysrecue login: root (automatic login)
[root@sysrecue ~]#
First, check which disk/partition you need to modify and which filesystem you’re using. On many VPSs, the main disk is /dev/vda and the root partition is, for example, /dev/vda1.
lsblk -fThe output will look roughly like this:
lsblk -f
NAME    FSTYPE FSVER LABEL           UUID                                 FSAVAIL FSUSE% MOUNTPOINTS
vda
├─vda1  ext4   1.0   cloudimg-rootfs 7df54820-4e88-4805-aed8-832ab23eb0ea  126.3G    12% /
├─vda14
├─vda15 vfat   FAT32 UEFI            8ACE-943C                              98.2M     6% /boot/efi
└─vda16 ext4   1.0   BOOT            da969e06-ca69-4842-9b26-2abbb33440d9  704.5M    13% /boot
vdb
└─vdb1  ext4   1.0                   1e69482e-14a3-47a0-96d1-4fc84d9339d1    1.3T    29% /mnt/bigstorage
Do you see under ‘FSTYPE’ that your rootfs (recognisable by the ‘LABEL’) is set to xfs instead of ext4? Then you can’t shrink that partition. See the XFS section further down.
Step 5
First start the graphical rescue environment with the command:
startxYou’ll now see a desktop environment. Click the start button (X) and select ‘System’ > ‘Gparted’.

Step 6
GParted will start. In the table, right-click the correct partition (e.g. /dev/vda1) and select ‘Check’ > the green tick to run a filesystem check first, just to be safe. This prevents many problems during resizing.
You’ll usually see one large Linux partition (cloudimg-rootfs) and a few small partitions (e.g. UEFI & BOOT). Leave those small partitions alone.
Tip: Is swap enabled and do you see it listed here? Disable swap before resizing (right-click swap > Swapoff).

You’ll see a warning asking whether you’re sure you want to perform this action. Click ‘Apply’ to confirm.

Step 7
Now shrink the partition. Right-click the partition (e.g. /dev/vda1) and select ‘Resize/Move’.

Choose a new size, preferably by dragging the bar at the top (1). If you manually enter numbers (2), the start of the partition may also be adjusted (‘Free space preceding’), which can lead to problems.
If you shrink to 100GB, there must be at least a 4MiB buffer. In other words, ‘Free space following (MiB)’ must be at least 4MiB.
After adjusting the size, click ‘Resize/Move’ (3) and then click the green tick again (4).

Confirm your choice to shrink the partition and wait for GParted to finish.

Step 6
Once the resize is complete, close GParted. Then click the start button (X) and select ‘Log off’. In the menu, click ‘Shutdown’.

Step 7
Now go to the control panel, open the relevant VPS, click ‘…’ at the top right of the console, and select ‘cancel add-on’. Then cancel only the disk add-ons needed to reach the desired amount of disk space (e.g. one 100GB NVMe add-on when shrinking from 300GB to 200GB). Do not select the VPS itself when cancelling.

Step 8
Your VPS will restart automatically as part of the cancellation process. After the VPS has restarted, log in and then verify that the change has been applied correctly:
lsblk
df -h
sudo fdisk -l
XFS or complex setups (LVM/encryption)
Are you using XFS, or do you have a complex storage layout (e.g. LVM, encryption, multiple disks)? In that case, shrinking is often not (safely) possible with a simple resize. The safest approach is usually:
- Create a backup/snapshot.
- Create a new VPS with the desired smaller disk.
- Restore your data (e.g. via rsync/backup tooling) to the new VPS.
‘Disk size is smaller than the main header indicates’ error
After shrinking, do you see messages such as ‘Disk size is smaller than the main header indicates’ or CRC/backup header warnings? If so, you can usually repair the GPT backup header with sgdisk.
Step 1
Connect to your VPS and run the following command (if necessary, first return to rescue mode—for example if you’re using Windows Server):
sudo sgdisk -e /dev/vdaThis rewrites the GPT backup header to the end of the (now smaller) disk.
Step 2
Check GPT consistency:
sudo sgdisk -v /dev/vda
Step 3
If you see “the kernel is still using the old partition table”, reboot or run partprobe:
sudo partprobe
sudo reboot