


Direct Send is a mail function from Microsoft that allows devices and applications to send internal emails. Thanks to Direct Send, you can—for example—scan a document on a printer in your office premises and email it to yourself or a colleague as an e-mail attachment.
Direct Send is a feature that is enabled by default for all Microsoft mail services, such as Exchange Online, 365 Online (now M365 Copilot), or your own Exchange mail server.
Direct Send can be abused by malicious actors to send phishing emails to internal email addresses, for example from your.address@yourcompany.com to someone.else@yourcompany.com. In this guide, we will show you how to secure your mail domain against abuse of the Direct Send feature. You have two options:
- Disable Direct Send (except for connectors; more on that later in this article)
- Secure Direct Send
-
Note: Only an administrator or owner of a mail domain can disable or secure Direct Send. You will therefore need the email address and password of an administrator or the domain owner to follow the steps in this guide.
- Microsoft recommends using Direct Send only when SMTP is not an option and is therefore working on an option to disable Direct Send by default.
Do I need Direct Send?
Simply put: if you need Direct Send, choose to secure it. If not, disable it. The question is: do you need Direct Send?
Is there a device or application in your organisation that lets you send emails to yourself or to colleagues without entering a password—such as a printer/scanner? If so, that device/application uses Direct Send and you will need the ‘Secure Direct Send’ option in this guide.
If you are currently using Direct Send, it is advisable to discuss with the device/application developer whether switching to SMTP is possible. Migrating to SMTP will make configuring your organisation’s mail environment simpler in the long run than the secure use of Direct Send.
Disabling Direct Send
In this context, disabling Direct Send means setting the RejectDirectSend option to true. This will reject Direct Send emails unless a connector is used and the sender is exempted within it. For more information, see the next section. Microsoft is still working on an option to fully disable Direct Send.
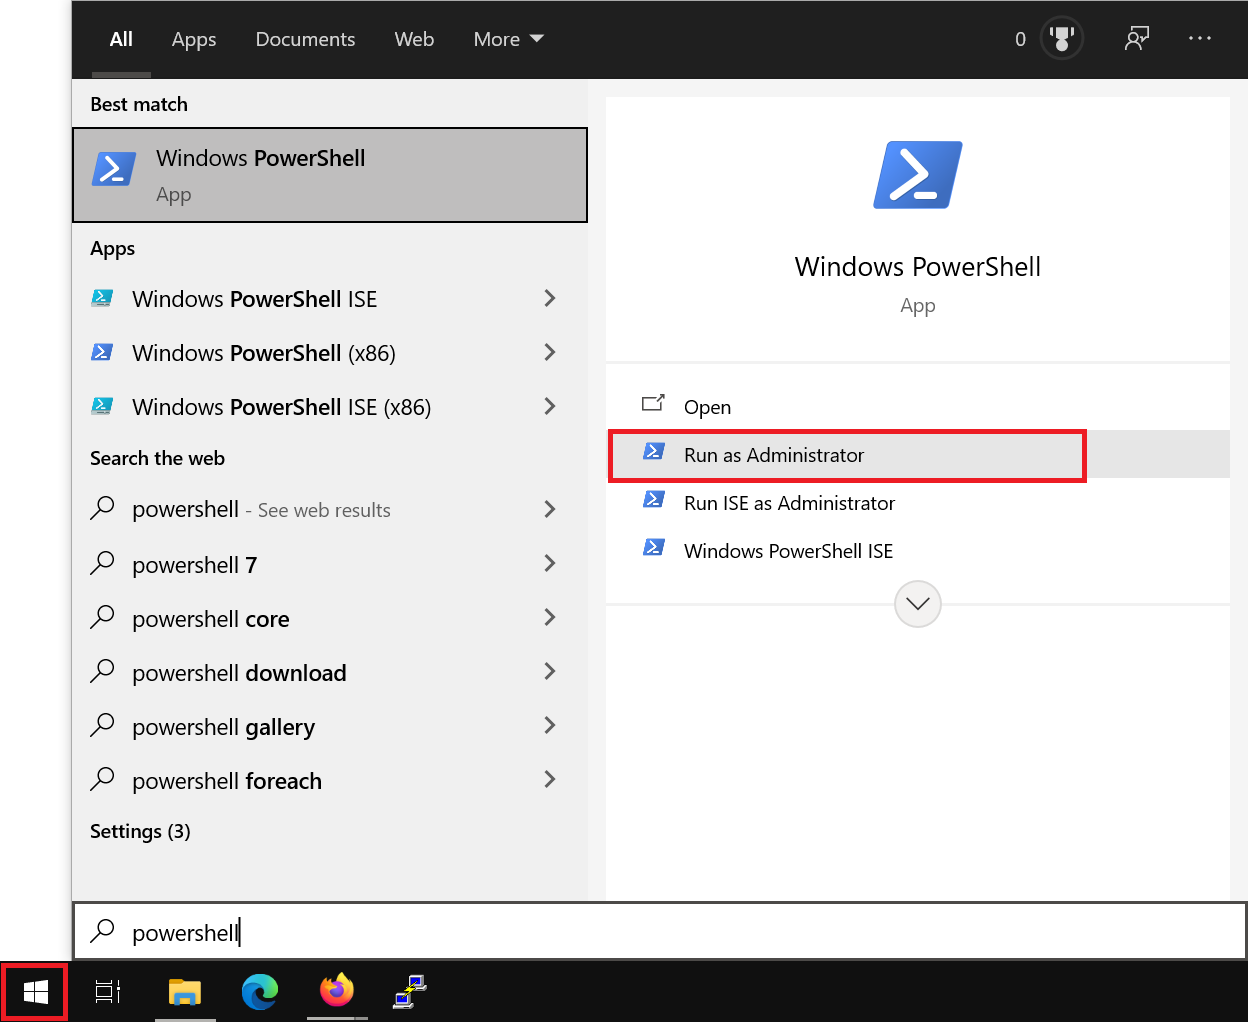
Step 1
Click the Windows Start button, type 'PowerShell' and click the 'Run as Administrator' option.
Step 2
Run the following commands to allow scripts in PowerShell, install the Exchange PowerShell module and connect to your Exchange Online environment.
- On Windows 11, the
-AllowClobberflag is generally not necessary.
- The first three commands will prompt for permission—grant it when requested.
Set-ExecutionPolicy RemoteSigned
Install-Module PowershellGet -Force -AllowClobber
Install-Module -Name ExchangeOnlineManagement -Force -AllowClobber
Connect-ExchangeOnline
Step 3
You will see a login prompt to sign in to your Microsoft account. Use the email address of an administrator or domain owner of the Microsoft mail domain; a regular user account does not have permission to perform the following steps.

Step 4
Now reject all Direct Send mail with the command:
Set-OrganizationConfig -RejectDirectSend $trueVerify that Direct Send is now disabled in your organisation with:
Get-OrganizationConfig | Select-Object Identity, RejectDirectSendIf you see ‘True’ under RejectDirectSend for
Step 5
Now disconnect the PowerShell session from Exchange Online with the command:
Disconnect-ExchangeOnlineIt takes approximately 30 minutes for the changes to be fully processed by your Microsoft mail server.
Securing Direct Send
You can secure Direct Send so that you can still use it internally—for example, for the printer/scanner in your office—while disabling it for external senders. Securing Direct Send consists of two parts:
- Disabling Direct Send as described in the previous section. This rejects Direct Send mail unless a connector is used and the sender is exempted in that connector.
- Creating the connector.
Step 1
Complete steps 1 to 4 of the previous section to set RejectDirectSend to true. Do not close PowerShell or the Exchange Online connection yet.
Step 2
Now create a connector for mail in your organisation. This ensures that all incoming mail from your mail domain to your mail domain is first checked against the condition in the connector. In other words, a connector for @outlook.com will affect mail from@outlook.com to@outlook.com but not mail from@gmail.com to@outlook.com.
Does your organisation already use on-premises connectors that overlap with these Partner connectors? That’s not a problem: they can overlap and function alongside each other without issues.
You have two options:
- Create the connector based on the domain name in your mail server’s TLS certificate, for example *.yourcompany.com (wildcard). Microsoft recommends this option.
- Create the connector based on IP addresses.
Option 1
Replace *.yourcompany.com in this command with the domain name in your mail server’s TLS certificate.
New-InboundConnector -Name "Reject mail not routed through MX (third-party service name)" -ConnectorType Partner -SenderDomains * -RestrictDomainsToCertificate $true -TlsSenderCertificateName *.yourcompany.com -RequireTls $true
Option 2
Replace 123.123.123.123,234.234.234.0/24 in this command with the IP addresses/ranges you want to allow via the connector to send internal mail using Direct Send. Note: IPv6 is not supported by this feature.
New-InboundConnector -Name "Reject mail not routed through MX (third-party service name)" -ConnectorType Partner -SenderDomains * -RestrictDomainsToIPAddresses $true -SenderIpAddresses 123.123.123.123,234.234.234.0/24
Step 3
Now disconnect the PowerShell session from Exchange Online with:
Disconnect-ExchangeOnline
Additional resources
If you want to learn more about Direct Send, its secure usage, and alternatives, this guide was written based on the following resources: