


Servers are often attacked by automated bots. In the case of Linux servers, they try (in almost all cases) to penetrate as root users via SSH port 22 by means of brute force attacks.
We, therefore, recommend changing your SSH port and disabling access to SSH as root user on your VPS. The latter has already been automatically applied to our DirectAdmin, Plesk and cPanel VPSs.
In this article, we show you how to change your SSH port. Changing your SSH port is a form of 'security through obscurity'; you make your VPS (partially) untraceable for most of the attacking bots. An additional advantage is that your log files remain more organized and you get a clearer picture when your VPS is attacked.
Do you use DirectAdmin, Plesk, or cPanel? Then, for changing your SSH port, check out our articles about securing these control panels:
Step 1
Connect to your VPS via the VPS console. If you connect via SSH, your connection will disconnect while you process the changes.
Step 2
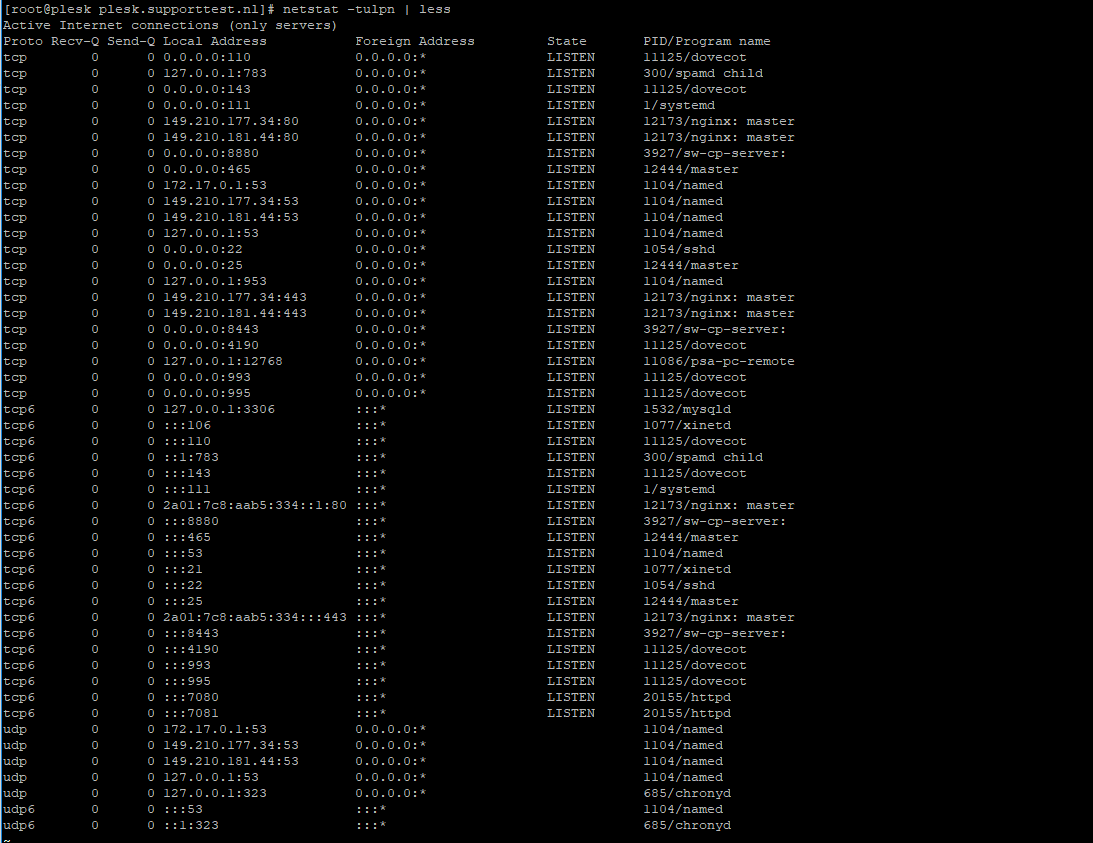
Check your ports used with the command:
sudo netstat -tulpn | lessAn overview as shown in the screenshot below appears. In this overview, the port numbers are the numbers in the row 'Local Address' behind the colon.
Step 3
Choose a random port number between 0 and 65535 that is not shown in the overview (for example 47592) and press 'q' to stop netstat.
Step 4
Open the SSH configuration file with the command below. You can also use vim for this.
sudo nano /etc/ssh/sshd_config
Step 5
The configuration file opens, and, amongst other things, you will see the code below.
# If you want to change the port on a SELinux system, you have to tell
# SELinux about this change.
# semanage port -a -t ssh_port_t -p tcp #PORTNUMBER
#
#Port 22
#AddressFamily any
#ListenAddress 0.0.0.0
#ListenAddress ::
Uncomment / delete the # in front of '#Port 22' and change the number to the number you chose under step 2, for example:
Port 47592Save the file and close the file by pressing ctrl + x> y> enter.
Ubuntu 22.10 and later:
The SSH service in more recent versions of Ubuntu use an activation model based on sockets. As a result, an adjustment of the socket configuration in /etc/systemd/system/ssh.service.requires/ is required, or you could add your own custom configuration:
Adjusting the existing socket configuration
Open the SSH socket configuration:
sudo nano /etc/systemd/system/ssh.service.requires/ssh.socketChange the ‘ListenStream’ port number to the new port number, for example:
ListenStream=47592Save the changes and close the file by pressing ctrl + x > y > enter on your keyboard.
Reload systemd to process the changes:
sudo systemctl daemon-reload Creating a modified socket configuration
Create a custom configuration file:
sudo nano /etc/systemd/system/ssh.socket.d/override.confAdd the following, but feel free to change the port number:
[Socket]
ListenStream=47592
Save the changes and close the file by pressing ctrl + x > y > enter on your keyboard.
Reload systemd to process the changes:
sudo systemctl daemon-reload
Step 6
Add the chosen port to your firewall and connect port 22 to your firewall. Below, we have examples of some commonly used firewalls. Replace 47592 with the port number you selected in step 2.
The VPS Firewall in the control panel
Step 1
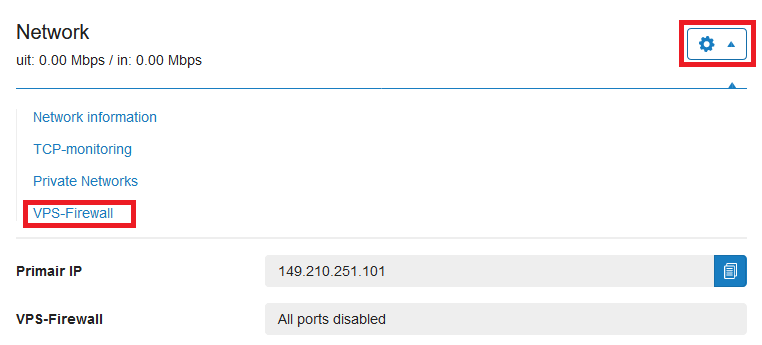
Log in to your control panel and navigate to the relevant VPS.
Step 2
Click the cogwheel behind 'Network' (directly under the VPS console) and click 'VPS Firewall'.
Step 3
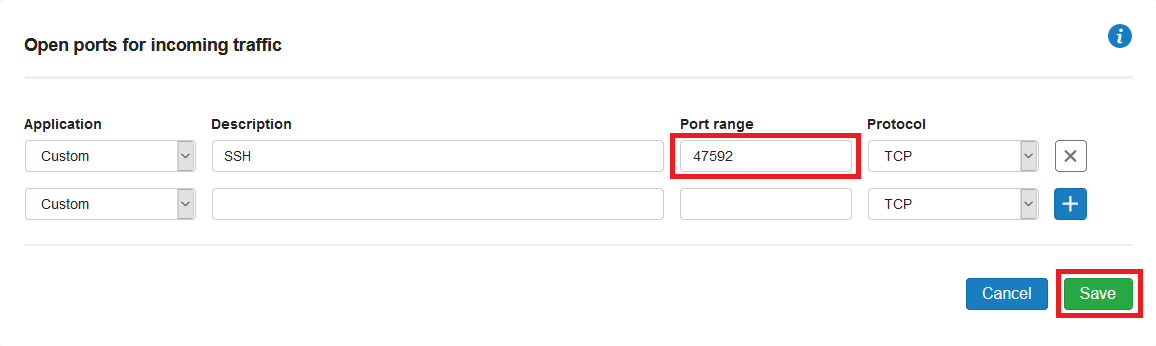
Remove the current SSH rule, if present, and add a custom rule for your new SSH port. Finally, click 'Save' to process the changes.
FirewallD
sudo firewall-cmd --permanent --zone=public --add-port=47592/tcp
sudo firewall-cmd --permanent --zone=public --remove-port=22/tcp
sudo firewall-cmd --reload
Optionally you can open up SSH only for specific IP addresses or IP ranges in FirewallD as follows:
sudo firewall-cmd --permanent --zone=public --add-rich-rule='
rule family="ipv4"
source address="1.2.3.4"
port protocol="tcp" port="12345" accept'
Ufw
sudo ufw allow 47592/tcp
sudo ufw deny 22/tcp
Optionally you can open up SSH only for specific IP addresses or IP ranges in UFW as follows:
sudo ufw allow from 123.123.123.123 to any port 47592 proto tcpNftables
Debian is switching to nftables instead of iptables. Since most Debian users use ufw or iptables and nftables is a lot more complicated than these solutions, it now falls outside the scope of this manual. We will include a separate article on the use of nftables in our knowledge base in the future.
Step 7
Finally, restart SSH with the command below.
sudo systemctl restart sshd
Optional: Step 8 - Selinux
Do you use Selinux (you can check if you do using the command 'sestatus')? Add the selected port to Selinux as well:
sudo semanage port -a -t ssh_port_t -p tcp 12345Are you getting an error that the semanage command cannot be found? Install the required package using:
sudo dnf -y install policycoreutils-python
Your SSH port has now been changed and your SSH connection can no longer be easily attacked by automated bots!