


At TransIP you can order web hosting for your domain name. A web hosting package allows you to build your own web site and create email addresses.
Simply ordering web hosting for your domain name isn't always enough. If you want to use its features, your domain name will have to point to the web hosting package.
In this article we will show you how to connect your domain name to a web hosting package.
Choose your domain name
In order to use a web hosting package, you will need a domain name at TransIP. Click on the box that applies to your situation.
I already own a domain name and a web hosting package at TransIP
It's perfectly possible you already ordered a web hosting package for your domain name. In order to use its website and email features, you will need to point your domain to the web hosting package.
Head over to 'Connect your domain to your web hosting package' to find out how.
I only own a domain name at TransIP
If you don't own a web hosting package yet, you can order one for your domain name via your control panel. Make sure you are logged in to your account and head over to 'Domain'. Next, select your domain name on the left hand side (don't check the box).

Now scroll down to 'Order Extras' and click on 'Order' next to 'Launch lightning fast websites'. You will now see an overview of available packages for your domain name.
Choose the web hosting package that fits your needs, select 'Order' below it and finish the order on the next page.
Afterwards, it will take a few moments for your web hosting package to become active, which is indicated by the web hosting icon next to your domain name:
![]()
Refresh the page to check if the web hosting package is active and head over to 'Connect your domain to your web hosting package'.
I don't own a domain name yet
Use the article 'Registering a domain name at TransIP' to learn how to register your very own domain name at TransIP. Make sure to add a web hosting package during the registration process.
Once your order is finished, your domain name will be registered with the registry. The registration time of your domain name depends on the registry. Go to 'Domains & Hosting' inside your control panel and select your domain name on the left hand side. If the registration is still pending, a notification will be shown. As soon as the notification disappears, the registration will be completed.
Awaiting your domain name's registration, you can already point your domain to your web hosting package by using the steps in 'Connect your domain to your web hosting package'.
My domain name is registered elsewhere
Your domain name needs to be registered at TransIP if you want to use one of our web hosting packages. If your domain name is registered elsewhere, you can transfer your domain name to TransIP by following the steps in the article 'Transfering your domain name to TransIP'.
Make sure to add a web hosting package during the transfer process.
Once you've transfered your domain name and ordered a web hosting package, head over to 'Connect your domain to your web hosting package'
Connect your domain name to your web hosting package
You now have a domain name with a web hosting package at TransIP. Your domain name uses the 'TransIP settings' by default, which means your domain name's DNS is automatically configured to point to your web hosting package.
However, if you've edited the default domain settings in the past, these default settings will be used during your domain name's registration or transfer in stead..
It's also possible you've previously edited your domain name's DNS or nameservers yourself. This means the TransIP settings are disabled. In both cases the TransIP settings will be disabled.
In case your domain name isn't using the TransIP settings, you will have to manually connect your domain name to your web hosting package.
Check if you're using the TransIP settings
Log on to your control panel to check if your domain name is using the TransIP settings. Head over to 'Domain' and select your domain name on the left hand side (don't check the box). Now scroll down to the center of the page.
Do you see 'Domain settings' here with the TransIP settings set to 'On'? Then your domain name is already connected to your web hosting package., then the TransIP settings will be enabled and your domain name automatically points to your web hosting package.

If you want to add extra DNS records, you will need to turn off the TransIP settings. Use the article 'Changing DNS and nameservers via the control panel' to learn how to enter DNS records at TransIP.
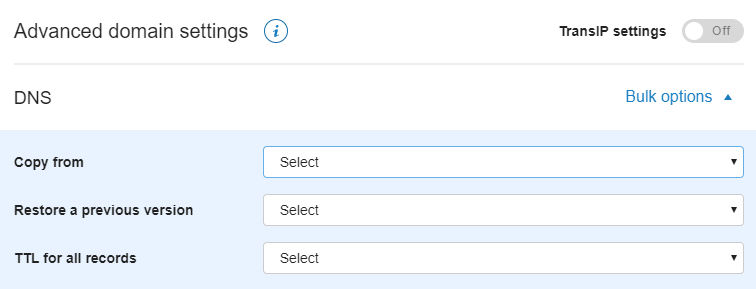
If you see 'Advanced domain settings' here with the TransIP settings set to 'Off', you will have manual control over your domain name's DNS settings.

Now decide if you want to either fully or partially connect your domain name to your web hosting package.
- Connecting your domain name fully is recommended if you want to use both your web hosting's website features and email features.
- Connecting your domain name partially is recommended if you only want to use either your web hosting's website features or email features.
Fully connecting your domain name to your web hosting package
There are two options to choose from when you wish to use all the features of your web hosting package. You can either enable the TransIP settings or manually configure the 'TransIP default DNS settings' for your domain name.
If you choose to enable the TransIP settings, the correct DNS settings for your web hosting package will be automatically added to your domain name. Take note that the previous DNS records will be overwritten and you will not be able to add any other records.
If you manually configure the TransIP default DNS settings, you will be able to add additional DNS records.
Enabling the TransIP settings
-
Visit your control panel and click 'Domain'. Select your domain name on the left hand side (don't check the box) and scroll down to 'Advanced domain settings'.
Set the slider to 'On' next to the TransIP settings. We will now take care of the DNS records for you, by fully connecting your domain name to your web hosting package.
Manually configuring the TransIP default DNS settings
-
Visit your control panel and click 'Domain'. Select your domain name on the left hand side (don't check the box) and scroll down to 'Advanced domain settings'.
Right next to 'DNS', click on 'Bulk options'. Now click on the drop down menu next to 'Copy from' and select the 'TransIP default DNS settings'.
Your existing DNS records will now be overwritten by the DNS records for your web hosting package. You can add extra DNS records if desired. Click on 'Save' to save the DNS records.
Partially connecting your domain name to your web hosting package
It's possible you've already configured the DNS of your domain name to point to a website or an email server that's hosted somewhere else than TransIP. If you want to use either the website or email features of your web hosting package, you need to be careful which DNS records you add and delete.
Use the boxes below for a step by step guide on which DNS records to use in either situation.
I want to use my web hosting package for a website
-
This means you've probably configured the DNS records of your domain name to send and receive email with another hosting provider. Specifically, these DNS records should be one SPF record (with type TXT) and one or more MX records.
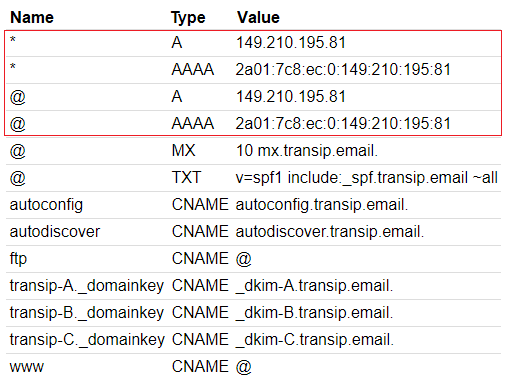
In order to use the website feature of your web hosting package, you leave the MX and SPF records for what they are and add the A records and AAAA records of your web hosting package. The A and AAAA records allow your domain name to point to a web server.
Right after disabling the TransIP settings you'll receive an email containing the DNS records of your web hosting package. Search this email to continue; the email is sent to the email address you've listed in 'My Account' with 'DNS settings for [domain.extension]' as the subject.
In this email you will find the A and AAAA records for your web hosting package, as seen in the example below.
I want to use my web hosting package for email
-
This means you've probably configured the DNS records of your domain name to point to a website hosted at another hosting provider. Specifically, these DNS records should be one or more A records and, if present, AAAA records.
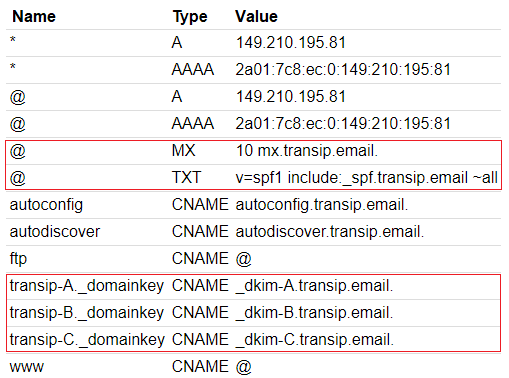
In order to use the email feature of your web hosting package, you will need to use the matching SPF record (with type TXT) and MX record. These records allow you to send and receive email with email addresses created on your web hosting package. You will need to add DKIM records as well.
Right after disabling the TransIP settings you'll receive an email containing the DNS records of your web hosting package. Search this email to continue; the email is sent to the email address you've listed in 'My Account' with 'DNS settings for [domain.extension]' as the subject.
In this email you will find the MX, SPF (with type TXT) and DKIM records for your web hosting package, as seen in the example below. These specific DNS records are the same for each web hosting package.
Now head over to 'Domains' and select your domain name on the left hand side (don't check the box). Scroll down to 'DNS' and remove the existing SPF records (with type TXT) and MX records by clicking on the X next to the records.
Next, enter the SPF (with type TXT), MX and DKIM records of your web hosting package in the empty field below your DNS records. You can find an explanation on entering DNS records in your control panel in the article 'Changing DNS and nameservers via the control panel'.
Afterwards, click 'Save' to save your changes.
Your current website will remain active on your domain name, but you will now also be able to create and use email addresses via your web hosting package.
Keep in mind that DNS changes may take up to 24 hours before they are picked up by the global resolvers. Unfortunately, we cannot affect this process although the changes are usually effective long before 24 hours have passed.