


Our preinstalled version of cPanel / WHM comes with CentOS as the underlying OS. By default CentOS uses some older versions of software (although updated with the latest security updates) because it prefers stability above the latest features. This is also the reason that the default PHP version is usually a few versions behind on what is available. If you want to use PHP 7 for example, you will first need to update the PHP version on your VPS.
Important!
- It is not without risk to update the PHP version on your VPS. You are advised to always create a snapshot before performing below commands in case something goes wrong.
- Is is not possible to update PHP through the regular command of yum update. The package for PHP are deliberately kept outsides of the default 'yum repository' by cpanel. You therefore always need to use the EasyApache software to update PHP of by running the /usr/local/cpanel/scripts/phpup script.
- You can always check the current installed version of PHP by running the command php -v.
- Starting with version 62 of cPanel / WHM, EasyApache 4 is the default application for managing the webserver including PHP. If you are still using EasyApache 3 and want to use PHP 7, you will need to switch to EasyApache 4. You can find more information regarding this switch in the documentation cPanel provides.
Step 1: Check the WHM and EasyApache version

- Login into WHM via your browser. In the top right corner you can find more information regarding the current installation, including the WHM version. If it is possible to update to a newer version, a notice with a link will be visible.
- As soon as you are using the latest version of WHM, you can navigate to the 'EasyApache' application ((Home > Software > EasyApache 4). Most likely 2 versions of EasyApache will be visible, both version 3 and 4. Version 4 is the only supporting PHP 7 and later, so select that option.
- if you upgraded from an older version of WHM and EasyApache is still the default option, you could see a notice: "EasyApache 4 is not available when EasyApache 3 is active." If that's the case there will be a link below to documentation on how to migrate to version 4. Basically you will need to run the following command (as root) via the command line:
/scripts/migrate_ea3_to_ea4 --run
. During this process you are required to enter a y a few times. - EasyApache is now updated and you can use it to change the PHP version!
Step 2: Update PHP

- You can customize the current profile, or switch to a predefined package. By selecting Customize you can change the current active configuration.
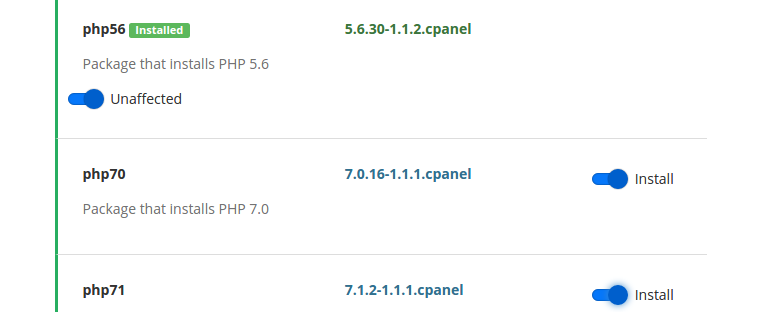
- When selecting PHP Versions on the left hand side (this guide leaves the Apache options out), you can add PHP 7.0 and 7.1 support for example. Switch the sliders to Install and press Next on the bottom of the page.
- On the next page you can add support for several PHP extensions / modules, as for example the ioncubeloader, mcrypt or soap. Click Next when all the desired options have been selected.
- An overview with all the relevant changes will be visible. Select Provision on the bottom of the page in order to process these change. This could take a while.
Step 3: Selecting the PHP version for your website

- To have your website start using the new version of PHP you will need to login into cPanel itself (by default on https://youripaddress:2083).
- Find the section labeled Software and select the MultiPHP Manager.
- You will now see an overview of all the domains in that cPanel account. Here you can select domains as desired and set it's PHP-version!