







Ollama is an open-source application that allows users to host and manage AI models locally or on your own dedicated servers, for example GPT-Oss, Qwen or DeepSeek.
In this guide, we'll show you how to install Ollama, a LLM configures and then uses via Ollama's REST API.
Required hardware
Look at here the available models. For each model you will find under 'size' how much RAM you need to load the model into memory.
Hosting LLMs often requires sturdy hardware; preferably use one or more sturdy GPUs, but it is also possible to have LLMs only work on RAM. Please note that your performance will then be approximately 10-50x slower compared to using dedicated GPUs.
To reduce the hardware requirements you can use 'quanitzed' models. Simply put, you compress a LLM by applying quantization. You then sacrifice a minimal amount of accuracy for a significant reduction in required hardware. The dynamic-quantized models of Unsloth are a very good option for this. Pro tip: also take a look Unsloth-studio.
In the table below we give an example of different amounts of parameters and the amount of vRAM (or RAM, or a combination of both) you need when using Unsloth quantization for Qwen3.5.
Qwen3.5 |
3 bit | 4 bit | 6 bit | 8 bit | BF16 |
| 0.8B + 2B | 5GB | 9GB | |||
| 4B | 7GB | 10GB | 14GB | ||
| 9B | 19GB | ||||
| 27B | 24GB | 54GB | |||
| 35B-A3B | 70GB | ||||
| 122B-A10B | 245GB | ||||
| 397B-A17B | 810GB |
Install and use Ollama
Step 1
Linux (Ubuntu, AlmaLinux etc)
You can easily download and install Ollama with one command:
curl -fsSL https://ollama.com/install.sh | shWindows
Download Ollama via the button below. Launch the downloaded file and click 'Install’.

macOS
Download Ollama via the button below. Launch the downloaded file and click 'Install’.
Step 2
Ollama is executed automatically. In the case of Linux, this means that you can issue Ollama a command directly from the terminal. In Windows you have to start the command prompt (Windows start button > cmd) and in MacOS a terminal.
Now you simply install the desired model with the command:
ollama run <modelnaam>:<parameters>For example for Qwen3.5:27b
ollama run qwen3.5:27bYou can optionally switch which model you are using by simply editing the model and running the command again.
Finally, close the Ollama terminal session with the command:
/byeYou can now use Ollama immediately! Do you want to use Ollama from another device? Then read the next paragraph first.
Using models with specific quantization
By default Ollama uses models with 4-bit quantization. Using this you normally need about a third or less memory (RAM/GPU) compared to the full (FP16) model, while retaining 95-99% of the quality. Should you prefer a different type of quantization than 4-bit, specificy it in the pull command, for example for gemma4 12B respectively for 8-bit, bf16 en pf16:
ollama pull gemma4:12b-q8_0
ollama pull gemma4:12b-bf16
ollama pull gemma4:12b-pf16
Use Ollama from another device
It is possible to use Ollama from a device other than the one on which you installed Ollama. This requires a small adjustment in the configuration of Ollama.
If you use this option, we recommend that you do not forget about the security of your server. For example, set an IP restriction in your firewall for port 11434 (the port that Ollama uses) so that you only have access from your own IP address(es). You can optionally combine this with your own VPN server.
Linux
Step 1
Open the Ollama service configuration:
sudo nano /etc/systemd/system/ollama.service
Step 2
Under the [Service] block, add the following two lines:
Environment="OLLAMA_HOST=0.0.0.0"
Environment="OLLAMA_ORIGINS=*"
Save the changes and close the file (ctrl + X > y > enter).
Step 3
Reload systemd and restart Ollama to process the changes:
sudo systemctl daemon-reload
sudo systemctl restart ollama
You can now also use Ollama from another device, for example from your phone, see the next paragraph.
macOS
Run the following commands and then restart the Ollama application:
launchctl setenv OLLAMA_HOST "0.0.0.0"
launchctl setenv OLLAMA_ORIGINS "*"
You can now also use Ollama from another device, for example from your phone, see the next paragraph.
Windows
Step 1
Exit Ollama. At the bottom right of the taskbar there is an icon (possibly hidden under the up arrow) that you can click on with the right mouse button and then 'Quit Ollama' can select to close it.
Step 2
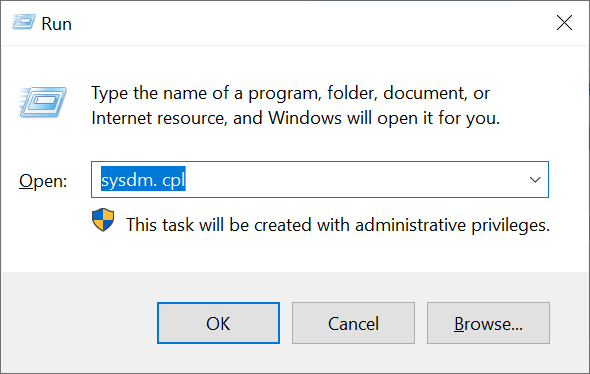
Simultaneously press the Windows Start icon + R on your keyboard. The run screen appears. Type the command 'heresysdm.cpl' and press 'OK' or the enter key.
Step 3
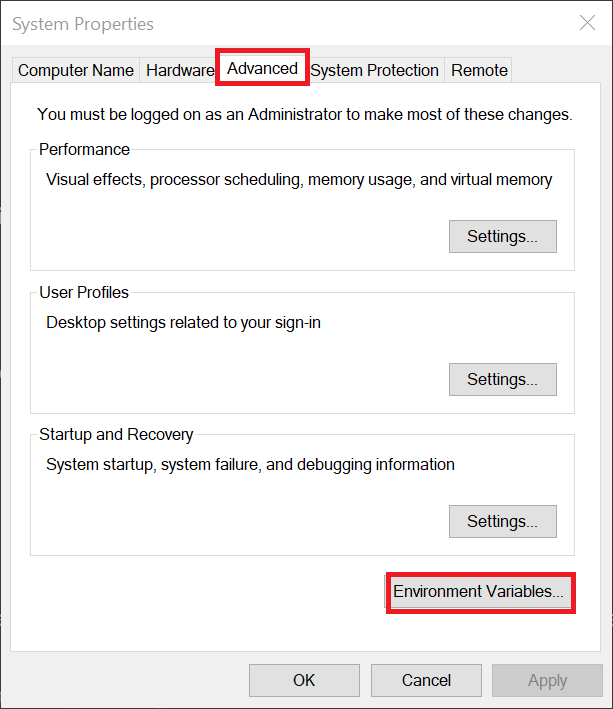
Click on the tab 'Advanced' > 'Environment Variables'.
Step 4
Click under 'User variables for <yourusername>' on 'New…’.

A 'New User Variable' pop-up window appears. Use as 'Variable name'the name'OLLAMA_HOST' and if 'Variable value'the value'0.0.0.0' and click on 'OK’

Repeat this step and this time add a variable called 'OLLAMA_ORIGINS' and the value '*’.
Finally, restart Ollama. You can now also use Ollama from another device, for example from your phone, see the next paragraph.
You can use Ollama-hosted LLM
The moment you were waiting for has arrived: using Ollama. There are multiple options available for using Ollama, but we recommend three:
- OpenWeb UI: with Open WebUI you add a layer
- Chatboxai: a chat program somewhat similar to ChatGPT, but only with chat functionality
- API: your self-hosted LLMs are via a REST API available
ChatboxAI
ChatboxAI is an AI client application that allows you to easily connect to many AI models and APIs from your computer, phone, or tablet. You install and use ChatboxAI in much the same way on all your devices:
Step 1
Download ChatboxAI from https://chatboxai.app or the link below. Open the downloaded file and go through the installation.
Step 2
Chatbox usually starts automatically, if not, start it up. You will now see an automatic configuration wizard and you can always adjust the settings via the 'Settings'-gear. Adjust the following information:
- API Host: Only adjust this if you are using Ollama from a device other than the one you are hosting it on. In that case, change the local host IP address http://127.0.0.1:11434 to the external IP address of your server/computer, for example http://123.123.123.213:11434.
- Model: Select the desired Ollama model. You can always adjust this later in a chat session.

You can now get started with Ollama via Chatboxai. There are already a few examples automatically included in Chatbox in which the model has received an instruction, such as in the example below in which the selected LLM is instructed to behave like a software developer.

API
One of the most useful features of Ollama is that you can use a API at no cost to integrate models into your own project. As icing on the cake, this is also relatively simple. Below we give a Python example.
Requirements
- Python (an up-to-date version): Many operating systems support Python out-of-the-box and the installation is therefore outside the scope of this manual.
- The OpenAI module for Python: Install the module via a terminal/cmd with the command: pip install openai
The basics
Step 1
Create a .py file (e.g. ai.py) and add the following code (replace deepseek-r1:32b with your chosen model):
import openai
client = openai.Client(
    base_url="http://127.0.0.1:11434/v1",
    api_key="ollama"
)
response = client.chat.completions.create(
    model="deepseek-r1:32b",
    messages=[{"role": "system", "content": "You're a helpful assistant."},{"role": "user", "content": "Hello"}],
    temperature=0.7
)
print(response.choices[0].message.content)- Optionally adjust 127.0.0.1 to the public IP address of your server and 32b (after model =) to the number of parameters of the model used.
- “You're a helpful assistant.” is the instruction for the model before the chat starts. You are free to make this a lot more extensive.
- “Hello” is your prompt/question to your chosen model. Of course, adjust this as desired.
- The print command ensures that the output is shown in your terminal.
Step 2
Run the .py file, for example (in Windows):
c:\Ollama>ai.pyThe output will look something like this:
<think>
Okay, the user asked me to act as a helpful assistant. I need to respond in a friendly and approachable way. Maybe say something like, "I'm here to help! How can I assist you today?" That should cover it.
</think>
Hello! I'm here to help. What do you need assistance with?
So far so good: Ollama shows his thought, which will vary with repeated use of the same prompt. But… after running ai.py, the script runs once and closes. How can you have an ongoing chat session in a terminal? That brings us to the next paragraph
Have an ongoing conversation
After the basics you have come a long way. For convenience, below we show another example of how to have an ongoing conversation, thanks to DeepSeek who generated this example himself:
import openai
# Create the client
client = openai.Client(
    base_url="http://127.0.0.1:11434/v1",
    api_key="ollama"
)
# Start your conversation history
messages = [
    {"role": "system", "content": "You're a helpful assistant."}
]
while True:
    # Ask for user input
    user_input = input("User: ")

    # If user types something like 'exit' or 'quit', break out
    if user_input.lower().strip() in ["exitchat", "quitchat"]:
        print("Exiting...")
        break
    # Add the user's message to the conversation
    messages.append({"role": "user", "content": user_input})
    # Generate assistant response
    response = client.chat.completions.create(
        model="deepseek-r1:32b",
        messages=messages,
        temperature=0.7
    )

    # Grab the assistant's reply
    assistant_reply = response.choices[0].message.content
    print("Assistant:", assistant_reply)

    # Append assistant message to the conversation so context is maintained
messages.append({"role": "assistant", "content": assistant_reply})- Optionally adjust 127.0.0.1 to the public IP address of your server and the chosen model (behind model =) to the desired model.
- “You're a helpful assistant.” is the instruction for the model before the chat starts. You are free to make this a lot more extensive.
- “User:" indicates that this is where your input comes
- exitchat and quitchat end the chat session
Run the .py file, for example (in Windows):
c:\Ollama>ai.pyThis time you can actually have a chat session with your chosen model. Be careful: the thinking process (<think>….</think>) can be quite extensive.
That brings us to the end of this guide on self-hosting Ollama. Good luck!