


This is the second part of our Tutorial Series 'Setting up a redundant VPS environment'. If you are setting up a new redundant VPS environment, we recommend starting with part 1 and to not skip any parts.
Thanks to HA-IP Pro, the failover and load balancing of your web servers is automatically taken care of. In this section, we will discuss the synchronization of the files, for example on your websites, between your (web) servers.
There are various options for the synchronisation of files on your server, but in this tutorial we discuss two solutions which are (relatively) easy to set up and not only offer you access to your files on multiple servers, but also make sure the data itself is stored redundantly:
- GlusterFS
- Rsync (beschreven in dit artikel)
GlusterFS
We recommend GlusterFS for pretty much all use cases. It's relatively easy to set up (Rsync is however even easier still). synchronises files real-time (Rsync doesn't) and offers a combination of excellent performance and functionality (e.g. automatic failover and recovery tools).
When we speak about server and client configuration in our GlusterFS manual , you can choose to install both the server and client role on the same VPSs. You could for example then have two or three VPSs which all perform the roles of server and client instead of two or three servers and two or three seperate clients. This saves half the hardware costs and doesn't diminish the redundancy of your setup.
When setting up a server with GlusterFS, for example a web server, it's important when configuring the GlusterFS client that you pay attention to where you save/mount the data, for example in /var/www/users/ and give your users their own subdirectory such as /var/www/users/username.
Rsync
For the synchronization of files on your website, we use the Rsync command. Rsync is a command that allows you to copy files and folders from one server to another server. By using a cronjob, you create a task to continuously synchronize files between the web servers using Rsync.
To update your websites, upload your updated website to one of your VPSs using FTPS or SFTP. Rsync then automatically ensures that the update is synchronized to your other web server(s). Your update will be live on all your web servers within a few minutes.
Can visitors of your website upload files to your website? Then they are also automatically synchronized between both servers.
Step 1
Connect to both VPSs via SSH or the VPS console in your control panel and install rsync:
Ubuntu / Debian:
apt-get install rsync
CentOS:
yum -y install rsync
Step 2
To test the operation, we first perform a dry run (i.e. nothing is actually copied) using the command below. Execute this from both VPSs, but do not forget to adjust the IP and port number, see the expandable explanation for a more in depth explanation.
rsync -auvn -e "ssh -p 2233 -o StrictHostKeyChecking=no" transip@192.168.1.1:/var/www/ /var/www/ --no-perms --no-owner --no-group --no-times
Step 3 SSH-Key
When executing the command in the previous step, a password is requested for the user (in this case the user transip). This happens because the Rsync command uses an SSH connection. If you want to automate this process, it is also desirable that you do not have to ask for the password each time. We use an SSH key for this.
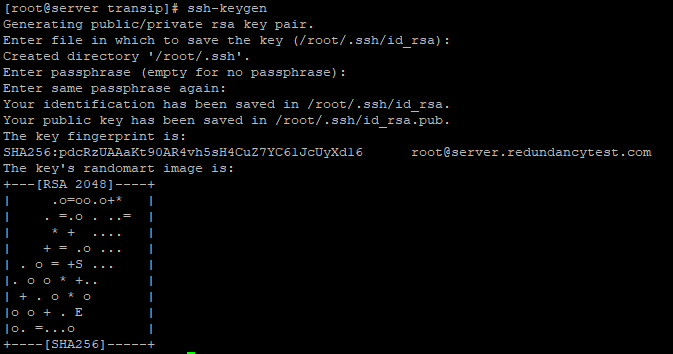
First, create an RSA key pair on both web servers with the following command:
ssh-keygenPress enter 3 times when prompted to give permission to create the RSA key in /root/.ssh/id_rsa and not to use a passphrase (Rsync requires this to execute without a password prompt). The result looks like this:
Step 4
Copy your SSH key to the other web server with the following command (available by default in most OS's).
- Replace 22 by your actual SSH port number.
- Replace transip by the username you also used in step 2.
- Replace 192.168.1.1 by the private network IP address of the VPS other than the one on which you created the key.

ssh-copy-id -p 22 transip@192.168.1.1
The user's permission and password are requested. Give permission and the password to continue. The output looks like this:
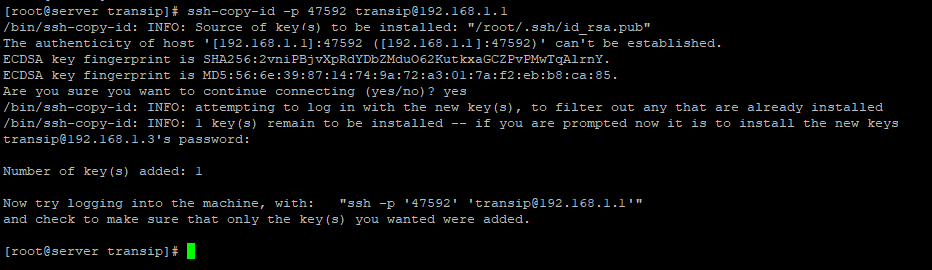
The above output recommends connecting to your primary web server from your slave VPS. You can also test rsync directly using the command from step 2.
Step 5
Lastly, you create a cron job to automate rsync:
crontab -e
Step 6
For example, give your cronjob the following content:
SHELL=/bin/bash
HOME=/
*/2 * * * * date >> /var/log/rsync_log
*/2 * * * * rsync -auv -e "ssh -p 2233 -o StrictHostKeyChecking=no" transip@192.168.1.1:/var/www/ /var/www/ --no-perms --no-owner --no-group --no-times >> /var/log/rsync_log
In summary, the above does the following:
- The cronjob is executed every 2 minutes (defined by */2 * * * *). At https://crontab.guru/ you'll find a site that will help you configure specific cronjob schedules.
- date >> /var/log/rsync_log: this part ensures that every time the cronjob is executed in /var/log/rsync_log, the date and time of the synchronization is specified on a new line at the end of /var/log/rsync_log.
- The Rsync command is explained in step 2. The addition >> /var/log/rsync_log ensures that the output is written to /var/log/rsync_log (under the date and time). This way, you can always look back at how the synchronization has expired (cat/var/log/rsync_log | less).
If desired, you can remove the cronjob as follows:
crontab -rYou check the cronjob itself (without adjusting it) with:
crontab -l
Please note: if you use a custom logfile directory as above, do not forget to create it (mkdir /var/log/siteupdates).
Permission denied
With some regularity, people experience problems with rsync because of folder permissions / owner that are not set correctly. If you get a permission denied error, check the permissions of the relevant folder using ls -l /mapname/ (e.g. ls -l /var/www/transip.nl_a/) and adjust the owner / rights if necessary with chown / chmod.
We have come to the end of this part of the tutorial series and you now have the tools to set up an excellent synchronization of your website. Click here to continue to the next part: synchronizing your database.