


This is the sixth part of our DirectAdmin Tutorial Series. If you're setting up a new VPS, we recommend starting with part 1.
To send and receive email with your domain, DirectAdmin uses Exim and Dovecot as the outgoing and incoming mail servers, respectively. DirectAdmin automatically secures your email with TLS.
In this part, we will cover the following topics:
- Setting up Reverse-DNS
- Adjusting the email limit
- Creating an email address
- SSL/TLS on mail for multiple domains (SNI)
- Logging into webmail
- General settings for use in email software
- Spam protection
Your mail ports on a new VPS are closed for security reasons. Before you can open your mail ports, reverse DNS must be configured for your VPS. Additionally, an invoice must have been successfully paid from your account. Note: there is a standard waiting period of 17 days before this is allowed.
After setting up reverse DNS, you can ask our support team to manually open the ports in advance. They will review your request and potentially expedite the process.
Setting up Reverse-DNS
To prevent your emails from being marked as spam, configure reverse DNS for your VPS's IP addresses. More information on reverse DNS can be found in our reverse DNS article. To set up reverse DNS, follow these steps:
Step 1
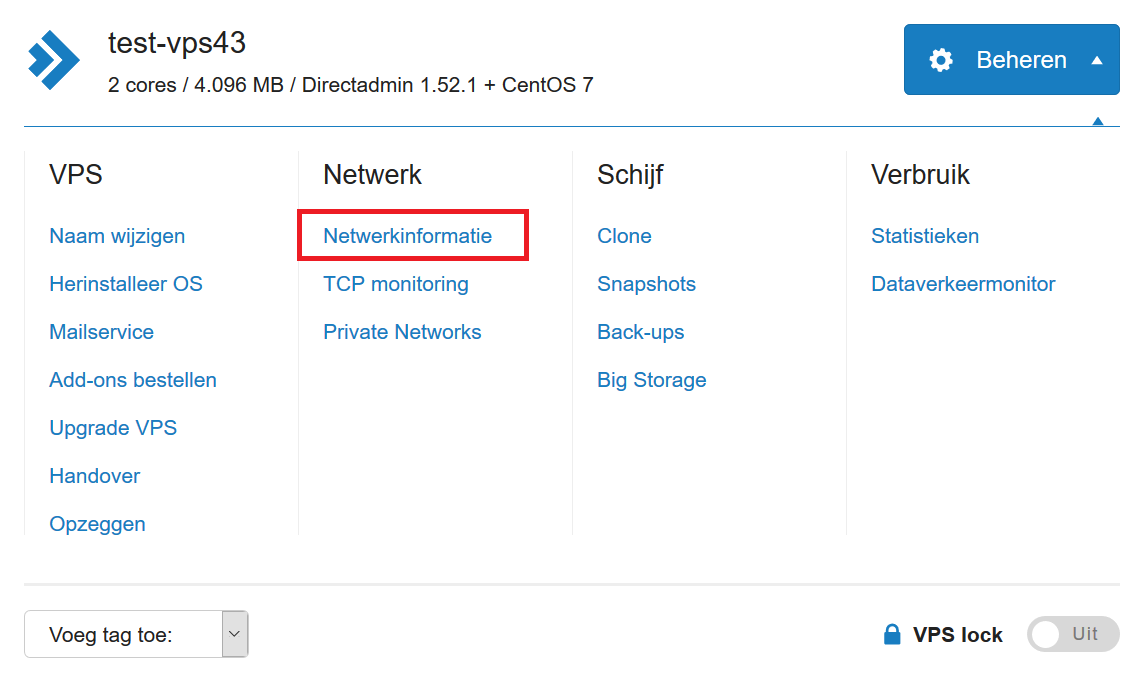
In the control panel, go to the ‘VPS’ tab and click on your VPS name.
Step 2
Click 'Manage' > 'Network Information'.
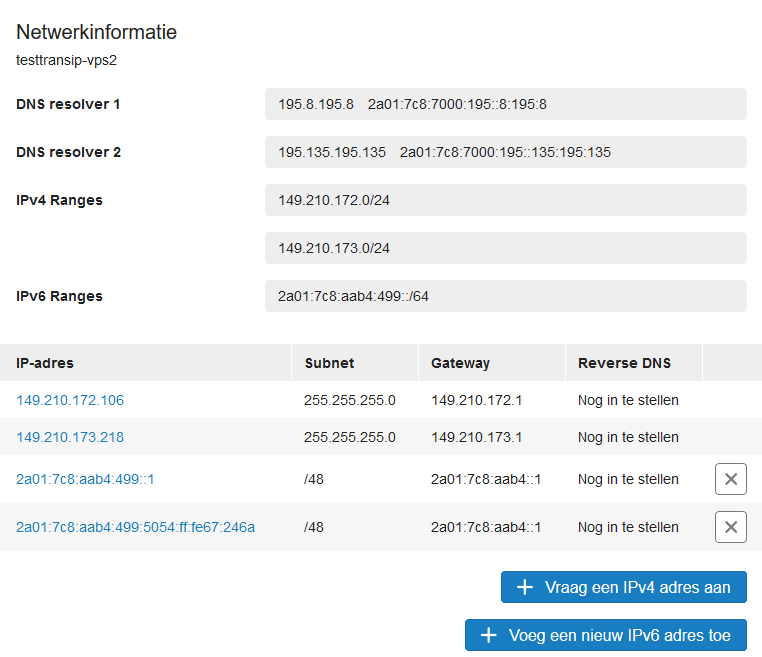
Step 3
Click on the IP address for which you want to set the 'Reverse DNS'. If the IPv6 address isn’t displayed, you can always add it via the '+ Add a new IPv6 address' button.
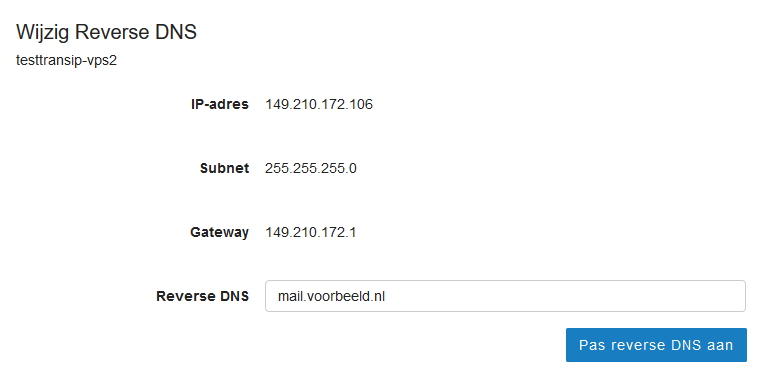
Step 4
Enter the desired reverse DNS name and click 'Apply reverse DNS' to save it. We recommend a syntax such as server.yourdomain.com or mail.yourdomain.com.
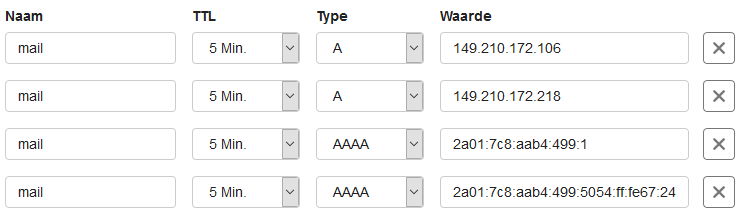
Step 5
Next, configure DNS records in your domain’s DNS settings for the chosen reverse DNS. The screenshot below shows 4 IP addresses for which you would create the following records in your DNS settings.
If you're using the IPs for reverse DNS on the root (@) of your domain, you can use CNAME records, as shown below.

When entering the reverse DNS, it's preferable to use the hostname of your VPS or the domain from which you send mail, such as server.yourdomain.com or mail.yourdomain.com.
Creating an email address
The email address yourusername@yourdomain.com is automatically created. For this guide, we are using the user 'username' and the domain example.com.
DirectAdmin has already created username@example.com. You are free to create as many email addresses as you want (as allowed by the package created in part 1), but don’t forget to create any email addresses you may have set up for Fail2ban in chapter 2.
Step 1
Log in to DirectAdmin as a user (or click on the ‘User’ tab as admin), then click 'Email Manager' > 'Email Accounts' > ‘Create Account’. Optionally, you can switch domains in the top right corner.

Step 2
Create the email address. You can set a limit for the maximum size and number of emails per day. We recommend using this option to prevent customers from sending spam, whether intentionally or not.

You will now see a confirmation of the created email address. Note: the information for incoming mail (POP/IMAP) and outgoing mail (SMTP) for setting up your email (e.g., on mobile devices) is also listed here.

DirectAdmin automatically creates an email address for the logged-in user. The login name for webmail and setting up your email in software is the logged-in user's username, not the actual email address!
Each email address you create uses the email address as the login name. See the screenshot below for an example.

Enabling DKIM
DKIM is a type of DNS record used to verify the validity of an email sender. A digital signature is sent with emails, which is checked using the key included in the DKIM record. We recommend using DKIM: without it, your emails are more likely to be marked as spam.
Step 1
You can enable DKIM on the same page where you create an email address: Click 'Email Manager' > 'Email Accounts' > 'Enable DKIM’.

That's it! DKIM is now automatically enabled for your domain. Do you manage the DNS records for your domain externally (e.g., from the TransIP control panel)? Continue with step 2.
Step 2 - optional for external DNS management
DirectAdmin automatically adds the correct DNS record for domains where DNS is managed by DirectAdmin itself. To find the DKIM record in DirectAdmin, go to ‘Account Manager’ > ‘DNS Management’.

Copy the DKIM selector (in this case, x._domainkey) and the corresponding value ("v=DKIM1; k=rsa; etc.), and set them with the provider where you manage your domain’s DNS records (e.g., in the TransIP control panel). See our guide for setting up a DKIM record.
Optional - adjusting the DKIM selector
DKIM uses a so-called DKIM selector. By default, it is named ‘x’. If you wish to change this, you can do so with two command-line commands (replace example with your desired DKIM selector name):
/usr/local/directadmin/directadmin set dkim_selector example restart
/usr/local/directadmin/custombuild/build exim_conf
SSL/TLS on mail for multiple domains (SNI)
The following instructions were incorporated into our DirectAdmin image in May 2018. These instructions only apply to installations prior to May 2018 or if you're using your own license. A VPS reinstall will automatically use the following options.
If you’re using email on your DirectAdmin VPS for multiple domains (i.e., domains that don’t match the domain used for your hostname), you need to enable SNI for email. SNI allows you to apply SSL to multiple domains instead of just your hostname.
For websites, SNI is enabled by default, but as of this writing, the image DirectAdmin provides us does not have this enabled for email and uses an outdated version of exim.conf (for outgoing mail). The steps below will enable SSL/TLS for mail on all domains on your VPS.
Step 1
Connect to your VPS via SSH or the VPS console, and open directadmin.conf:
sudo nano /usr/local/directadmin/conf/directadmin.conf
Step 2
Add the following line to the file, and close it with ctrl + X > Y > enter.
mail_sni=1
Step 3
Restart DirectAdmin to apply the changes.
systemctl restart directadmin
Step 4
Run the following commands to update Exim and its configuration file so that Exim can use SNI for email (Dovecot can already do this immediately after adding mail_sni=1).
cd /usr/local/directadmin/custombuild
./build update
./build set exim yes
./build set eximconf yes
./build set eximconf_release 4.5
./build set spamassassin yes
./build update
./build exim
./build exim_conf
Logging into webmail
DirectAdmin uses Roundcube as the webmail server. Once your email address has been created, you can immediately start using webmail by logging in at 'yourdomain.com/roundcube'. Use your email address and the password you set up in the previous section.

- If your username (e.g., admin) is the same as the name of your email address (e.g., admin@example.com), you can only log in with the username (e.g., admin) and not the full email address (e.g., admin@example.com).
- Using webmail itself is beyond the scope of this guide.
Optional: using mail.yourdomain.com for webmail
It’s a personal preference whether you prefer using webmail at yourdomain.com/roundcube or mail.yourdomain.com. The yourdomain.com/roundcube option works automatically. To use mail.yourdomain.com, follow these steps:
Step 1
You’ll need a DNS record for mail.yourdomain.com. If you’ve followed this tutorial series so far, this has been automatically created in DirectAdmin or set up in your domain's DNS settings with the party that manages it. If not, do this now before continuing with the steps below.
On your computer, create a text file called .htaccess.txt with the following content:
Redirect 301 example.com/roundcubeReplace yourdomain.com with the actual name of your domain (not the subdomain ‘mail’).
Step 2
Connect to your VPS with FTPS (see chapter 5 under 'FTPS') and navigate to public_html > mail.
Step 3
Upload the .htaccess.txt file to the 'mail' folder. Right-click on the file and select 'Rename'. Remove the .txt extension from the name so that the name is now .htaccess.
General settings for use in email software
You might want to use your email address in an app, email software, or send emails from your website. The settings for all these cases are the same:
- Server: mail.yourdomain.com
- Port: 993
- SSL: enabled
- Username: your email address
- Password: the password you set for this email address
- Server: mail.yourdomain.com
- Port: 995
- SSL: enabled
- Username: your email address
- Password: the password you set for this email address
Outgoing email (SMTP)
- Server: mail.yourdomain.com
- Port: 465
- SSL: enabled
- Username: your email address
-
Password: the password you set for this email address
- Replace yourdomain.com with your actual domain name.
- Your username is the same as the name (e.g., admin in admin@supporttest.com) if it's also a DirectAdmin user, as described under 'Creating an email address'.
- Using Windows mail? Choose the 'Other account' option.
Spam protection
DirectAdmin comes with Spamassassin anti-spam software to protect your email from spam. However, Spamassassin is disabled by default until you enable it. Follow the steps below to turn on Spamassassin and adjust some settings:
Step 1
Log into DirectAdmin as a user and click 'Email Manager' > 'Spamassassin Setup' and then ‘enable spamassassin’.

Step 2
You can now customize the Spamassassin settings as needed. We recommend at least setting the option ‘Where do you want the spam to go’ to a spam folder. Click 'save configuration' to save the changes.

- Where do you want the spam to go: Spam emails go to the inbox by default. You can change this to make sure spam actually ends up in the spam folder.
- What score threshold do you wish to use: This determines how strictly Spamassassin filters mail.
- Would you like to delete high-scoring spam: This option ensures that when Spamassassin is highly confident an email is spam, it is deleted right away. The spam email will not even appear in your spam folder.
- Do you wish to rewrite the subject of a spam email: This is useful if you prefer spam to go into your inbox. You can add a prefix to the subject of an email to make it easier to spot spam.
- How should the spam be delivered: To prevent spam scripts from being executed, spam emails are delivered as attachments in a separate email by default.
- Blacklist/Whitelist emails: Specify email addresses/domains you want to block or allow. You can enter specific email addresses or use wildcards like *@.com, *.com, user@*.com, user@test.*, *@domain.com, user@domain.com.
Your email address(es) is now ready to receive messages from friends, family, and customers (and the rest of the world)! Continue to 'Part 7: Additional articles and questions' for some final pointers.
If you have any questions about this article, feel free to contact our support team. You can reach them via the 'Contact Us' button at the bottom of this page.