In this article we'll explain how to transfer the website that's hosted elsewhere to a Web Hosting package at TransIP.
We'll first show you how to prepare your domain name and Web Hosting at TransIP. Afterwards, you'll learn how to place your website on your Web Hosting package and how to transfer your website to TransIP with as little downtime as possible.
- Is your domain name already registered at TransIP, but does it point to a website hosted elsewhere?
- Continue to 'My domain name is registered at TransIP'.
- Continue to 'My domain name is registered at TransIP'.
- Is your domain name not registered at TransIP yet? In that case you can either:
- Transfer your domain name directly. Your domain name will be registered at TransIP, before your website is transfered. Your website will have some downtime when choosing this method.
- Transferring your domain name later. This method allows you to prepare your website at TransIP, before the domain transfer finishes. Your website will have as little downtime as possible.
- Continue to 'My domain name isn't registered with TransIP yet'.
My domain name is registered at TransIP
It's possible you've registered your domain name at TransIP while the website for the domain name is hosted elsewhere. In that case, you can simply add a Web Hosting package to your domain name and place your website on it.
In that case, your domain name will still point to the current website. Once the website is hosted on the Web Hosting at TransIP, you can simply point your domain name to the Web Hosting package to activate it.
Step 1
Visit the control panel and head to the tab 'Domains & Hosting'.
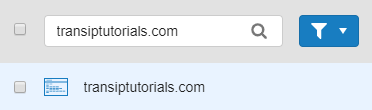
On the left hand side, check the box next to your domain name.
Step 2
Click 'Add / Upgrade' and select one of the Web Hosting packages by clicking 'Order' below it.
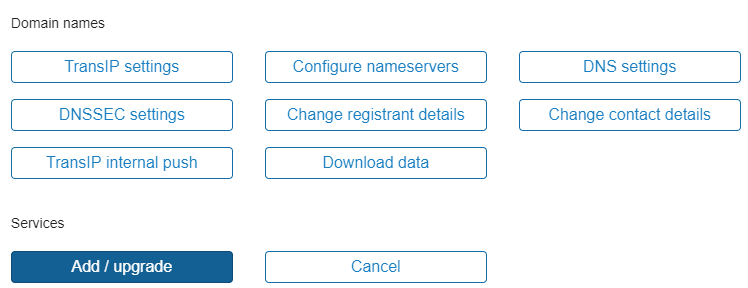
Finish the order and your Web Hosting will be activated for your domain name
Step 3
After finishing your order, head back to the tab 'Domains & Hosting' and click on your domain name on the left hand side (don't check the box). You will now see a Web Hosting icon next to your domain name, which means the Web Hosting package is activated.
If you don't directly see the icon, wait a few minutes and refresh the page.
Once your Web Hosting package is activated or if you already own a Web Hosting package, head over to 'Placing your website on your Web Hosting package'.
My domain name isn't registered with TransIP yet
If you want to transfer your website to TransIP, you will need to transfer your domain name to TransIP first. You can order a Web Hosting package during the transfer process.
There are two ways to approach the transfer to TransIP:
If you wish to prepare your website before transferring your domain name, you will need to enter an incorrect authorization code during the domain transfer. This way you will still be able to order a Web Hosting package for the domain name, while the transfer itself won't succeed just yet.
This allows you to place your website on your Web Hosting package, resulting in as little downtime as possible.
It is only possible to prepare your website before transferring if the domain name is not yet registered at TransIP.
Step 1Visit our homepage and enter your domain name in our domain checker.
Click 'Check'.

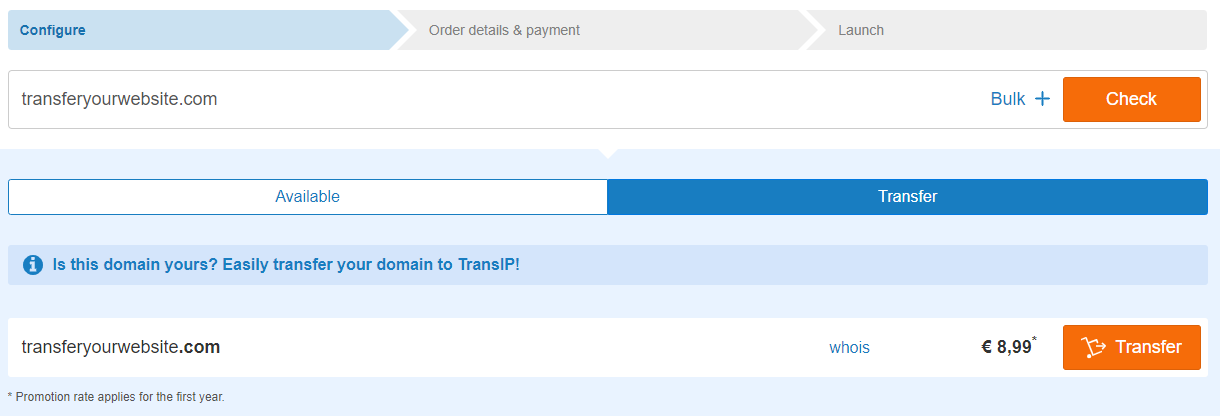
Step 2In the next window you will see the price of your domain transfer and the option to request a transfer for the domain name.
Click 'Transfer'.
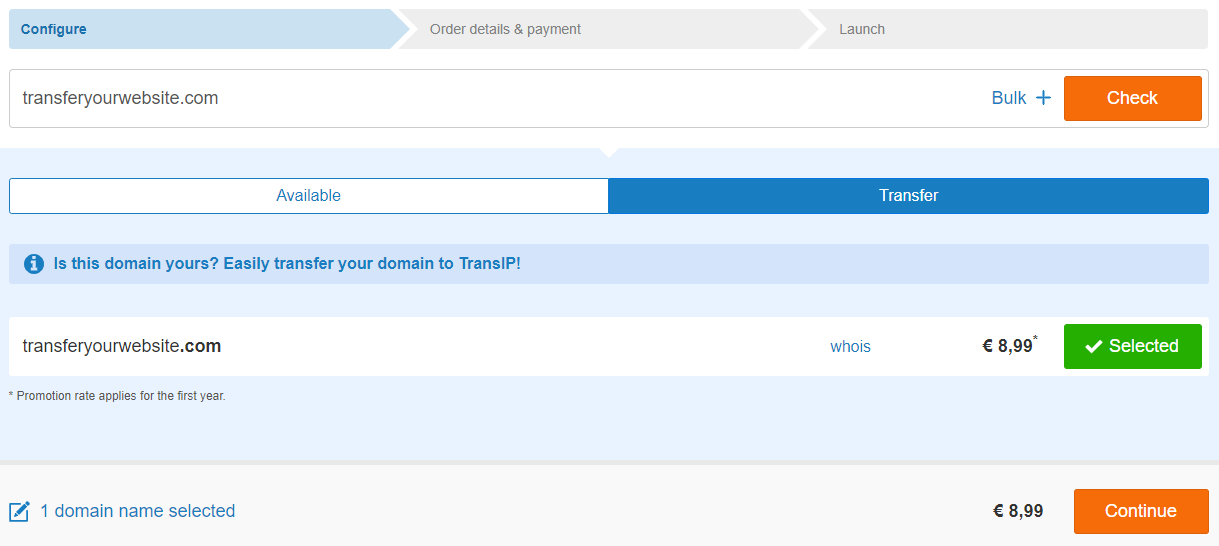
Step 3Click 'Continue'.
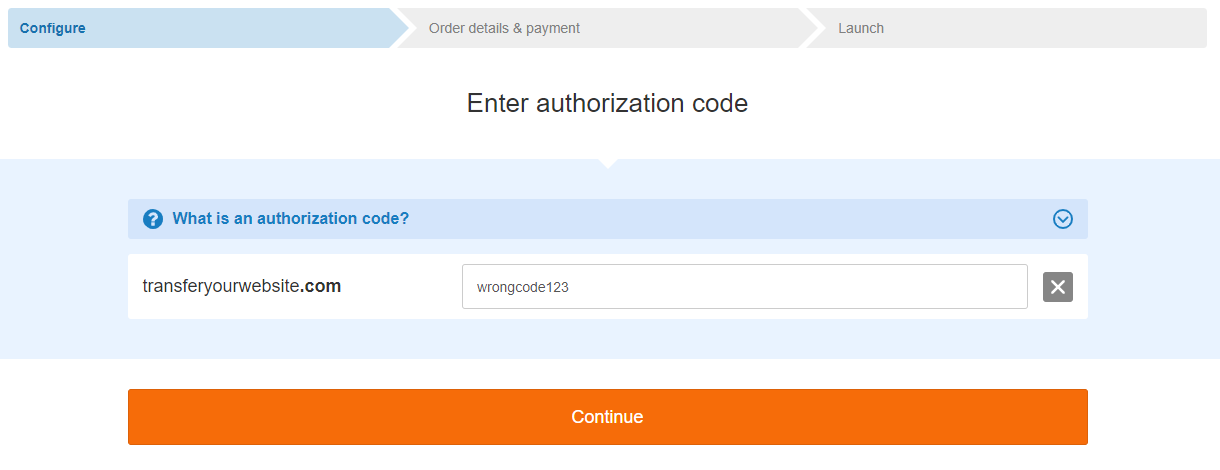
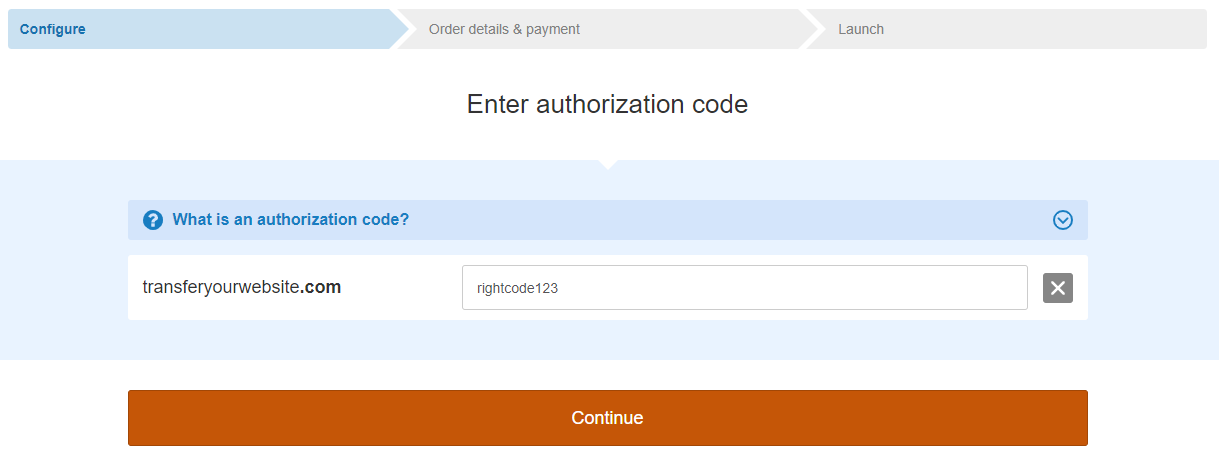
Step 4You will now be asked to enter the authorization code. In order to prepare your website on your Web Hosting package first, you will nee to enter an incorrect authorization code.
You can choose whichever authorization code you like, as long it's not the correct code. Make sure the code is at least 8 characters long, with at least 1 letter and 1 number.
If for some reason your incorrect authorization code isn't accepted during this step, please contact our support team and tell them which code you're entering. They will help you with entering a proper incorrect authorization code.
Take note: The transfer procedure may require additional or different steps, depending on the domain extension. Read the article 'Transferring your domain name to TransIP' for more information on the transfer procedure of your domain name.
After entering your incorrect code, click 'Continue'.
Step 5Once your incorrect authorization code is accepted, you will be able to choose a Web Hosting package for your domain name. You need Web Hosting to host your website at TransIP.

If you click 'Choose', you will add the Pro package to your domain name.
If you want add a different size of Web Hosting, click 'Show all hosting options' and select a different Web Hosting package.
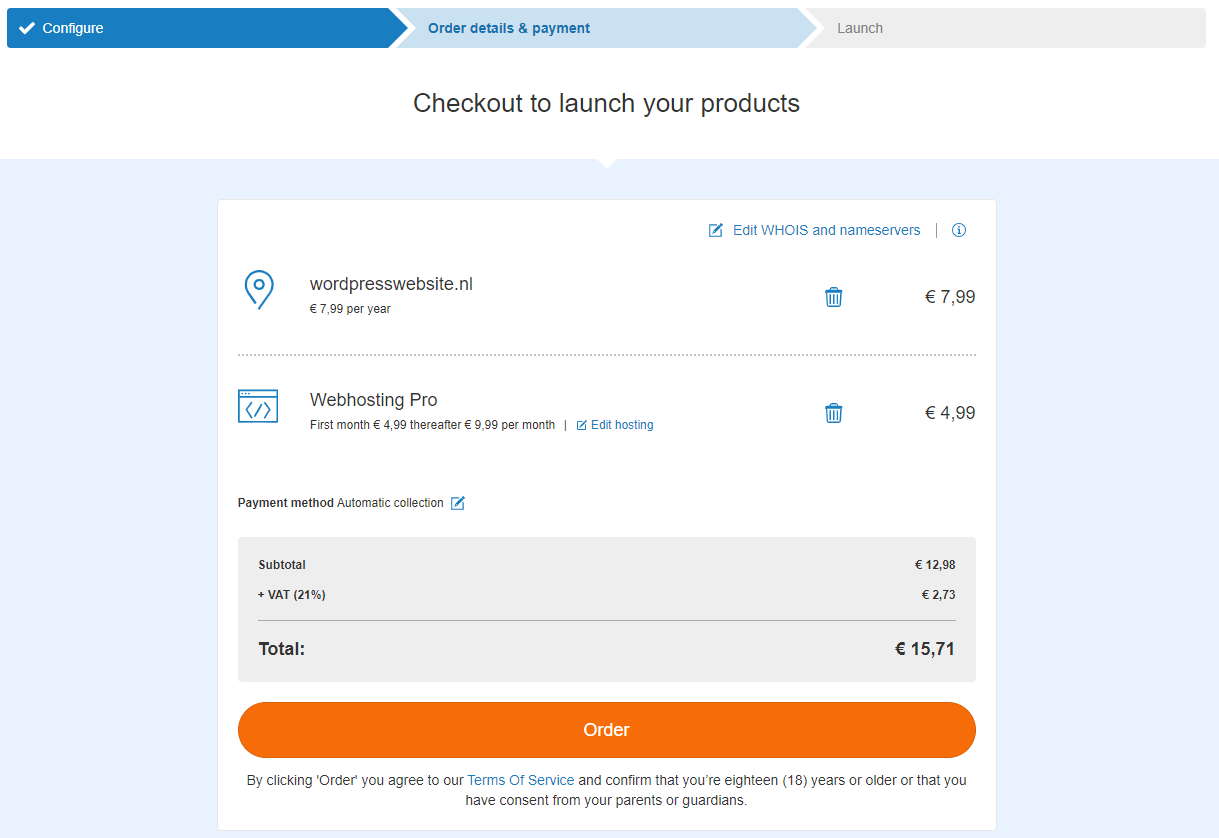
Step 6You will now see an overview of your selected products and payment method. Click the 'Edit' button next to the payment method to choose a different method.
Once you're ready, click 'Order'.
Your order will now be processed. Click on 'To control panel' to return to, you guessed it, your control panel.
Step 7Inside your control panel, head over to the tab 'Domains & Hosting' and select your domain name on the left hand side (don't check the box).
Next to your domain name you will find a Web Hosting icon. If the icon doesn't directly show up, wait a few minutes and refresh the page.
A notice should now also appear, telling you the transfer was requested. However, because you've entered an incorrect authorization code, the transfer could not be completed.
Later in this article we will show you how to complete the transfer. But first it's time to place your website on your Web Hosting at TransIP.
Proceed to 'Placing your website on your Web Hosting package'

Take note: By choosing the method 'I want to transfer my domain name first', the transfer of your domain name may be completed before you are able to place your website on your Web Hosting package.
Furthermore, your domain name will use the default TransIP DNS settings after a succesful domain transfer. This means your domain name will no longer point to your external website after the transfer of your domain name is complete.
Keep this in mind when choosing this method. If you rather want to prepare your website on your Web Hosting package before completing the domain transfer, choose the method 'I want to prepare my website before transferring my domain name' in stead.
Step 1
Visit our homepage and enter your domain name in our domain checker.
Click 'Check'.
Step 2In the next window you will see the price of your domain transfer and the option to request a transfer for the domain name.
Click 'Transfer'.
Step 3Click 'Continue'.
Step 4You will now be asked to enter the authorization code. As you want to transfer your domain name before preparing your website on your Web Hosting package, enter the correct authorization code here. You can request this code at your current registrar.
Take note: The transfer procedure may require additional or different steps, depending on the domain extension. Read the article 'Transferring your domain name to TransIP' for more information on the transfer procedure of your domain name.
Click 'Continue'.
Step 5Once your authorization code is accepted, you will be able to choose a Web Hosting package for your domain name. You need Web Hosting to host your website at TransIP.
If you click 'Choose', you will add the Pro package to your domain name.
If you want add a different size of Web Hosting, click 'Show all hosting options' and select a different Web Hosting package.
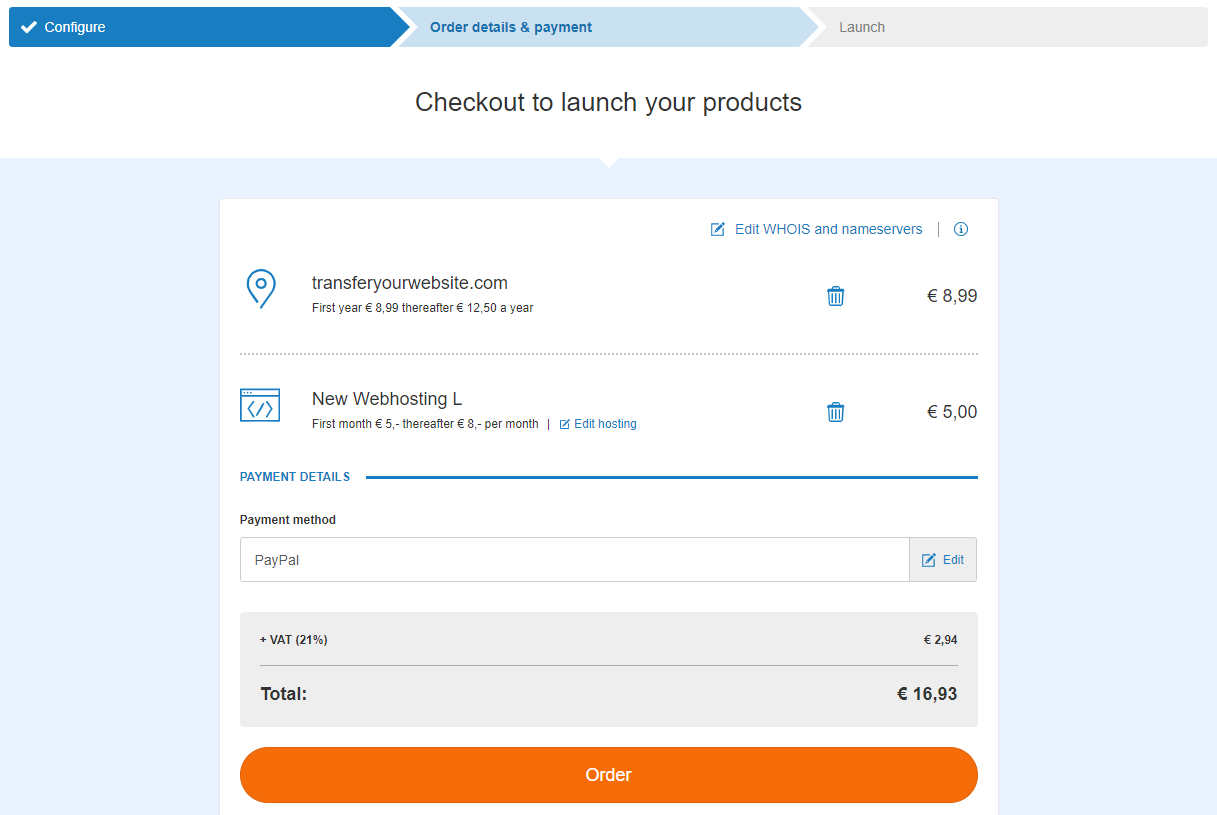
Step 6You will now see an overview of your selected products and payment method. Click the 'Edit' button next to the payment method to choose a different method.
Once you're ready, click 'Order'.
Your order will now be processed. Click on 'To control panel' to return to, you guessed it, your control panel.
Step 7Inside your control panel, head over to the tab 'Domains & Hosting' and select your domain name on the left hand side (don't check the box).
Next to your domain name you will find a Web Hosting icon. If the icon doesn't directly show up, wait a few minutes and refresh the page.
A notice should now also appear, telling you the transfer was requested. Depending on the domain extension, the time before the transfer is completed can differ. See the article 'Transferring your domain name to TransIP' for more information.
If you have any questions regarding the transfer procedure of your domain name, please contact our support team.

The Web Hosting package you ordered during the domain transfer will be activated within minutes after requesting the transfer. This means you can get started right away with placing your website on your Web Hosting.
Proceed to 'Placing your website on your Web Hosting package'.
Placing your website on your Web Hosting package
Once you've ordered and activated a Web Hosting package for your domain name, you can start placing your website on it.
To do so, you require the database(s) and files for your website. Ask your current provider for a back-up or create one yourself if possible.
Make sure you save the database(s) and website files in a folder on your computer. Once you've received the required database(s) and files for your website, you can start placing the website on your Web Hosting package.
We will now tell you how to create a database on your Web Hosting. Afterwards we'll show you how to upload the website files and we'll conclude the article by telling you how to point your domain name to the website on your Web Hosting package.
Create and upload your database
Step 1
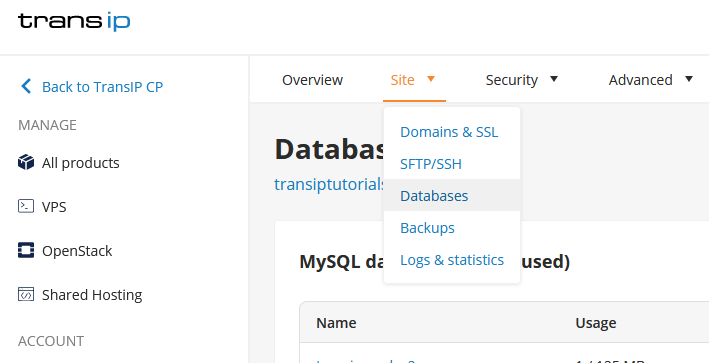
Log in to the control panel and navigate to your domainname via the 'Domain & Hosting' tab. Click 'Manage webhosting' next to 'Webhosting' to manage your website on the webhosting package.

Click the 'Site' tab, followed by 'Databases'.
Step 2
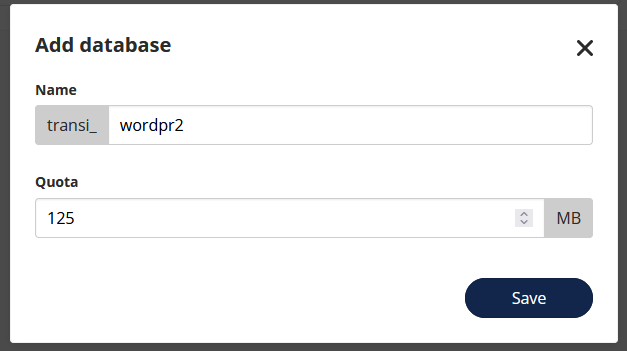
Click '+ Add database'.

Step 3
Choose a name for your database and assign the database size. We recommend using around 100 MB.
Next, click 'Save'.
Step 4
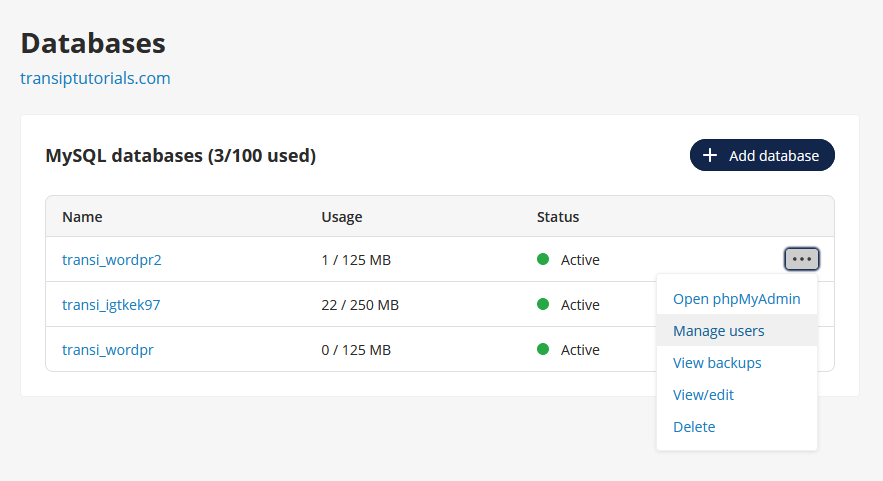
After a few moments your database will become active. To be able to log in, you first need to create a database user. Click the three dots on the right of your database, followed by 'Manage Users'
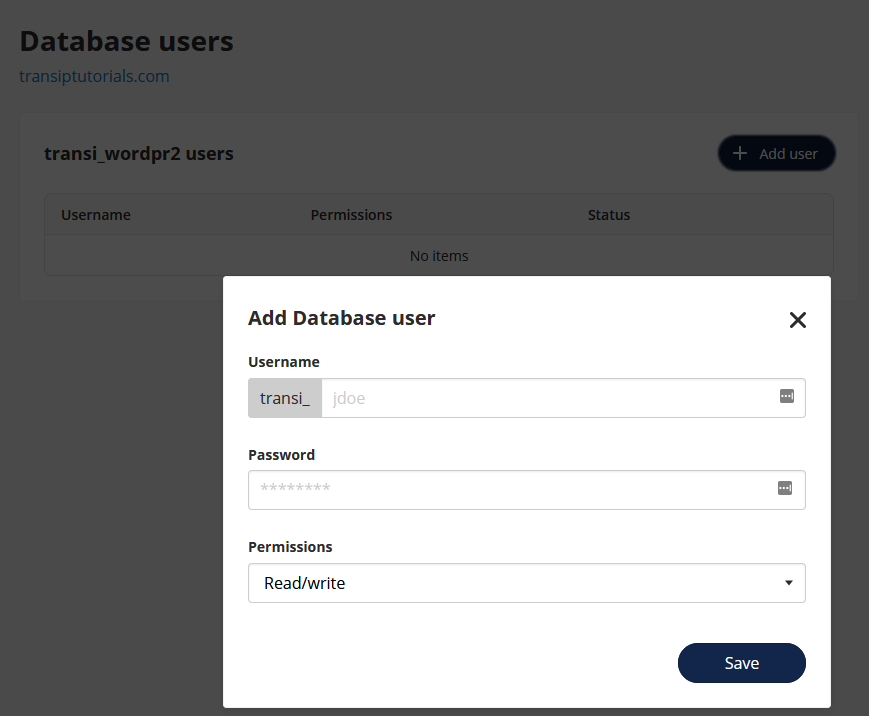
Click '+ Add user' to set a username and password.
Click the three dots on the right side of the database and click 'Open phpMyAdmin' to log in to phpMyAdmin automatically. This is the control panel used for managing your database.

Step 5
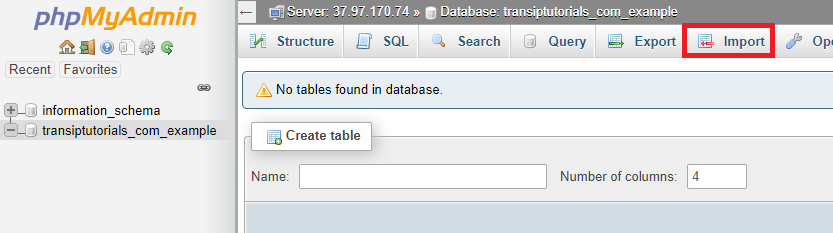
After logging in to phpMyAdmin, click the 'Import' button.
Step 6
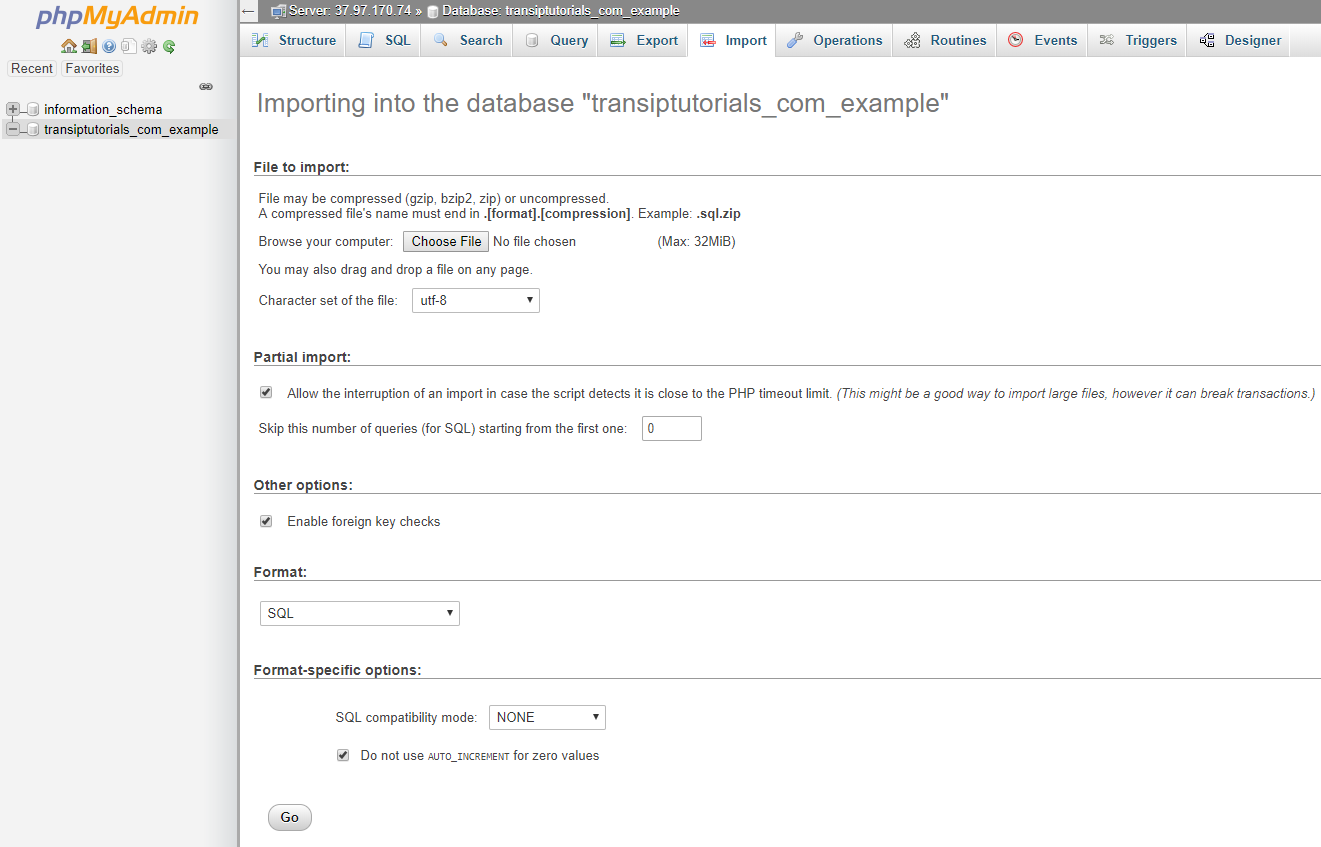
Click 'Choose file' and open the database file you saved earlier. Click 'Go' to start the import.
phpMyAdmin uses an upload limit of 32MB. It could happen that the database file you're trying to upload is too large.
In that case we recommend splitting up the database and upload them seperately. You can use the nifty tool 'SQLDumpSplitter' for this purpose, which can be downloaded via this link.
Your database file is now succesfully uploaded to the newly created database on your Web Hosting package. Now it's time to upload the website files to your Web Hosting. You will need to use SFTP software for this, such as Filezilla or Cyberduck.
Add the log in credentials of your database to your website
Now that you've created and uploaded your database, you need to add the log in credentials of your newly created database to your website files. This allows your website to connect to your database at TransIP.
You will need to use the database log in credentials you received in the previous chapter and add these to a specific file of your website.
Step 1
Visit the folder on your computer where you saved your website files. Search for the file called 'wp-config.php' (WordPress) or config.php (other websites) and open it with simple text editing software. We recommend using 'Notepad++' or the PHP editing software 'PhpStorm'.
Step 2
In this file, search for the name, user and password of your database. These are usually called DB_NAME, DB_USER and DB_PASSWORD. You can see an example of these lines for a wp-config.php file for WordPress in the code block below.
// ** MySQL settings - You can get this info from your web host ** //
/** The name of the database for WordPress */
define('DB_NAME', 'example_website_db');

/** MySQL database username */
define('DB_USER', 'example_website_db');

/** MySQL database password */
define('DB_PASSWORD', 'old_password');
/** MySQL hostname */
define('DB_HOST', 'localhost');
Because you've created a new database, you will need to edit the name, user, password and host of your database here.
You do this by editing the values after DB_NAME, DB_USER,DB_PASSWORD and DB_HOST. Make sure you perform the edits within the single quotes. We will show you which information you need to edit in the next step.
Step 3
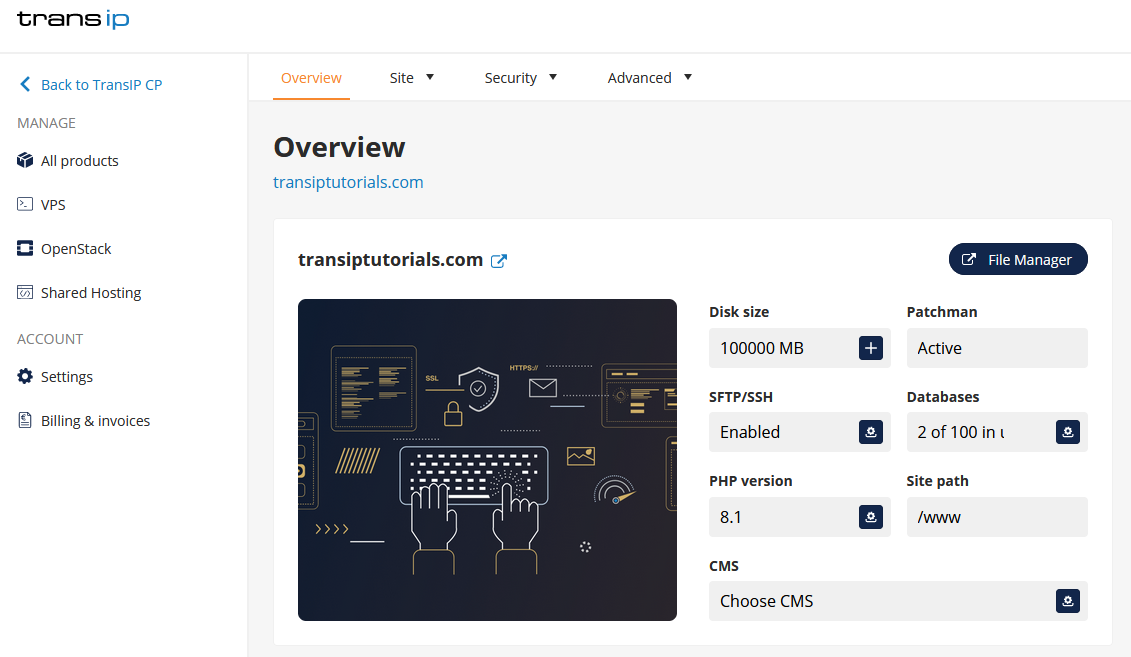
Use the information provided in the email sent to you in Step 4 of 'Create and upload your database'. You can also find the database name and user on the 'Databases' page inside your control panel.
In the image below you can see an example of the database information for transiptutorials.com.
With the (wp-)config.php file open, edit the lines from Step 2 as shown below:
- Next to 'DB_NAME', enter the database name of your new database.
- Next to 'DB_USER', enter the database user of your new database. You can find your database user by clicking the three dots next to the database name and clicking 'Manage users'.
- Next to 'DB_PASSWORD', enter the password of your database.
- Next to 'DB_HOST', enter the host name. The host name can be found by clicking the database name in the database overview.
If you do not know the password of your database, click the three dots next to the databse name and go to 'Manage users'.
Here you can view your usernames or make a new user. By clicking on the username you can change the password.
In our example our database uses the following information:
- Database name: transi_wordpr2
- Database user: transi_user
- Database password: new_password (we recommend using a more secure password)
- Database host: transi-wordpr2.db.transip.me
With this information, your (wp-)config.php file should look like this:
// ** MySQL settings - You can get this info from your web host ** //
/** The name of the database for WordPress */
define('DB_NAME', 'transi_wordpr2');

/** MySQL database username */
define('DB_USER', 'transi_wordpr2');

/** MySQL database password */
define('DB_PASSWORD', 'new_password');
/** MySQL hostname */
define('DB_HOST', 'transi-wordpr2.db.transip.me');
Now save the file in the same folder you've opened it from.
Upload your website files to your Web Hosting package
Now that you've added the log in credentials of your database to your (wp-)config.php file, you can start uploading your website files.
Step 1
Use one of the following tutorials to connect to SFTP software:
Because you will be uploading large amounts of files and folders in this tutorial, we recommend using SFTP software.
Even though it's a great way to upload individual files, SFTP filemanagement is not recommended for large, simultaneous uploads.
Step 2
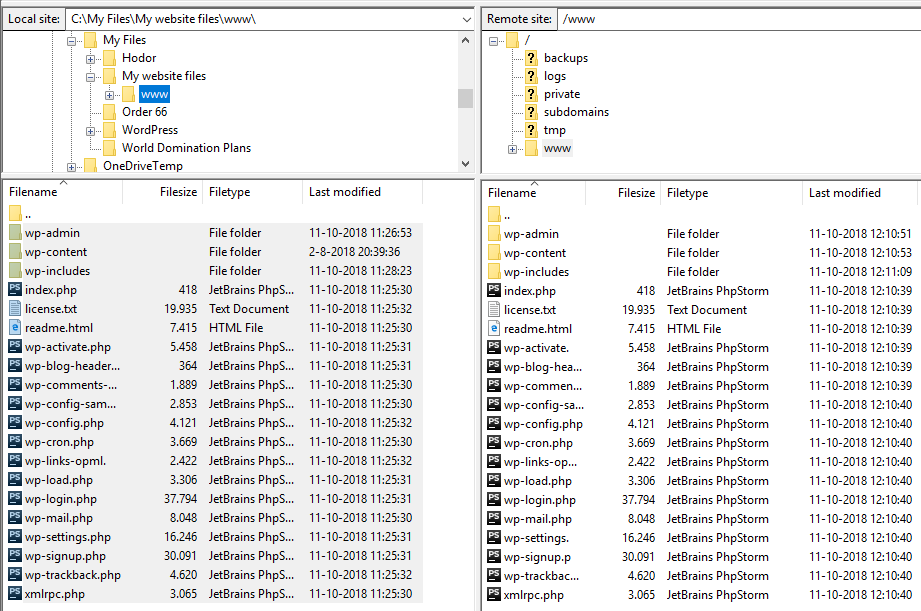
In this chapter we'll show you how to upload files to your Web Hosting package using Filezilla. The steps are similar when using Cyberduck.
Once you're connected, you will see your Web Hosting's web space on the right hand side and your local files on the left hand side.
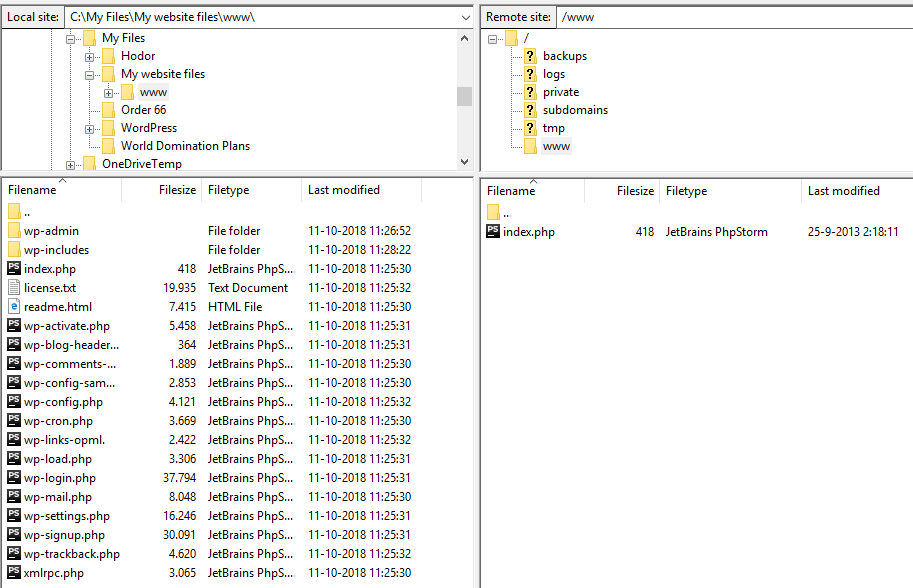
On the left hand side, look for the folder where you saved your website files and drag them to the www folder on the right.
Filezilla will then start uploading your files to the web space of your Web Hosting package. A notification will pop up when the upload is complete.
Check your website
Your website should now be ready on your Web Hosting package and can be viewed using the so called TransURL. The TransURL is a temporary domain name on which you can see what your website looks like, even if the domain name doesn't point to your Web Hosting package yet.
Your TransURL will always start with an unique code based on your domain name, followed by .site.transip.me. For instance, if your domain name yourwebsite.com uses a Web Hosting package, your TransURL could be yourwe.site.transip.me.
You can view the unique code in your control panel by navigating to your webhosting package. Next, click on 'Site' at the top of the screen, followed by 'SFTP/SSH'. You will now see your SFTP and SSH details. Copy the line below 'Host' and replace 'ssh' with 'site' to get your test URL.
Is your website fully functional when viewing the test URL? This means the transfer of your website was successful. However, your domain name itself may not be pointing to your Web Hosting package yet. To make sure it is, head over to 'Point your domain name to your Web Hosting'.
In that case we recommend checking the Error Log in your control panel.
Log in to the control panel and navigate to your domainname via the 'Domain & Hosting' tab. Click 'Manage webhosting' next to 'Webhosting' to manage your website on the webhosting package.
In the overview, click 'File Manager' in the top right.
Next, open the map named 'Logs' and open the file named 'error.log'.
You will most likely see one or more error messages that causes your website to be shown improperly. By troubleshooting these error messages, you should be able to make your website work again. Keep in mind that not all error messages in the Error Log are harmful.
If you are unable to troubleshoot the error messages in your Error Log, please contact our support team. Although they don't have access to your website, they should be able to help you interpret the error messages.
Point your domain name to your Web Hosting
Step 1
Visit your control panel and click on the tab 'Domains & Hosting'. Select your domain name on the left hand side (don't check the box).
Scroll down a bit. Is 'Domain settings' visible? Then you will see the 'TransIP settings' turned to 'On' next to it.
When the TransIP settings are active, your domain name will automatically point to it's Web Hosting at TransIP. If that's the case, you can skip Step 2.

If you see 'Advanced domain settings' in stead, then the 'TransIP Settings' are turned off. In that case, make sure your domain uses the correct DNS records in Step 2.

Step 2
Below 'Advanced domain settings' you will see your domain name's DNS records. To set the correct DNS records for your Web Hosting package, click 'Bulk options' next to 'DNS'.
Now next to 'Copy from' choose 'TransIP default DNS settings' from the drop down menu. In the image below you can see an example of how the DNS records should look like after choosing the TransIP default DNS settings.
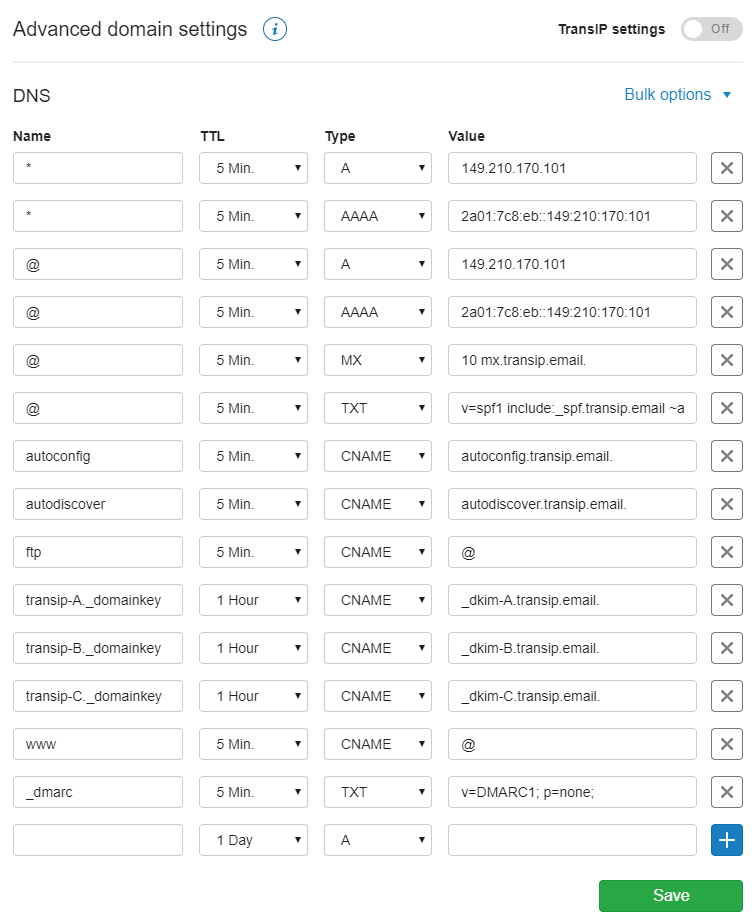
Take note that the IP addresses listed in this image are an example. You may see different IP addresses when performing these steps.
Your domain name now uses your Web Hosting's DNS records, click 'Save' to save your changes. Keep in mind that DNS changes may take up to 24 hours before they are fully processed.
Your website is now actief on your Web Hosting package and your domain name is pointing to it. If your domain name was already registered at TransIP or if you've used the correct authorization code to transfer your domain name to TransIP, you're all done! Your website will now be successfully transfered to TransIP.
If you transfered your domain name with an incorrect authorization code, follow the steps below to complete the transfer.
Transfer your domain name to TransIP
We recommend starting the transfer of your domain name at least 24 hours after saving the DNS records in the previous step. This way you can minimise your website's downtime.
Step 1
Visit your control panel, click the tab 'Domains & Hosting' and select your domain name on the left hand side.
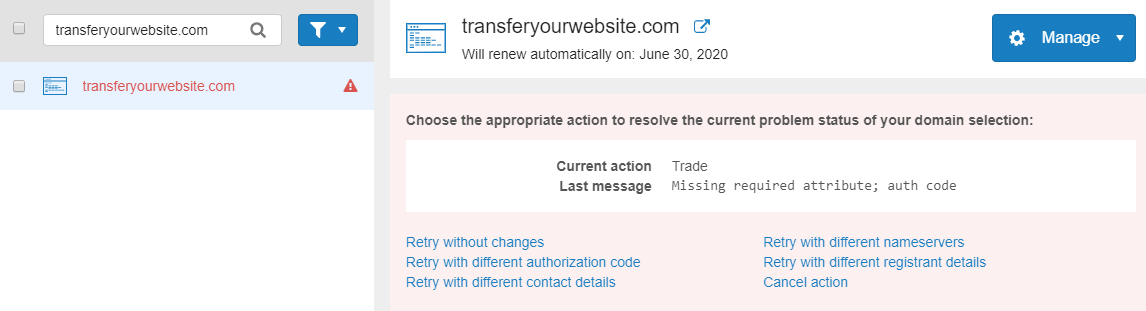
You will see the current status of your domain name. It should say the transfer can't be completed, because an incorrect authorization code was entered.
Step 2
Now click 'Retry with different authorization code' and enter the correct authorization code. You can request the correct code at your current registrar. Once you've entered this code, the transfer of your domain will start.
In most cases, the domain transfer will be completed in a matter of hours. However, some domain extensions require extra steps or take longer than usual. Read the article 'Transferring your domain name to TransIP' for more information on the transfer procedure of your domain name.
Once the transfer of your domain name is completed, both your domain name and website will be active at TransIP!
In this article we explained how to transfer your website to TransIP.
If you have any questions regarding this article, please contact our support team. You can reach them using the 'Contact us' button below or via the 'Contact' button inside your control panel.
If you wish to discuss this article with other users, feel free to leave a comment below.