With TeamSpeak 3, you can make calls to other users from your computer or phone, similar to a conference call.
Multiple users connect from their computers or phones to a TeamSpeak server and can then talk to each other. Usually, a headset with a microphone is used for this.
In this tutorial, we show you how to set up a TeamSpeak Server on a server with Ubuntu, Debian, or CentOS and how to connect to your TeamSpeak Server from your computer. To set up a TeamSpeak Server on a Windows Server, see this tutorial.
- Unless otherwise specified, complete the steps in this article with a user with sudo rights or as root.
- The steps in this article have been tested in CentOS 7, Debian 10, Ubuntu 16.04 and Ubuntu 18.04
Installing TeamSpeak
Step 1
In your browser, go to the TeamSpeak server download page and under 'LINUX', click on the clipboard (copy) icon behind 'SERVER 64-BIT 3.12.0'.
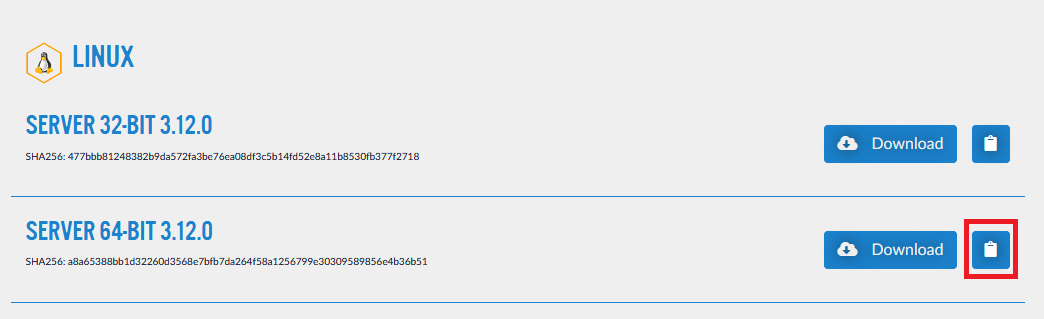
If you copy and paste the code examples in the following steps from this article, first paste this download address into a text editor such as Notepad so that you have it at hand in step 5.
Step 2
Connect to your VPS via the VPS console or SSH.
Step 3
Advanced: instead of a new user, you are welcome to use an existing user and / or place TeamSpeak in a different folder. Please note that in the further steps in this article where you talk about specific users/folders, you should adjust this accordingly if you do so.
Add a user called 'teamspeak':
sudo adduser teamspeakWhen creating this user, additional information such as a password will be requested in Ubuntu and Debian. Adjust the password in CentOS with the command:
passwd teamspeak
Step 4
Switch to the new user and navigate to the corresponding home directory:
su teamspeak
cd /home/teamspeak
Step 5
Type the command below to download the TeamSpeak server. Use the download address you copied in step 1 in this command.
Do you use Putty? then type 'wget' and right-click to paste the link.
wget https://files.teamspeak-services.com/releases/server/3.12.0/teamspeak3-server_linux_amd64-3.12.0.tar.bz2Do you use CentOS? Then install lbzip2 first; you will need this to extract the file in the next step:
sudo yum -y install lbzip2
Step 6
Extract the downloaded file and move it to the home directory of the TeamSpeak user. Then delete the downloaded file and folder created during the extraction:
tar -xf teamspeak3-server_linux_amd64-3.12.0.tar.bz2
cd teamspeak3-server_linux_amd64
cp * -R /home/teamspeak
cd ..
rm -r teamspeak3-server_linux_amd64
rm teamspeak3-server_linux_amd64-3.12.0.tar.bz2
Are you installing a newer version than described in this article? Then replace teamspeak3-server_linux_amd64-3.12.0.tar.bz2 in the first and last command with the name of the file you downloaded in the previous step.
Step 7
Create a file called .ts3server_license_accepted. If this file exists in the folder with your TeamSpeak server, you automatically accept the TeamSpeak license:
touch .ts3server_license_accepted
Step 8
Switch back to the user you were working under before executing the commands in step 4. The TeamSpeak user does not have the sudo rights that you need for the next step:
exit
Step 9
TeamSpeak starts and stops via a shell script. It is more convenient to process it in a system service. For example, your TeamSpeak server can start automatically with your VPS and you can use systemctl commands to manage the service.
Create a file for the TeamSpeak service with the command:
sudo nano /lib/systemd/system/ts3server.serviceGive the opened file the following content:
[Unit]
Description=Teamspeak Service
Wants=network.target

[Service]
WorkingDirectory=/home/teamspeak
User=teamspeak
ExecStart=/home/teamspeak/ts3server_minimal_runscript.sh
ExecStop=/home/teamspeak/ts3server_startscript.sh stop
ExecReload=/home/teamspeak/ts3server_startscript.sh restart
Restart=always
RestartSec=15

[Install]
WantedBy=multi-user.target
Then save the changes and close the file (ctrl + x > y > enter).
Step 10
Start and enable your TeamSpeak server with the commands:
sudo systemctl start ts3server
sudo systemctl enable ts3server
TeamSpeak automatically generates an admin account and an admin token that allows you to get admin rights to your TeamSpeak server. Both are shown in the journalctl log using the commands below. Record the output and store it safely. You will need the token when you first log in to your TeamSpeak server.
sudo journalctl -xe -u ts3server | grep password
sudo journalctl -xe -u ts3server | grep token
The password and token will be removed from journalctl after restarting your VPS.
Step 11
Before you can connect to your TeamSpeak server, you must open the ports in your firewall that TeamSpeak uses:
Ubuntu / Debian:
sudo ufw allow 9987/udp
sudo ufw allow 30033/tcp
sudo ufw allow 10011/tcp
sudo ufw allow 41144/tcp
CentOS:
sudo firewall-cmd --zone=public --permanent --add-port=9987/udp
sudo firewall-cmd --zone=public --permanent --add-port=30033/udp
sudo firewall-cmd --zone=public --permanent --add-port=10011/udp
sudo firewall-cmd --zone=public --permanent --add-port=41144/udp
sudo firewall-cmd --reload
The ports are used by TeamSpeak for the following:
- 9987 / UDP for Voice.
- 30033 / TCP for File Transfer.
- 10011 / TCP for ServerQuery.
- 41144 / TCP for TSDNS (optional)
Do you use the VPS firewall in your TransIP control panel? Do not forget to open the ports above therein as well.
Congratulations! Your TeamSpeak server is now up and running.
Connect to your TeamSpeak server
Step 1
To connect to your TeamSpeak server, you need a TeamSpeak client. Download the client from this page and install it on your computer or mobile.
Step 2
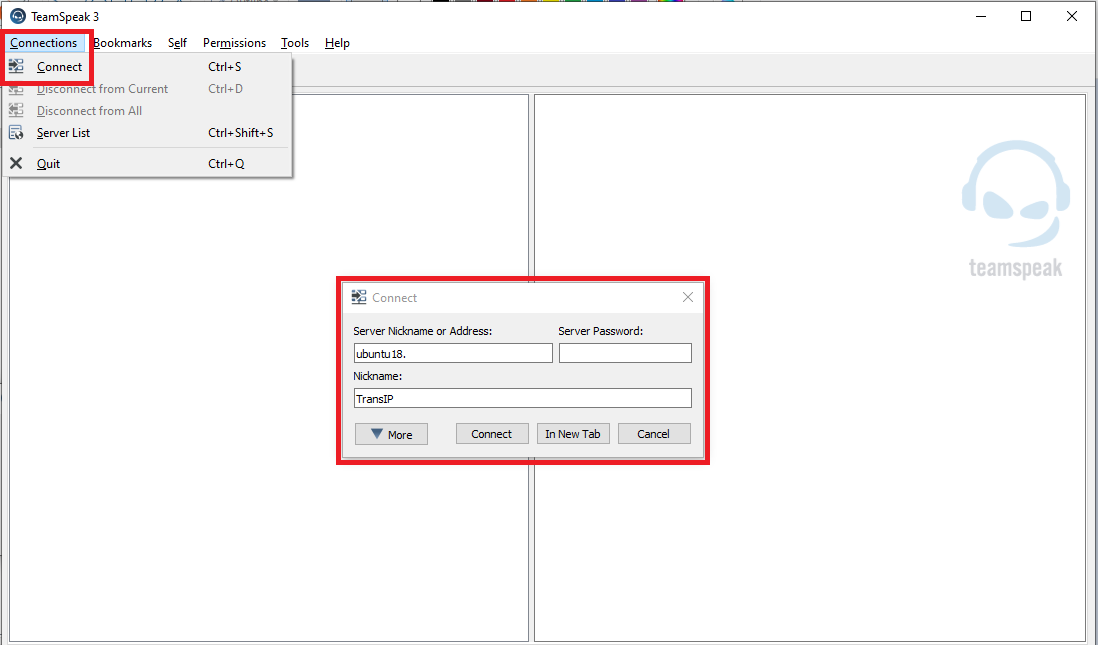
Start TeamSpeak and click on 'Connections'> 'Connect'. You have two options to enter as the address of your server:
- The IP address of your VPS (can be checked through command-line with the command 'ip a').
- A domain name that refers to your VPS. It doesn't matter if this is a subdomain or your main domain name, as long as it points to the IP address of your VPS.
Step 3
The first time you log in to your TeamSpeak server, you will be greeted by the screen below. Enter the administrator token that you noted in step 10 in the previous section. This allows you to claim the administrator rights of your TeamSpeak server.

You can now start using your server right away and invite people to use it. For example, right-click on 'Default Channel'> 'Edit Channel' to change the name of the channel.

Security tips
Your TeamSpeak server will be publicly available after completing this tutorial. We recommend the following options for securing your TeamSpeak server:
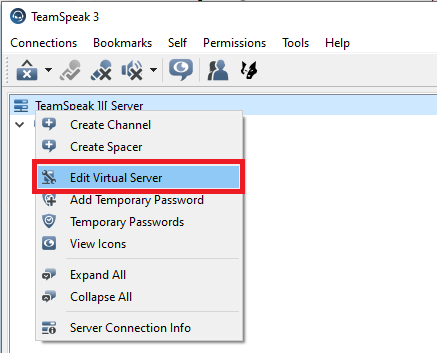
- Set a password: in TeamSpeak, right-click on the name of your server and select 'Edit Virtual Server'.
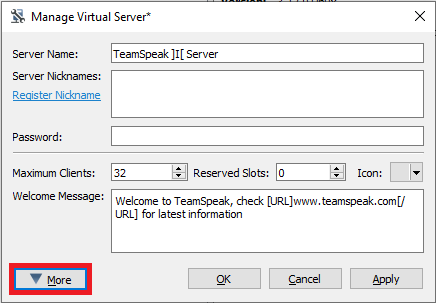
In the screen that appears, you can set a password behind 'Password'. Without this password, users cannot connect to your TeamSpeak server.
After configuring these settings, click 'Apply' and 'OK'. Tip: You can also edit the name and welcome message of your TeamSpeak server on the screen above.
- Apply encryption: in TeamSpeak right click on the name of your server and select 'Edit Virtual Server'> 'More'.
Click the 'Security' tab and set 'Channel voice data encryption' to 'Globally On' to apply encryption to all channels.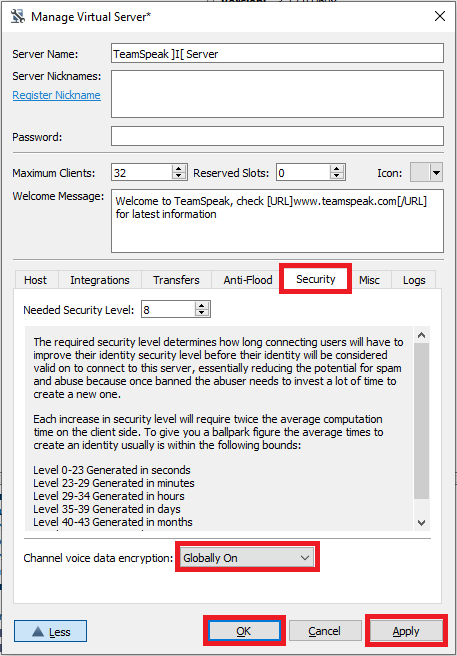
- Encryption increases the CPU utilization of your TeamSpeak server.
- The default value is 'Configure per Channel'. This allows you to apply encryption per channel via the right mouse button on channel > 'Edit Channel'> 'Advanced' > 'Voice Data encrypted'.
- Do you want to go one step further? Then you could also set up a VPN server and ensure that your TeamSpeak server is only accessible via your VPN.
This brings us to the end of this tutorial for installing your TeamSpeak Server in Linux.
Should you have any questions regarding this article, please do not hesitate to contact our support department. You can reach them via the button 'Contact us' at the bottom of this page.
Do you want to discuss this article with other users? Please leave a message under 'Comments'.