On Linux mail servers, Exim and Postfix (MTA) are usually used in combination with Dovecot (MDA). Exim and Postfix take care of sending mail from one mail server to another. Dovecot ensures that mail that is delivered to your VPS actually arrives at the correct mail address.
In this tutorial, we show you how to install Exim and Dovecot on a VPS with Ubuntu or Debian. As part of the installation, you'll be using virtual domains to handle e-mail accounts, rather then system accounts. Additionally, we show how you use SSL (TLS) from Let's Encrypt to secure the connection.
- For the steps in this manual you need:
- A VPS with Ubuntu or Debian. We tested this tutorial in Ubuntu 18.04 and Debian 10.
- Correctly set reverse DNS.
- A domain whose DNS refers to your VPS, for example via mail.example.com. In this guide (under mail), we provide an example of how you refer the DNS of your VPS to your VPS for email.
- Complete the steps in this article with sudo, or as a root user.
- This is fairly complex matter. It is recommended to create a snapshot of your VPS in advance so you have a relapse point in case of any configuration errors.
Installing and configuring Exim
Step 1
Connect to your VPS via SSH or the VPS console in the TransIP control panel.
Step 2
Update your VPS so you have the most recent software at your disposal:
apt -y update && apt -y upgradeWe recommend rebooting your VPS after an update. Many updates are only implemented after a reboot. In addition, any problems in the configuration of your server will then quickly come to light and you can possibly restore a backup.
Step 3
Install Exim with the command:
apt -y install exim4-daemon-heavy
Step 4
The global configuration is done through a user interface. This is started using the command:
dpkg-reconfigure exim4-configThe Exim configuration wizard will appear (the screenshots are from Ubuntu, but the steps are identical in Debian). In this step we'll go over all screens that you'll go through in this process.
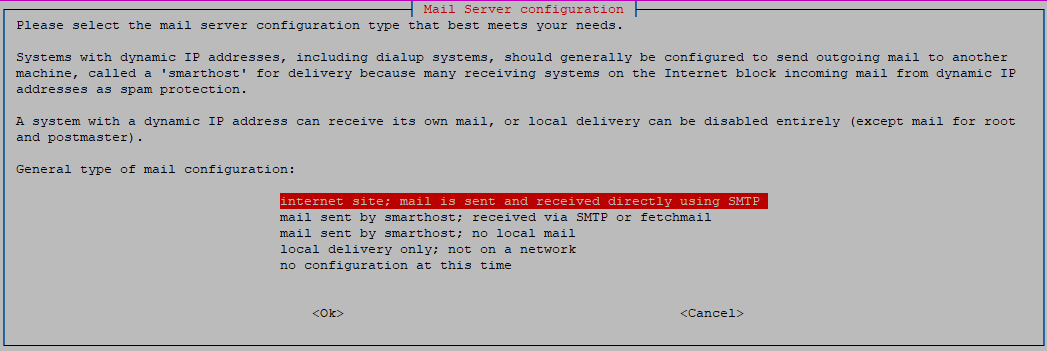
- First you'll choose a mail server configuration type. Select 'Internet site; mail is sent and received directly using SMTP.' Exim handles sending and receiving mail from one mail server to the other. This option is aimed at that. The other options are mainly meant for systems with dynamic IPs (which your VPS doesn't use).
- Next, provide the name of the domain you'd like to be added to mail addresses which do not have a domain name. Let's say that a system account called 'mail' attempts to send a mail, then the domain provided in this step will be used to send it from.
It is important that the provided domain has its DNS correctly configured to allow it to send mail from your VPS.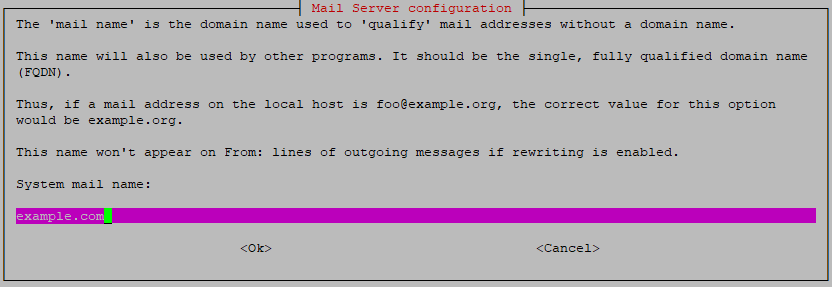
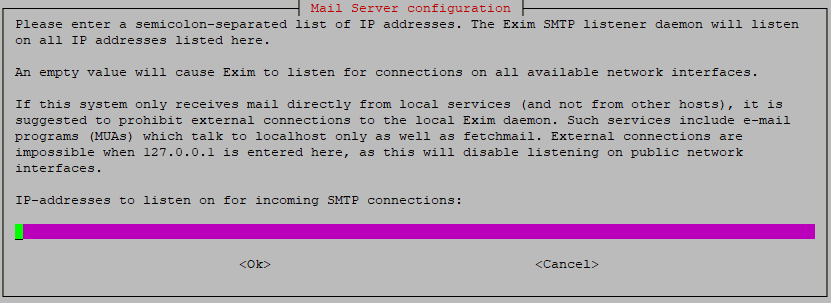
- In the following screen you'll be asked on which IP addresses Exim should listen. By default your localhost is listed, which causes Exim to deny external connections. Either clear this input, or specifically provide your primary IPv4 and IPv6 address from which you'd like to send/receive mail.
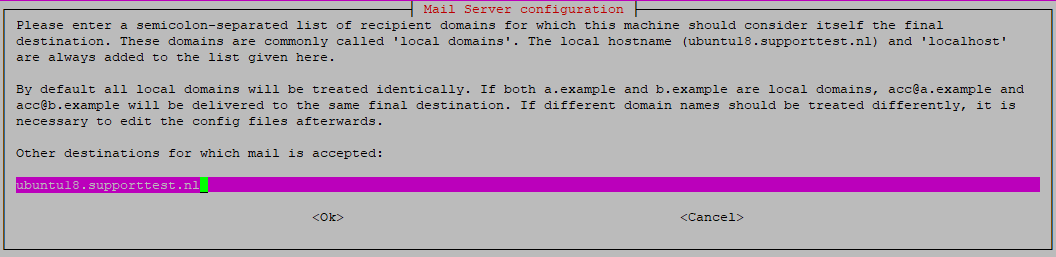
- You can now provide a list of local domains. These are domains to which mail can be delivered on your server. This is however an inconvenient system as mail@example.com and mail@domain.com would btoh be delivered to the same account. In this step, only provide your server's hostname and do not list any other domains. Further in this tutorial we'll use a virtual domain list instead.
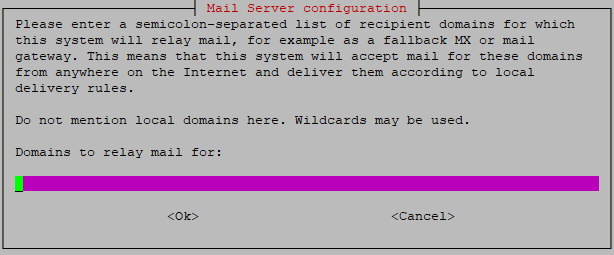
- Next, you're given an option to provide a list of domains which are allowed to relay domains through your server. For this tutorial we assume that your mail server is only used for domains that are allowed to directly send and receive mail to/from your VPS. Leave this option blank and proceed to the next step.
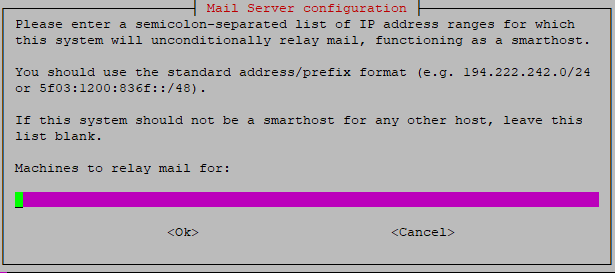
- You'll be asked the same question again, but this time to allow IP's to relay mail through your server. Leave this option blank as well and hit 'enter' to continue.
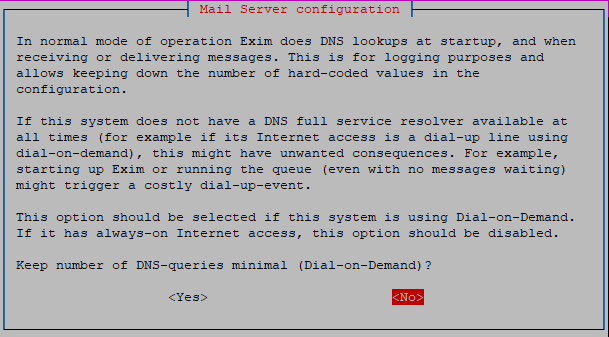
- For DNS lookups Exim can use a Dial-On-Demand system, but this is only relevant for systems with an internet connection which is not always ctive. Your VPS is always online, so select 'no'.
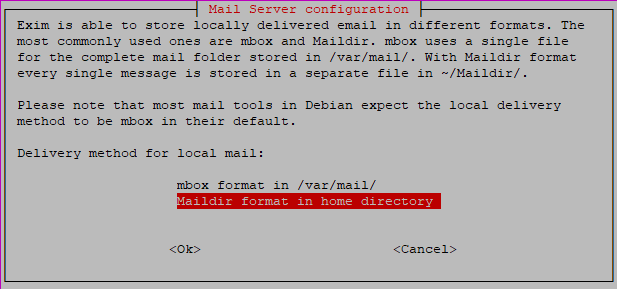
- Exim can make use of the Mbox or Maildir mail format. Maildir splits mail into seperate files and Mbox uses one large file. Maildir is a newer format and can better handle larger mailboxes and clusters of mail servers, making it more scalable. For this reason, we choose 'Maildir format in home directory', which sends mail to users' (system accounts) home direcotires.
- Exim can place the configuration in a single large file, or in about 50 smaller files. For this, and our other Exim tutorials, we assume you'll be using one single file. So select 'no' here.
Many small files are useful for small changes, but also makes finding specific options harder. Because of this, we prefer using a single file.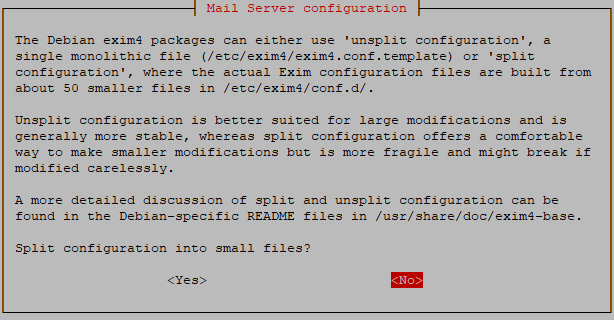
Step 6
You've now returned to the command-line. Exim only uses port 25 by default. You can enable port 465 and 587 with the commands:
echo"dc_local_interfaces='<; [0.0.0.0]:25; [0.0.0.0]:465; [0.0.0.0]:587; [::0]:25; [::0]:465; [::0]:587'">> /etc/exim4/update-exim4.conf.conf
The options which you've chosen in step 5 are added to /etc/exim4/update-exim4.conf.conf. With the commands above, you add an additional line indicating that Exim should also use port 465 and 587 for IPv4 and IPv6 traffic on your VPS.
Step 7
Next, you'll make various adjustments to the Exim configuration. Open /etc/exim4/exim4.conf.template with:
nano /etc/exim4/exim4.conf.templateAdjust/add the following options in the opened file. They are not all under each other, so you have to scroll / search through the file (ctrl + w in nano or /<wordyouarelookingfor> in vim). In bold you'll find an indication of under which section in this file you'll find / add these options.
Main configuration settings
Adjust the domainlist option and add auth_advertise_hosts:
domainlist local_domains = MAIN_LOCAL_DOMAINS : lsearch;/etc/listofdomains
auth_advertise_hosts = ${if eq {$tls_in_cipher}{}{}{*}}virtual_router
Under the 'router configuration' part, scroll to the end of the 850 router (end router/850_exim4-config_lowuid) and the beginning of the 900 router and palce the code below in between.
#####################################################
### virtual router configuration
#####################################################

virtual_router:
  driver = accept
  require_files = +/home/vmail/$local_part@$domain/
  transport = virtual_transport

#####################################################
### end virtual router configuration
#####################################################
The result looks like this:
#####################################################
### end router/850_exim4-config_lowuid
#####################################################
#####################################################
### virtual router configuration
#####################################################

virtual_router:
  driver = accept
  require_files = +/home/vmail/$local_part@$domain/
  transport = virtual_transport

#####################################################
### end virtual router configuration
#####################################################
#####################################################
### router/900_exim4-config_local_user
#####################################################
LOCAL_DELIVERY
The local_user-router uses the value of the LOCAL_DELIVERY variable to determine how mail should be delivered. This is configured to use the mail_spool transport. Search for the line 'LOCAL_DELIVERY=mail_spool' (ctrl + shift + _ + w) and change it to:
LOCAL_DELIVERY=local_deliveryNow search for the mail_spool transport and add the following between the 30_exim4-config_address_reply and 30_exim4-config_mail_spool comments:
#####################################################
### transport that handles delivery to local users
#####################################################

local_delivery:
  debug_print = "T:appendfile for $local_part@domain"
  driver = appendfile
  directory = $home/Maildir
  maildir_format
  delivery_date_add
  envelope_to_add
  return_path_add
  group = mail
  mode = 0660

#####################################################
### end local_delivery transport
#####################################################
The results looks as follows:
#####################################################
### end transport/30_exim4-config_address_reply
#####################################################
#####################################################
### transport that handles delivery to local users
#####################################################

local_delivery
  debug_print = "T:appendfile for $local_part@domain"
  driver = appendfile
  directory = $home/Maildir
  maildir_format
  delivery_date_add
  envelope_to_add
  return_path_add
  group = mail
  mode = 0660

#####################################################
### end local_delivery transport
#####################################################
#####################################################
### transport/30_exim4-config_mail_spool
#####################################################
virtual_transport
By adding the virtual_transport, you determine what happens to the mail that is designated for delivery to your server by the virtual_router.
Place the code below directly above the local_delivery component:
virtual_transport:
  driver = appendfile
  directory = /home/vmail/$local_part@$domain/
  maildir_format
  delivery_date_add
  envelope_to_add
  return_path_add
  user = vmail
  group = vmail
  mode = 0660
  mode_fail_narrower = false
Dovecot authenticator
Scroll to the end of the file (shortcut in nano: ctrl + shift + _> ctrl + v, or in vi(m): shift + G) and add the following:
#Dovecot Authenticator

dovecot_login:
  driver = dovecot
  public_name = LOGIN
  server_socket = /var/run/dovecot/auth-client
  server_set_id = $auth1

dovecot_plain:
  driver = dovecot
  public_name = PLAIN
  server_socket = /var/run/dovecot/auth-client
  server_set_id = $auth1
There are some additional options in the Exim configuration that you may want to adjust even further depending on your use case. For a complete overview, we recommend that you consult Exim's own documentation. You will find most options in the following places:
- General transport options: contains options to, for example, add extra header information to emails.
- Appendfile transport options: contains options for transports such as the local_delivery (see above).
Finally, save the changes and close the configuration before proceeding (ctrl + x> y> enter).
Create the /etc/listofdomains file with the command:
nano /etc/listofdomains
Step 10
In the file, you add a list of all domains (+ your hostname) that are allowed to receive mail on your VPS. If a domain is not in this file, Exim cannot process mail for it. Place each domain on a separate line, for example:
server.example.com
example.com
voorbeeld.nl
Then, save the changes and close the file (ctrl + x> y> enter).
This completes the installation and configuration of Exim. However, do not start Exim until you are also done with Dovecot and the SSL configuration.
IPv6
If you make use of IPv6, Exim will first try your IPv6 address. Exim has a tedency to use a different IPv6 address then your primary one. If you notice this is happening, you can check your IPv6 addresses with the command:
ip aOr send an email to yourself and check which IPv6 address was used to send it. Make sure you also include this IPv6 address in your SPF record and reverse DNS settings.
Do you prefer disabling IPv6 for Exim? Then add the code below under the 'Runtime configuration file for Exim' part of /etc/exim4/exim4.conf.template
disable_ipv6 = trueInstalling and configuring Dovecot
Step 1
Install Dovecot with the command:
apt -y install dovecot-core dovecot-imapd dovecot-pop3d
Step 2
The Dovecot configuration is spread over several specific files. First, you adjust the SSL configuration in the file 10-ssl.conf:
nano /etc/dovecot/conf.d/10-ssl.conf
Step 3
Add the following content to the file:
ssl_cert = </etc/letsencrypt/live/mail.yourdomain.com/fullchain.pem
ssl_key = </etc/letsencrypt/live/mail.yourdomain.com/privkey.pem
Then, save your changes and close the file (ctrl + x> y> enter).
Step 4
Next, you open the mail configuration. Here you indicate where the mailbox is located on your server.
nano /etc/dovecot/conf.d/10-mail.conf
Step 5
In the file, change #mail_location= enabled to:
mail_location = maildir:/home/vmail/%uThen, save your changes and close the file (ctrl + x> y> enter).
Step 6
You have set up a Dovecot authenticator in step 8 of the Exim configuration. You give Exim permission to use Dovecot's authentication system in 10-master.conf:
nano /etc/dovecot/conf.d/10-master.conf
Step 7
Add the content below at the bottom of the opened file.
service auth {
   unix_listener auth-client {
      mode = 0660
      user = exim
   }
}
Then, save your changes and close the file (ctrl + x> y> enter).
Step 8
Open the file which provides the authentication:
nano /etc/dovecot/conf.d/10-auth.conf
Step 9
Change the existing configuration so auth_mechanisms looks like this:
auth_mechanisms = plain login
Then, save your changes and close the file (ctrl + x> y> enter).
Step 10
Finally, open the /etc/dovecot/conf.d/auth-system.conf.ext file. Here, you adjust the authentication method for Dovecot, so you can actually work with virtual domains.
nano /etc/dovecot/conf.d/auth-system.conf.ext
Step 11
Place comments for the existing passdb and userdb parts and add a new one for both as in the example below:
#passdb {
#  driver = pam
  # [session=yes] [setcred=yes] [failure_show_msg=yes] [max_requests=<n>]
  # [cache_key=<key>] [<service name>]
  #args = dovecot
#}

passdb {
  driver = passwd-file
  args = /etc/dovecot/imap.passwd
}

#userdb {
  # <doc/wiki/AuthDatabase.Passwd.txt>
#  driver = passwd
  # [blocking=no]
  #args =
#
  # Override fields from passwd
  #override_fields = home=/home/virtual/%u
#}

userdb {
  driver = static
  args = uid=vmail gid=vmail home=/home/vmail/%u
}Then, save the changes and close the file (ctrl + x> y> enter).
Firewall and related settings
For the correct operation of your mail and the generation of Let's Encrypt certificates, it is necessary to open a few ports. You do this with the commands:
firewall-cmd --zone=public --permanent --add-port=80/tcp
firewall-cmd --zone=public --permanent --add-port=443/tcpfirewall-cmd --zone=public --permanent --add-port=25/tcp
firewall-cmd --zone=public --permanent --add-port=465/tcp
firewall-cmd --zone=public --permanent --add-port=587/tcp
firewall-cmd --zone=public --permanent --add-port=993/tcp
firewall-cmd --zone=public --permanent --add-port=995/tcp
firewall-cmd --reload
- Ports 80 and 443 are required for the Let's Encrypt validation (the acme-challenge).
- Ports 993 and 995 are respectively the IMAP and POP3 ports that Dovecot uses for TLS connections.
- Ports 25, 465 and 587 are the ports that Exim uses to send and receive email.
Optional tip: do you want to be able to close port 25 completely? Then, an adjustment to /etc/services is needed and to the variable daemon_smtp_ports in /etc/exim/exim.conf
Opening outgoing mail ports
For new VPSs, the mail ports are closed in the TransIP control panel for security reasons. In this article, we show you how to open them.
VPS firewall
Do you use the VPS firewall in the TransIP control panel? Then, open the ports 80, 443, 993, 995 and 587 therein.
Fail2ban
Do you use Fail2Ban? The logpath for the Exim-jail is /var/log/exim/main.log
Adding an SSL certificate
The basic configuration of Exim and Dovecot has been completed, but in the earlier steps, we have adjusted the configuration to require SSL (TLS). In this section, you create an SSL certificate and automate the renewal thereof.
Step 1
As SSL (TLS) certificate, we use a Let's Encrypt certificate. If you have not yet installed Let's Encrypt, first install it with the command:
apt -y install certbot
Step 2
In this step, you generate a standalone certificate with the command below. Replace mail.example.com with the subdomain that you will use to send and receive mail to/from (the same subdomain you used while configuring Exim).
You will be asked for an email address and permission for the terms and conditions, and for sharing your email address with the Electronic Frontier Foundation (optional).
certbot certonly --standalone -d mail.example.com
Do you host a webserver on your VPS? The command above will then tell you that port 80 is in use. In this case, use the command bewlo (replace /var/www/html/ by /usr/share/nginx/html if you use Nginx).
certbot certonly --webroot -w /var/www/html/ -d mail.example.com
Step 3
Your Let's Encrypt certificate and keyfile are stored in /etc/letsencrypt/live/<hostname>/ (the exact location is in the output of the command in step 2).
The advantage of Let's Encrypt is that you can automate certificate renewal. You do this with a cron job which you create with:
crontab -e
Step 4
If you've never opened Crontab before, it'll ask you which editor you'd like to use. Depending on your experience either select nano or vi(m). Assuming you selected vi(m), crontab opens in command mode and you switch to insert mode with the 'i' key. Then, add the content below.
SHELL=/bin/bash
HOME=/
@monthly certbot -q renew >> /var/log/le.log
- The cron job is performed every month at 0:00.
- -q ensures that no output is generated, except for errors.
- renew renews all Let's Encrypt certificates that expire within 30 days. Let's Encrypt certificates are valid for 90 days, so a new certificate is generated every two months.
- >> /var/log/le.log sends the output to the le.log file. You create this with the command: touch /var/log/le.log
By successively typing esc>:wq! the crontab closes and your changes are saved. If all goes well, you will see the following confirmation:
Step 5
Exim and Dovecot have no rights to the folders in which the certificates are stored and to the privkey.pem file. Change the permissions so both can use it:
chmod 755 /etc/letsencrypt/archive chmod 755 /etc/letsencrypt/archive/mail.example.com chmod 644 /etc/letsencrypt/archive/mail.example.com/privkey.pem chmod 755/etc/letsencrypt/live chmod 755 /etc/letsencrypt/live/mail.example.com
Step 6
In Ubuntu & Debian, Exim uses /etc/exim4/exim.crt and /etc/exim4/exim.key as tls certificate and private key. These don't exist yet and the required files have been generated in the previous steps using Let's Encrypt. To use these file locations, you can use a symbolic link where exim.key and exim.crt points to your certificates:
ln -s /etc/letsencrypt/archive/mail.jedomein.nl/fullchain.pem /etc/exim4/exim.crt
ln -s /etc/letsencrypt/archive/mail.jedomein.nl/privkey.pem /etc/exim4/exim.key
Creating email addresses
The final preparation
Before you can create email addresses, some preparation is still required: creating the Vmail user and group. All mail is stored in this user's home directory, for example, /home/vmail/mail@example.com/.
In addition, you create the file in which the authentication data of users end up and you set a location to which all mail sent to the root user on your VPS can go.
Step 1
Earlier in this manual, we have set that all mail is stored in the /home/vmail/<mailaddress> directories. To be able to use this, first create the vmail user and group:
useradd vmail
usermod -a -G vmail vmail
The home directory for Vmail is created automatically.
Step 2
Then, create the file in which the names of the email addresses and associated log-in data are stored.
touch /etc/dovecot/imap.passwd
Step 3
Open the /etc/aliases file. This sets where mail to specific system users is sent to.
nano /etc/aliases
Step 4
By default the user which you've created in step 1 will be listed as the user which will receive mail sent for the root user. You can change this in the bottom as in the example below.
root: mail@example.com
Then, save the changes and close the file (ctrl + x> y> enter).
Step 5
Now that the (basic) options are configured and the vmail user exists, generate the Exim master configuration file with the command:
update-exim4.conf- By saying that you're using a single configuration file in step 5 of the installation and configuration of Exim, /etc/exim4/exim4.conf.template has become the single configuration file used by Exim.
- The command update-exim4.conf processes changes made in /etc/exim4/exim4.conf.template. Use this command everytime you update this file.
- Alternatively, you can create a configuration file yourself. For this, use /etc/exim4/exim4.conf (Exim will use this file if it exists). This file does not exist by default and you can use the exim4.conf.template file as a template to work from, for example by copying it with:
cp /etc/exim4/exim4.conf.template /etc/exim4/exim4.conf
Step 6
Finally, enable Exim and Dovecot and set both to start automatically with a reboot of your VPS:
systemctl enable exim
systemctl enable dovecot
systemctl start exim
systemctl start dovecot
Creating email addresses
To make things easy for yourself, it is useful to create a shell script that you can use to create new addresses. This saves you the trouble of having to type all associated code every time you create an email address. You create such a script as follows:
Step 1
Open / create the file /etc/dovecot/create_mail.sh:
nano /etc/dovecot/create_mail.shReplace the location / name of the file as you wish, but the .sh extension must be retained.
Step 2
Give the file the content below.
#!/bin/bash
read -p " Enter user's mailaddress: " mailaddress
read -sp " Enter password: " passwd

sudo mkdir /home/vmail/$mailaddress
sudo chown vmail:vmail /home/vmail/$mailaddress
sudo chmod go-rwx /home/vmail/$mailaddress
sudo echo $mailaddress:`dovecot pw -s SHA256-CRYPT -p $passwd` >> /etc/dovecot/imap.passwd
Then, save the changes and close the file (ctrl + x> y> enter).
- There are more options than in the example above. For example, you could include an additional prompt to confirm the password: read -sp "Confirm password:" passwd1. You can then create an if then else construction where $passwd and $passwd1 are compared. If they do not match, you let the user specify it again for example.
- You could also create a second script to change passwords (e.g. with an SED command). Please note that you also use dovecot pw for this.
Step 3
Give yourself permission to execute the script with:
chmod 700 /etc/dovecot/create_mail.shUsing this command, only the owner has permission to execute the script. If you'd like to give more users permission to run the script, you could for example add a seperate group and use chmod to give the group execute rights (chmod 750) and use chown to change ownership of the file. Using usermod you can add users to the group.
Step 4
Run the script to create a mail address:
sudo /etc/dovecot/create_mail.sh
Can't create a directory? Use ls -lah /home/ to verify that permissions and ownership for /home/vmail/ are set as follows:
drwxr-xr-x vmail vmailSetting up email in mail software and apps
For this tutorial, we used a domain where the MX record has the value 10 mail and the subdomain mail refers to the VPS. We assume that you maintain the same structure, if not, adjust the following to your own scenario.
Use the following information to set up your email address in your email software:
- Email address: the desired email address with which you want to email. It must exist in /etc/dovecot/imap.passwd
- Username: the same email address as above
- Password: the corresponding (non-encrypted) password
- Account name: the same email address again
- Send message using the name: The name that you want to show for your emails.
- Incoming server:example.com (the subdomain that refers to your VPS)
- Account type: imap or pop3. The differences are explained here.
- Incoming port: 993 (IMAP) or 995 (POP3)
- Require SSL: yes, or SSL / TLS
- Outgoing (smtp) server:example.com (the subdomain that refers to your VPS)
- Outgoing port: 465 or 587
- Require SSL: yes, or SSL / TLS
- Outgoing server requires authentication: yes
- Use the same username and password for sending mail: yes
This brings us to the end of this article. We have discussed the basics of setting up a mail server with Exim and Dovecot with TLS security via Let's Encrypt in Ubuntu & Debian.For additional features such as antivirus, antispam and DKIM, see our overview of our mail documentation for VPSs.
Should you have any questions left regarding this article, do not hesitate to contact our support department. You can reach them via the ‘ContactUs’ button at the bottom of this page.
If you want to discuss this article with other users, please leave a message under 'Comments'.