When using a VPS to host your website it is not possible to “automatically” point your domain name to your VPS unlike with a webhosting subscription (unless your VPS is set as default DNS). In order to link your domain name to your VPS you can follow these steps:
It may take up to 24 hours before DNS changes are visible. This is the result of the global processing time. Unfortunately we have no influence on this.
Finding your VPS' IP address
Step 1
Log in to your control panel, go to the 'BladeVPS' tab and click the name of your VPS on the left.
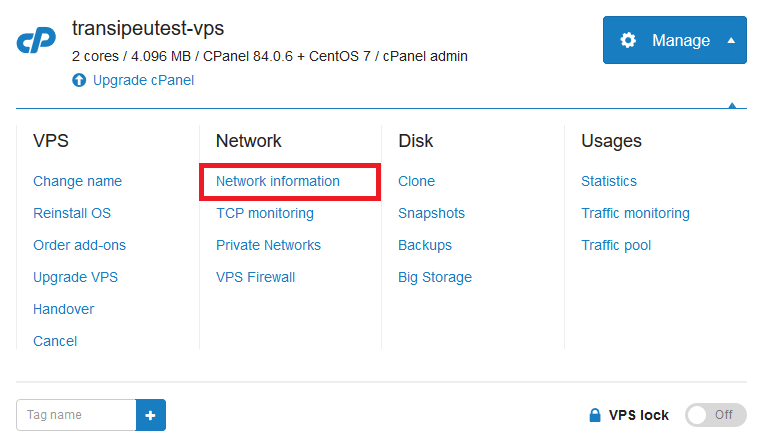
Step 2
Click on 'Manage' followed by 'Network information'.
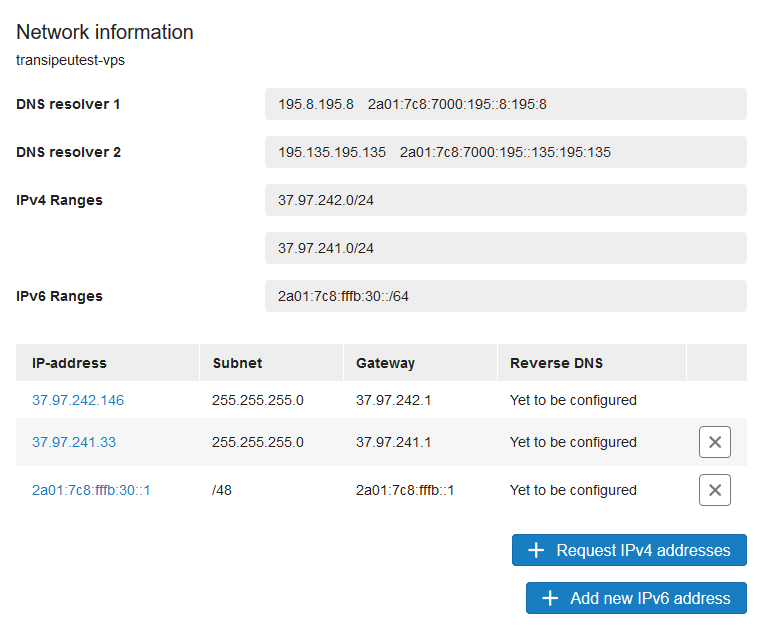
Step 3
You're now shown an overview of your VPS' IP addresses. If you have more than one IPv4 or IPv6 address, the top listed one will be the primary address for your VPS.
Adding the IP address to your DNS settings
Step 1
Log in to your control panel, go to the 'Domain & Hosting' tab and click the name of your domain on the left.
Step 2
On the right, scroll down to 'Advanced domain management' at the bottom of the DNS settings. If this option is still enabled for 'TransIP Settings', switch it off.

Set the DNS settings as follows to correctly refer to your VPS:
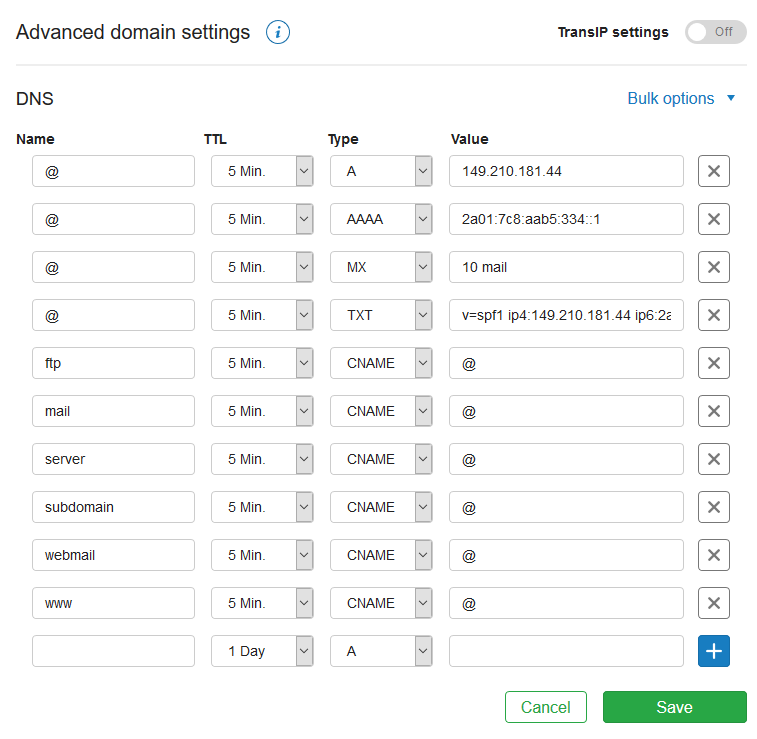
In this example, the DNS is set for the following use cases. Other scenarios are conceivable, but these are the most common:
General
As an absolute minimum, you configure your domain for the IPv4 and (optional) IPv6 address(es) of your VPS:
- Refer the root of the domain (with the name @) to the IPv4 address of your VPS via an A record.
- Refer the root of the domain (with the name @) to the IPv6 address of your VPS via an AAAA record.
Web hosting
- You refer the subdomain www (e.g. www.example.com) via a CNAME record with the @ value to the IPv4 and IPv6 addresses in the root DNS settings of your domain.
Hostname
- Do you also use this domain for the hostname of your VPS? Then, we recommend the server.example.com syntax. To do this, create a CNAME record with the name 'server' and value '@'. With the @ value, you refer to the IPv4 and IPv6 addresses in the root DNS settings of your domain.
Do you host mail on your VPS? Then, add at least the following records:
- An MX record named '@' and the value '10 mail' (without brackets). With this, you refer incoming mail to the subdomain 'mail' (i.e. mail.example.com).
- Create a mail subdomain by creating a CNAME record named 'mail'. Give the record the value @. With this, the 'mail' subdomain refers to the set A and AAAA records of the root (@) of your domain, or your VPS. With this construction, you would then use an email program (e.g. Outlook) as the server for incoming and outgoing mail, for example, the subdomain mail.example.com.
- An SPF record with the name @ and, for example, the value v=spf1 a:yourdomain.com ~all. This authorizes all A and AAAA records that are set for yourdomain.com (and not the subdomains of yourdomain.com).
Extra subdomains
Do you want to add extra subdomains, for example for webmail and refer to your VPS? Then, create a new record with the name of the 'CNAME' subdomain (e.g. webmail) and the value 'A'.
Please note that in order to be able to send and receive mail through a subdomain, you'll need to add an MX and SPF record for it as well.
This concludes our tutorial on configuring your domain for usage with your VPS. Should you have any questions left regarding this article, do not hesitate to contact our support department. You can reach them via the ‘ContactUs’ button at the bottom of this page.
If you want to discuss this article with other users, please leave a message under 'Comments'.