


The name Volume Group says it all: you can bundle multiple ‘Volumes’ under one group. This way, you can manage the volumes more easily in a single overview.
A Volume is a storage block (like a hard drive or an SSD) that you can attach to your server. You can store data on it or install your operating system.
In this article, we will explain how to create the following in AMS2:
- Create a Volume Group
- Add volumes to a Volume Group
- Remove volumes from a Volume Group
- Delete a Volume Group
- Clone a Volume Group
- Create snapshots of a Volume Group
- Create a Volume Group based on snapshots
Create a Volume Group
Step 1
Log in to the OpenStack Dashboard ‘Horizon’.
Step 2
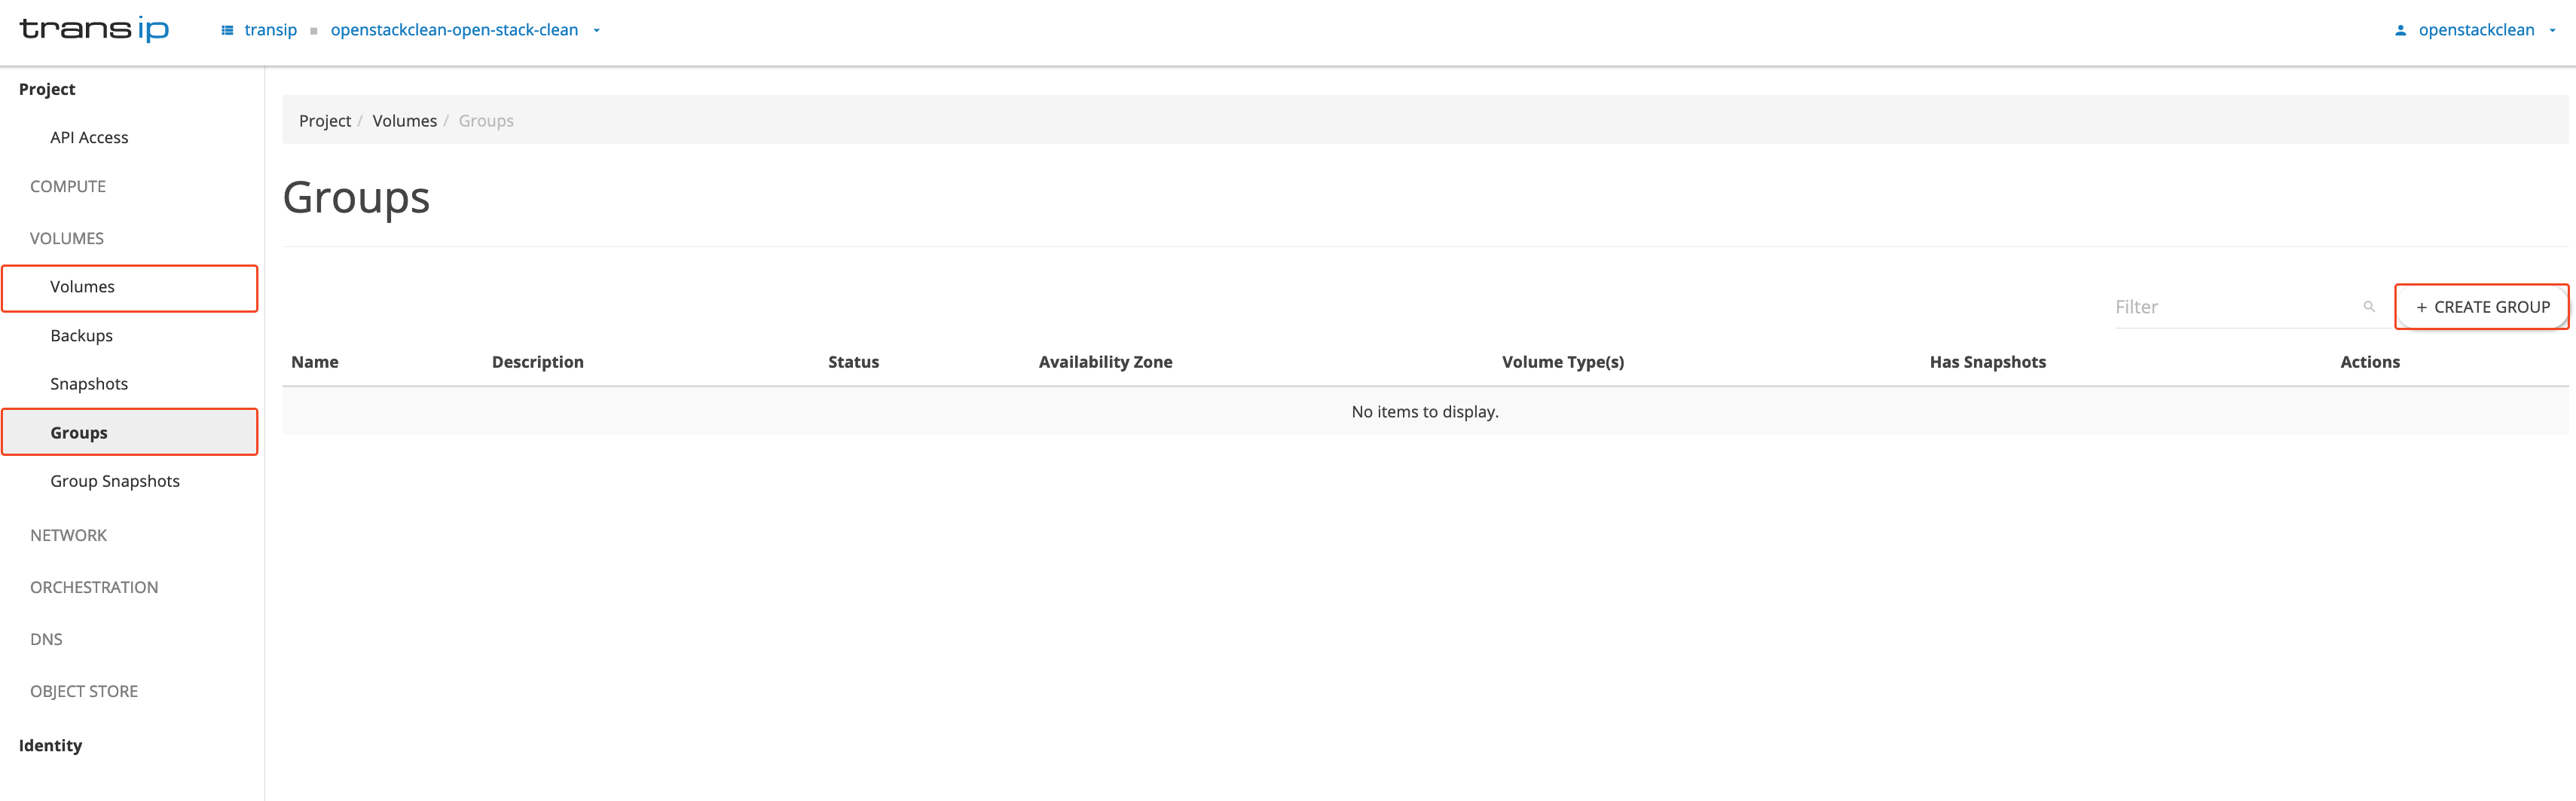
In the overview, navigate to 'Volumes' and choose 'Groups' in the submenu. On the right side, click ‘Create Group' to create a ‘Volume Group’.
Step 3
The following window will open. Fill in the various fields as shown in the image below and click ‘Create Group’.
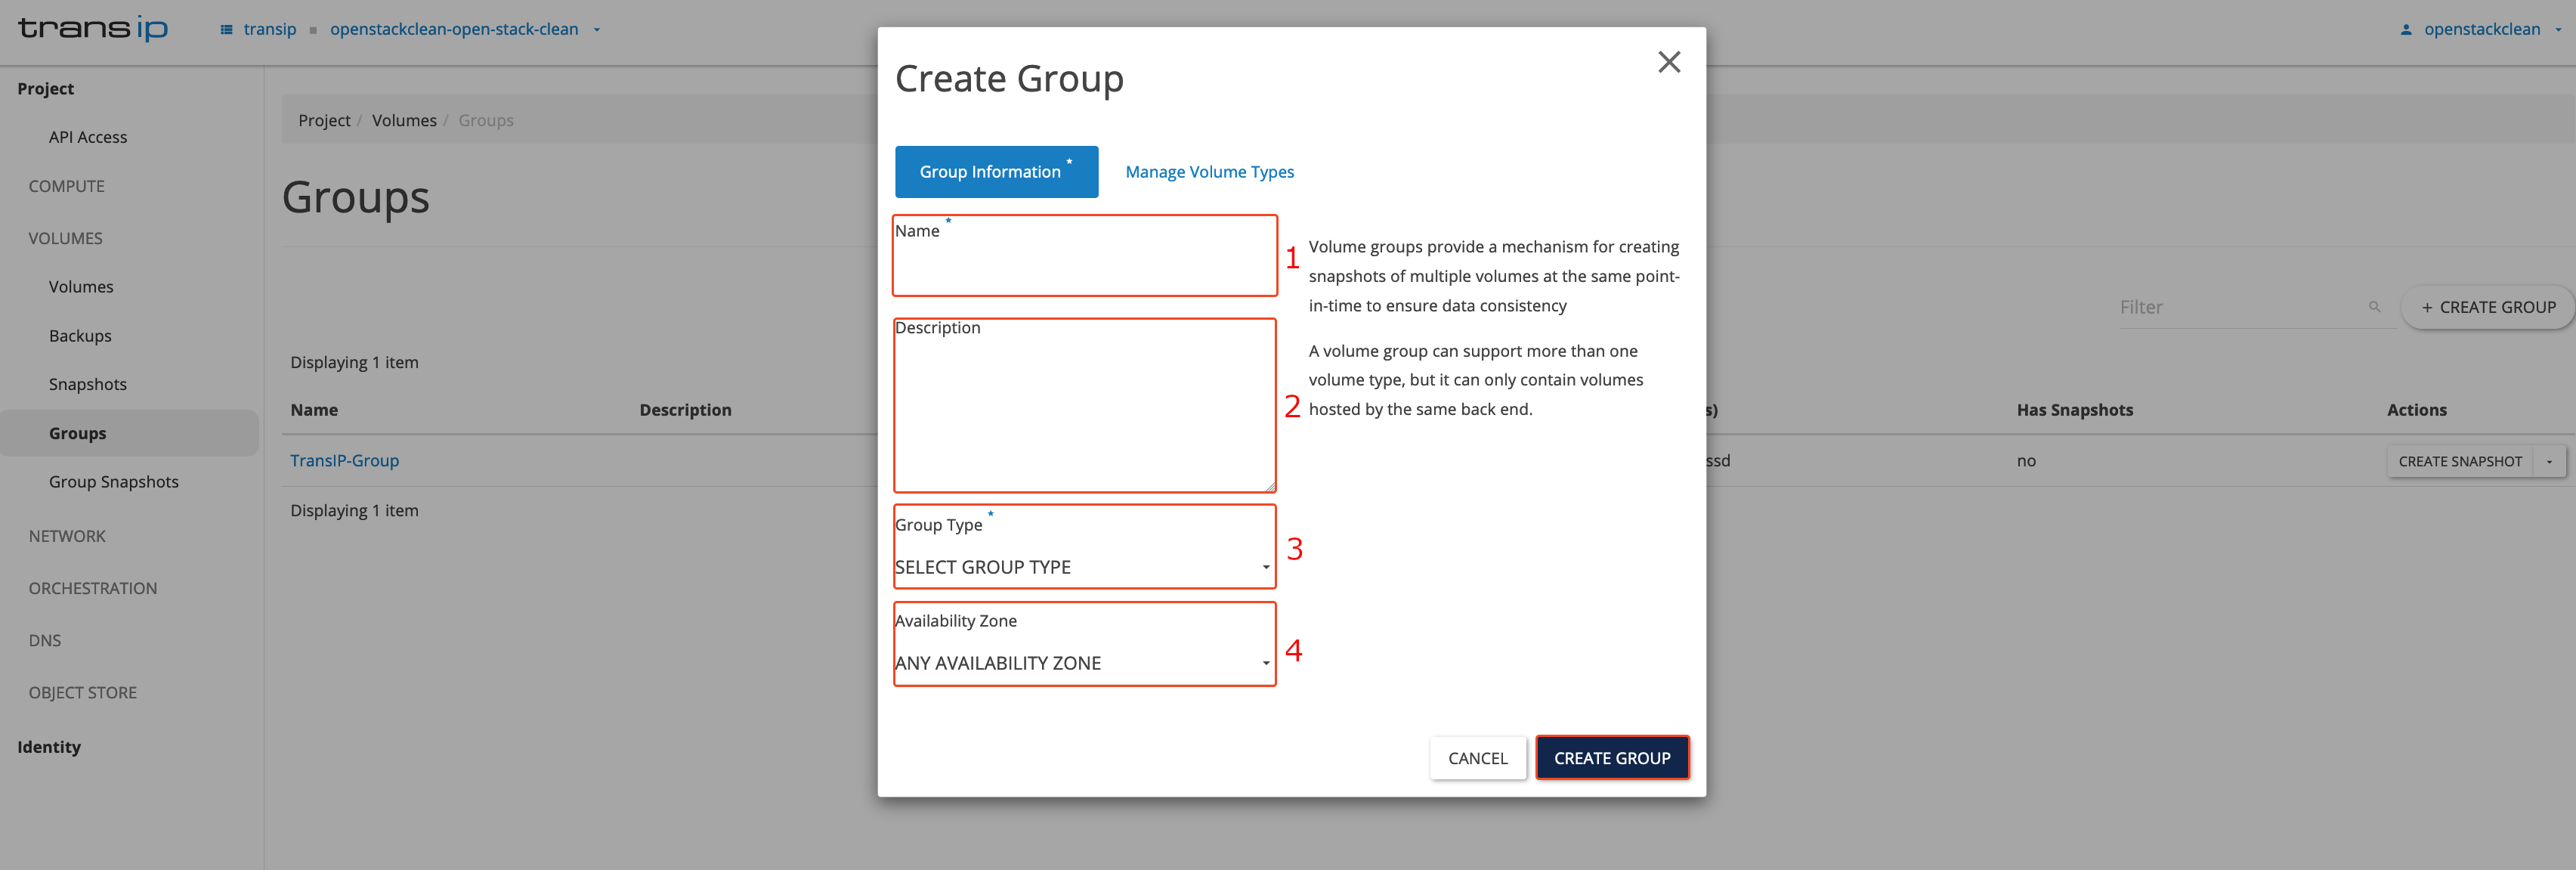
- Name: Give your Volume Group a name.
- Description: Add a description to your Volume Group (optional). This helps to distinguish volumes and name them, for example, after the availability zone or the instance the group is intended for.
-
Group type: Choose ‘Generic’.
Under ‘Manage Role Types’ you can assign your type of volumes (see Step 5) to the group. - Availability zone: Choose the zone where you want to create your ‘Volume Group’.
Step 4
Click on the 'Manage Volume Types’ tab to view the types that can be added to the group.
You can do this by clicking the plus sign next to the Volume type and then clicking 'Create group'.
Note: Types in a Volume Group must be the same. This means that all volumes in the group must use the same storage technology, such as ssd and ssd-encrypted, nvme and nvme-encrypted, or archive and archive-encrypted.
The main difference between nvme, ssd, and archive volumes in OpenStack lies in their performance, cost, and use cases. NVMe and SSDs are intended for fast data access with higher performance, while archive volumes are suitable for cheaper, less performance-critical storage of infrequently used data.
Add a Volume to a Volume Group
Step 1
Log in to the OpenStack Dashboard ‘Horizon’.
Step 2
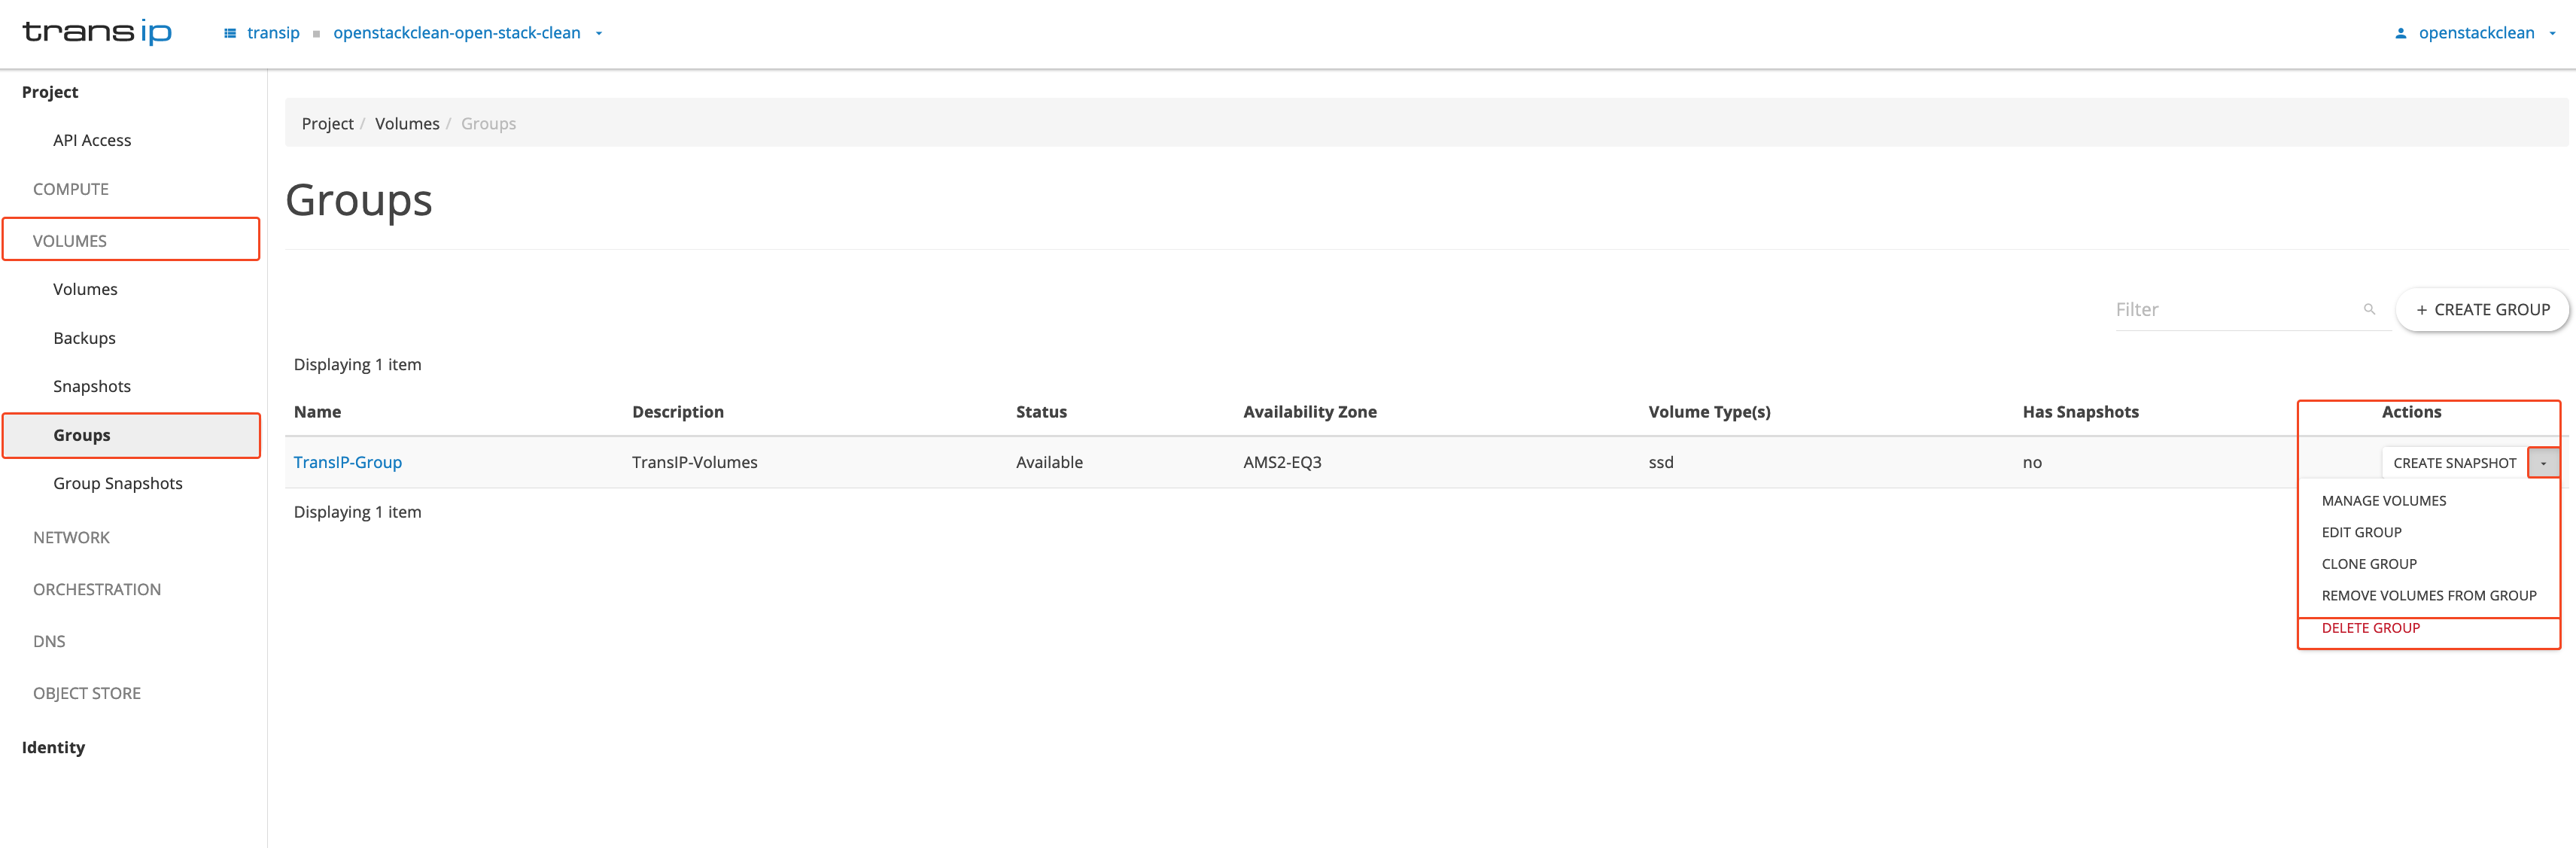
In the left menu, navigate to ‘Volumes’ and click 'Groups' in the submenu.
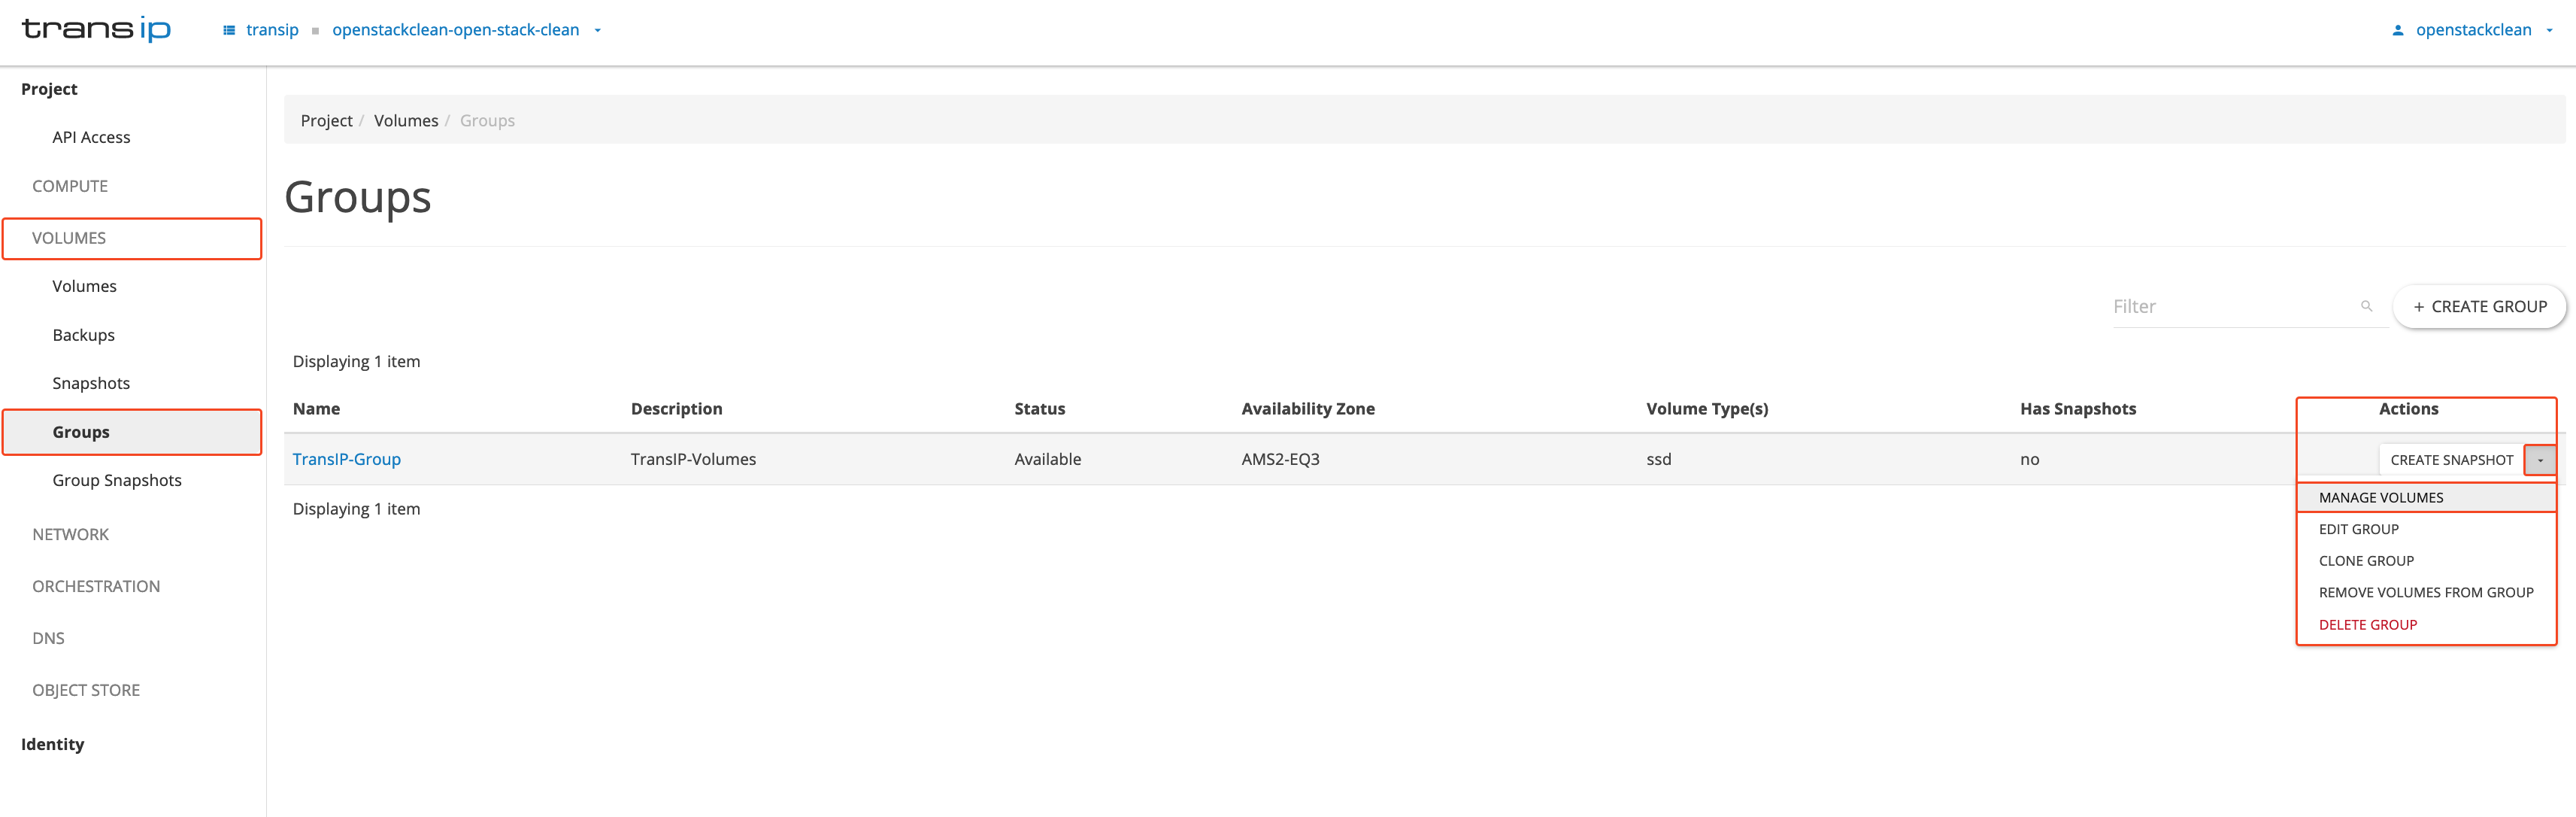
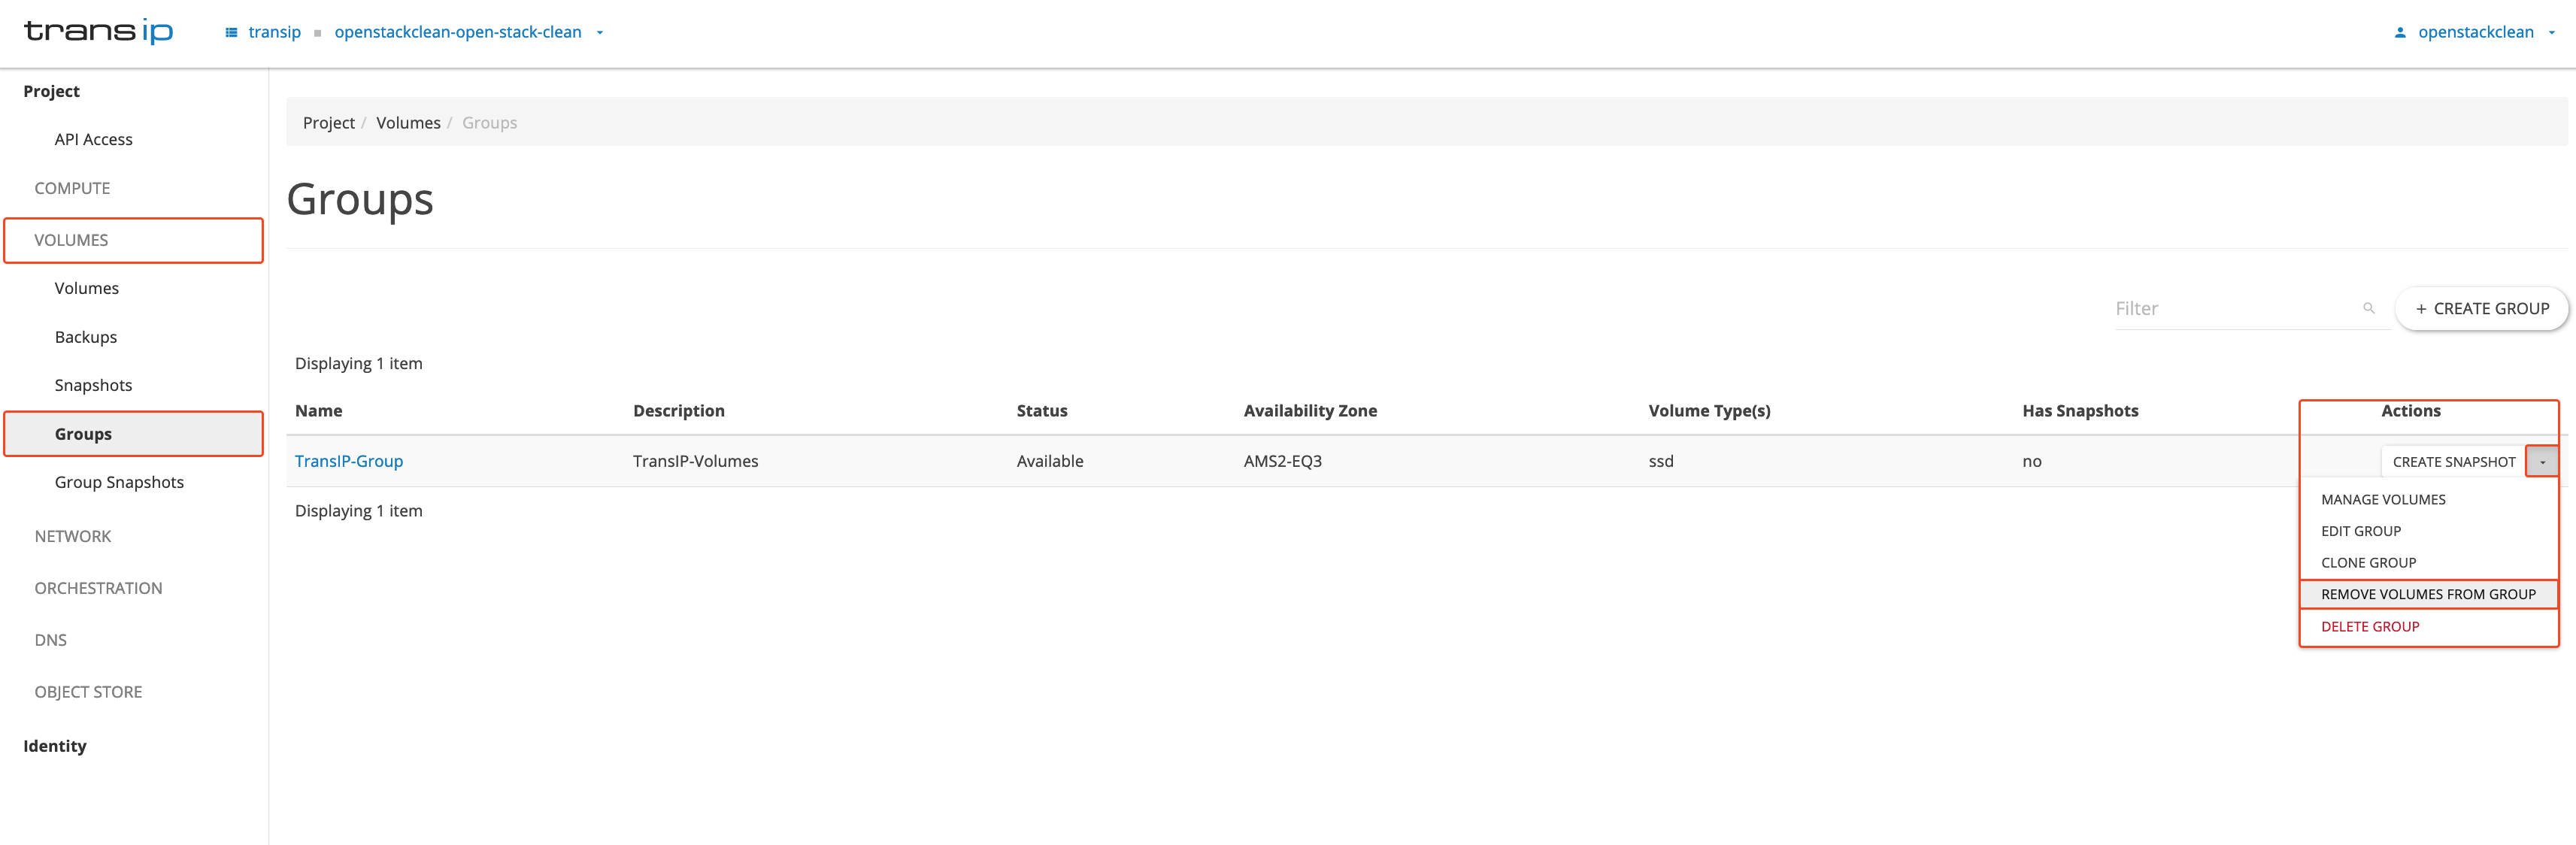
Find the Volume Group and click the arrow next to ‘Create Snapshot’, then choose 'Manage volumes' (as shown in the image below).
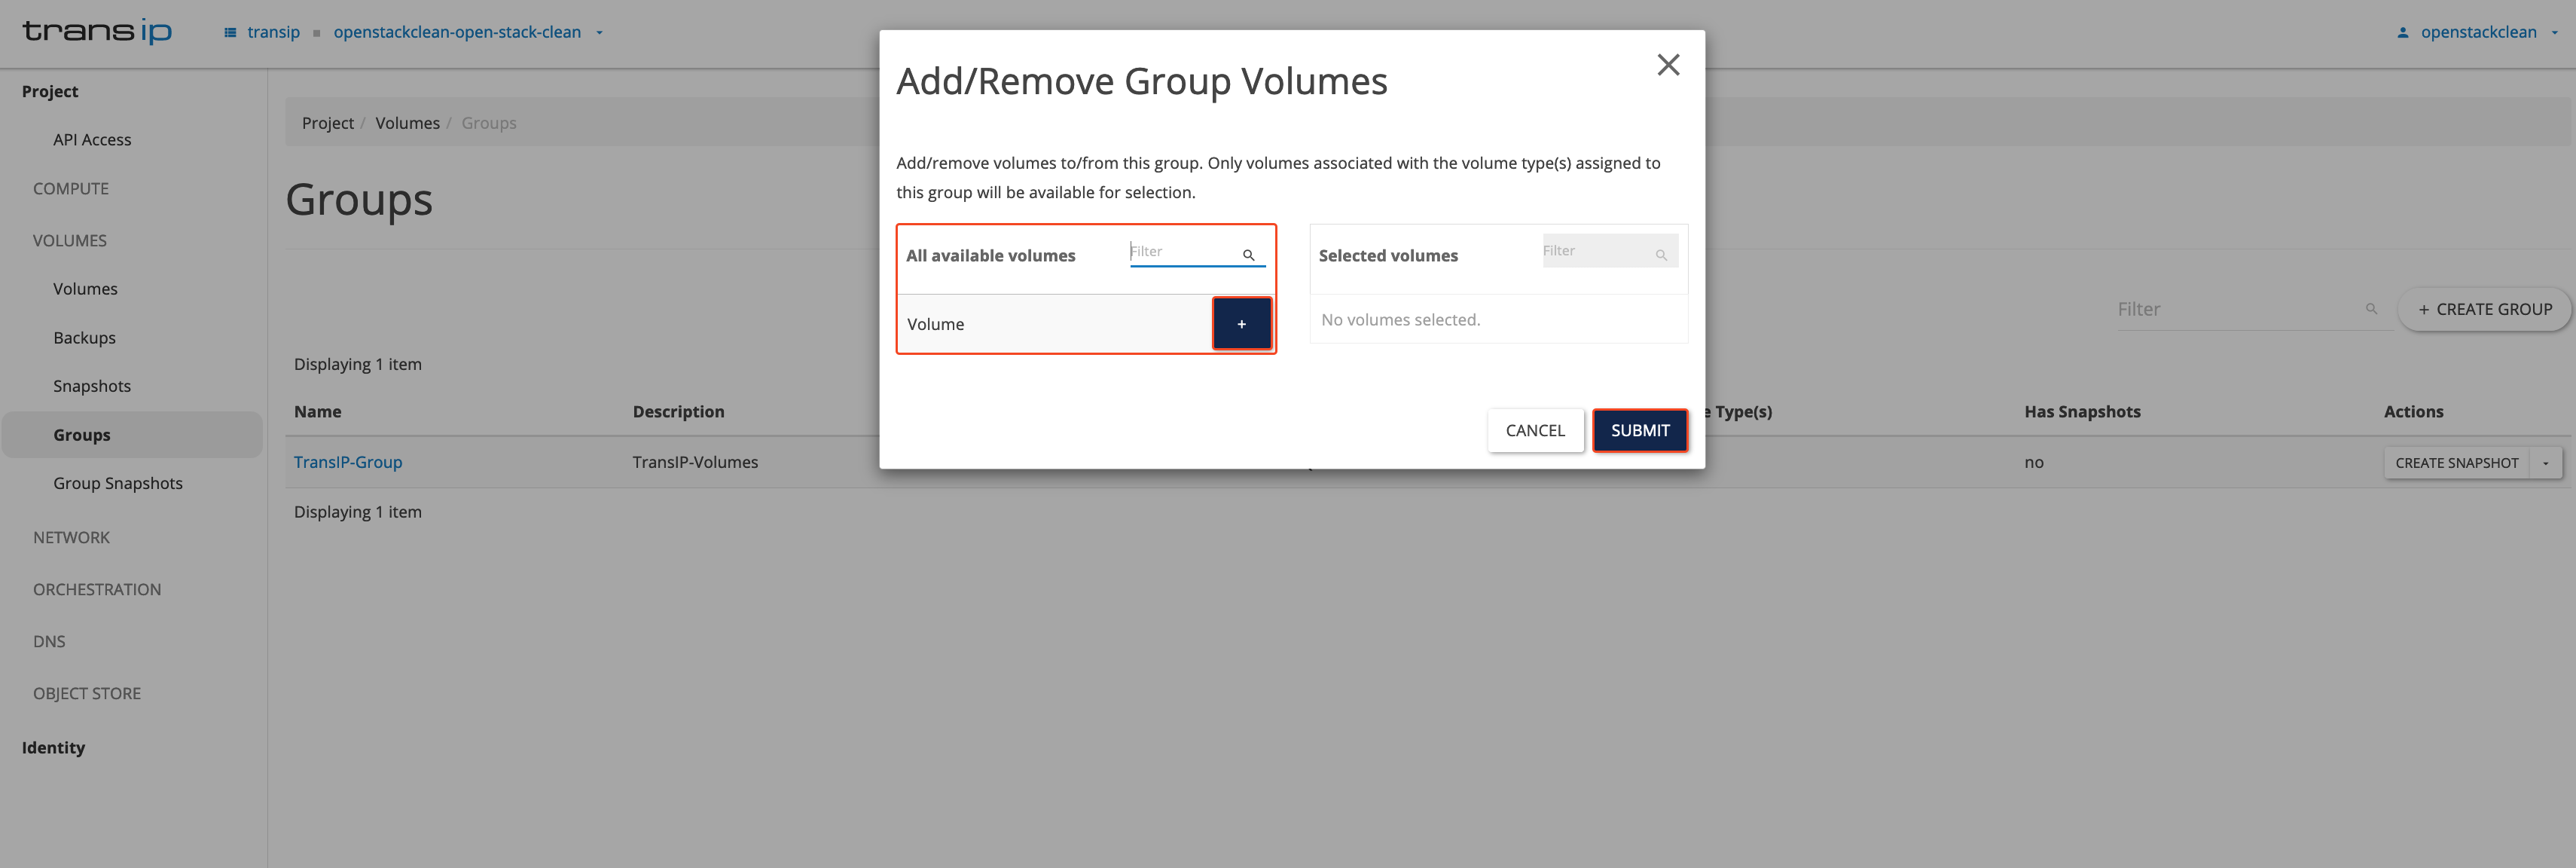
Step 3
The next window will appear. Here you can add volume types that match the group type (see ‘Step 4’ from the previous section). Click the arrows next to the volumes to add them, then click ‘Submit’.
Step 4
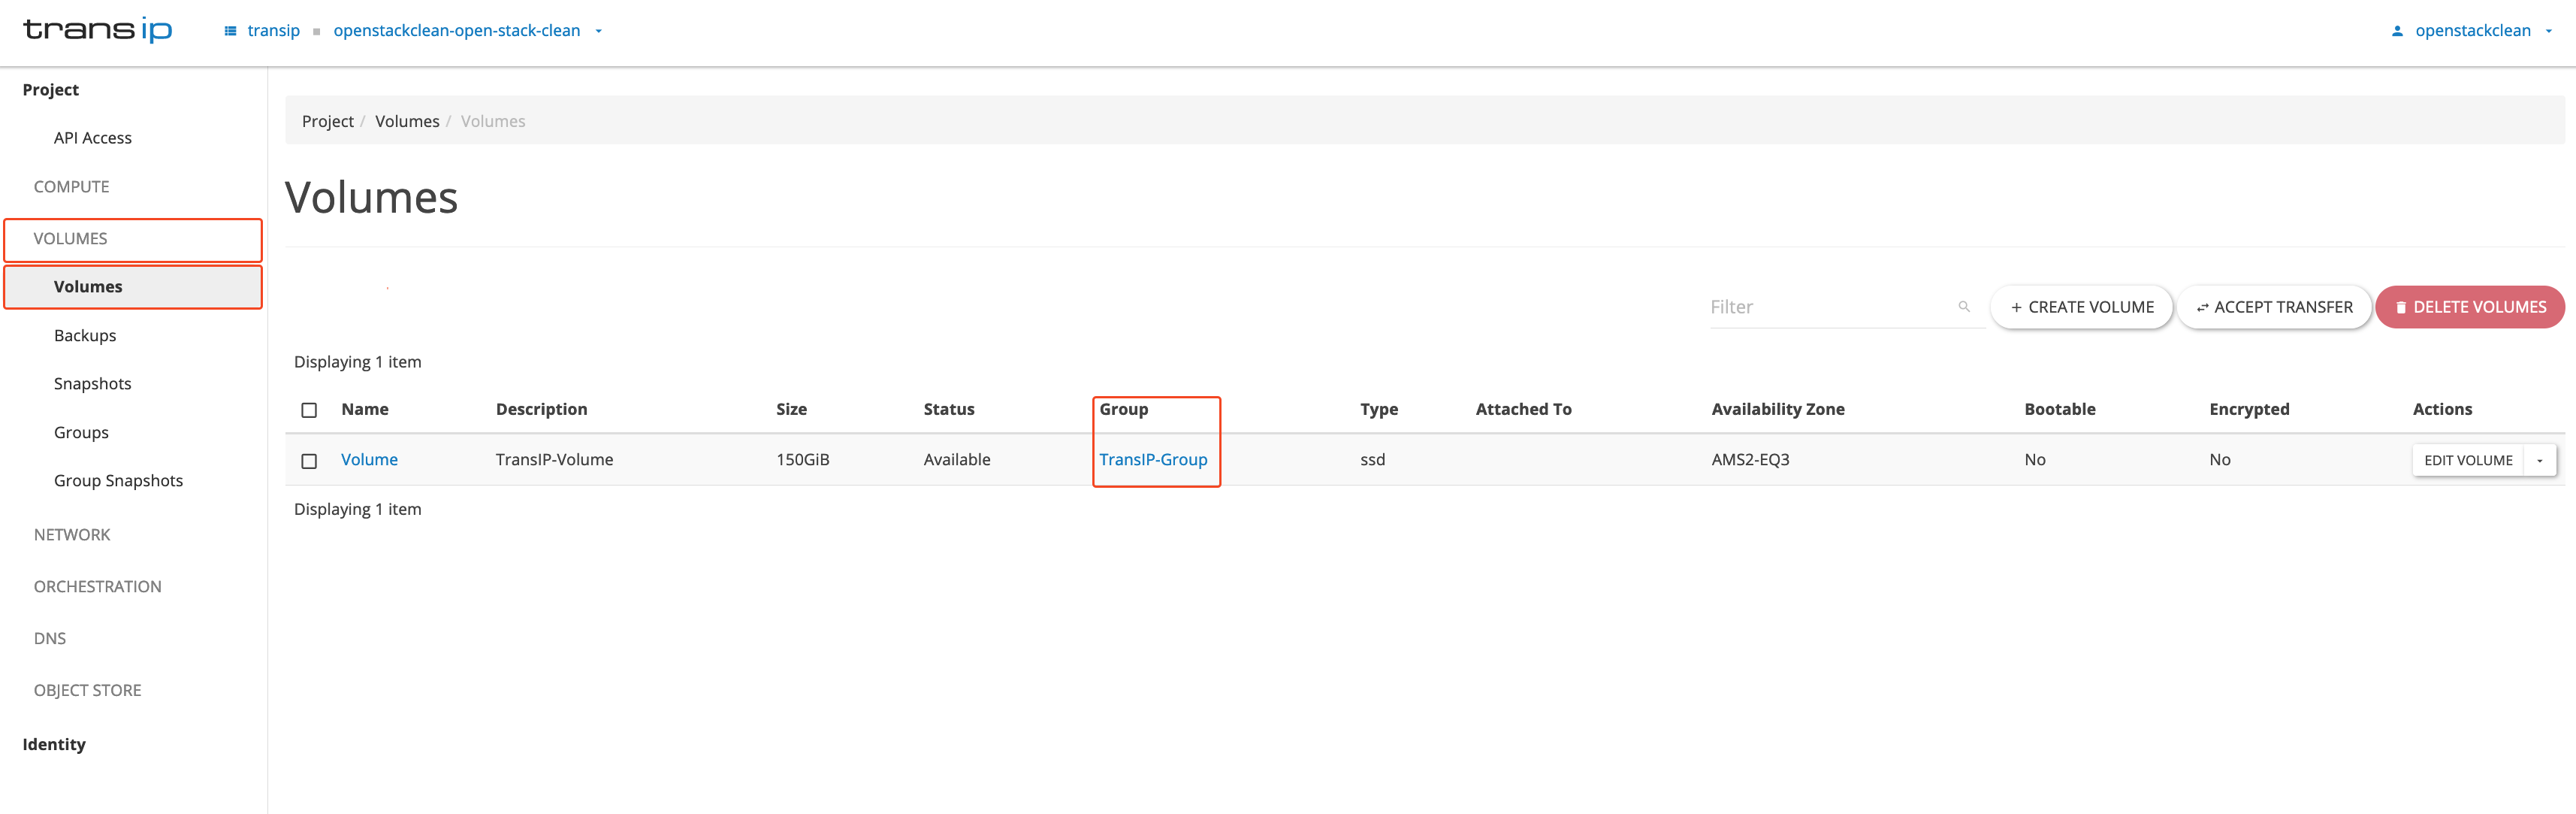
In the left menu, go to 'VOLUMES’ and select 'Volumes' in the submenu. You will now see that the Volume belongs to a group.
Remove a Volume from a Volume Group
If you want to remove all volumes from a Volume Group, you can also choose ‘remove volumes from group’ instead of ‘Manage volumes’. In the pop-up window that appears, click ‘Submit’ to remove all volumes from the Volume Group. This is not required but is faster than removing all volumes manually.
Step 1
Log in to the OpenStack Dashboard ‘Horizon’.
Step 2
In the left menu, go to 'VOLUMES' and click 'Groups' in the submenu.
For the desired ‘Volume Group’, click the arrow next to ‘Create Snapshot’. Choose 'Manage volumes' in the menu (as shown in the image below).
Step 3
Under ‘Selected volumes’, click the arrow next to the volume you want to remove, then click ‘Submit’. This allows you to remove specific volumes.
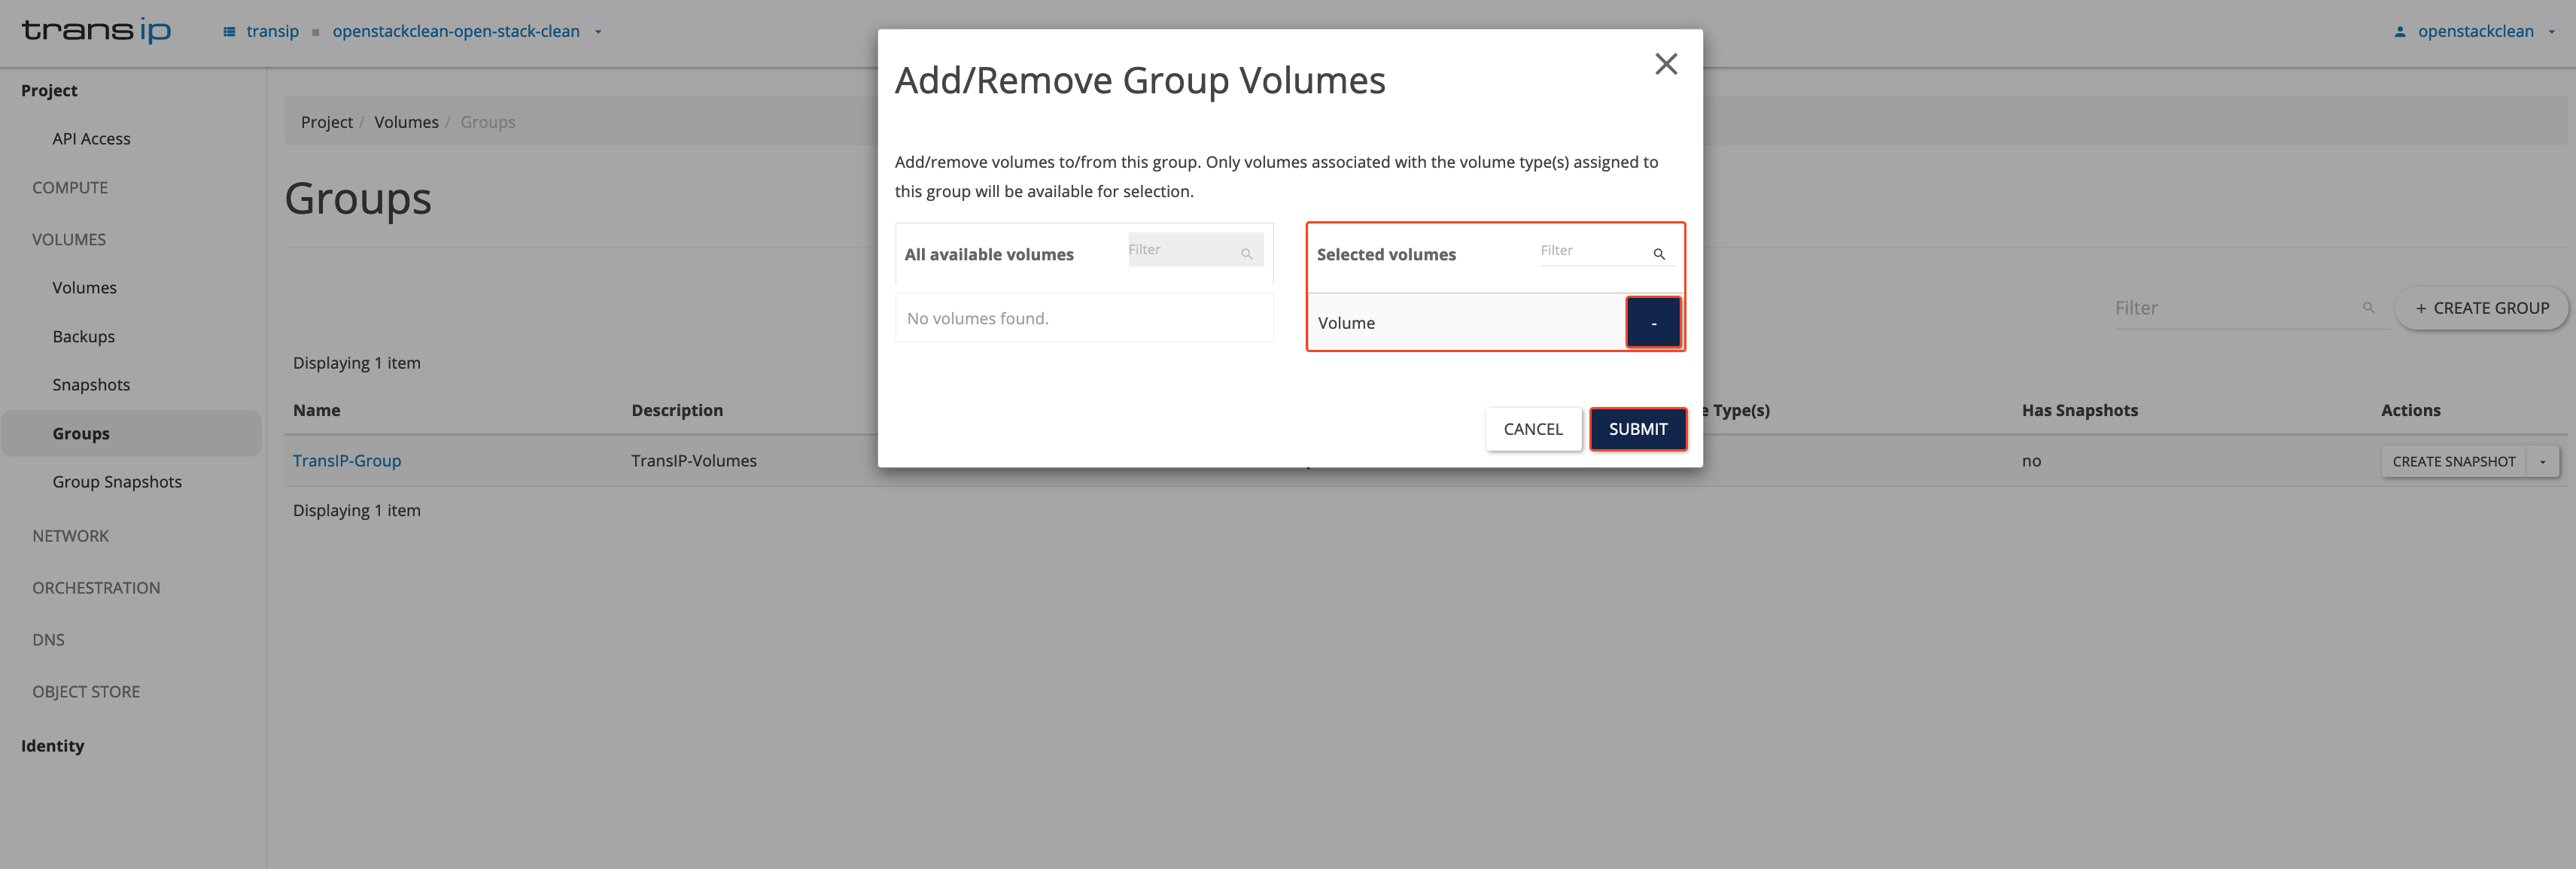
Alternatively, you can choose ‘Remove volumes from group’ instead of ‘Manage Volumes’ in Step 2 to remove all volumes at once.
Delete a Volume Group
When you want to delete a ‘Volume Group’, first ensure that no Volumes, Volume Snapshots, or Group Snapshots are present.
Step 1
Log in to the OpenStack Dashboard ‘Horizon’.
Step 2
In the left menu, go to ‘VOLUMES’ and click ‘Groups’ in the submenu.
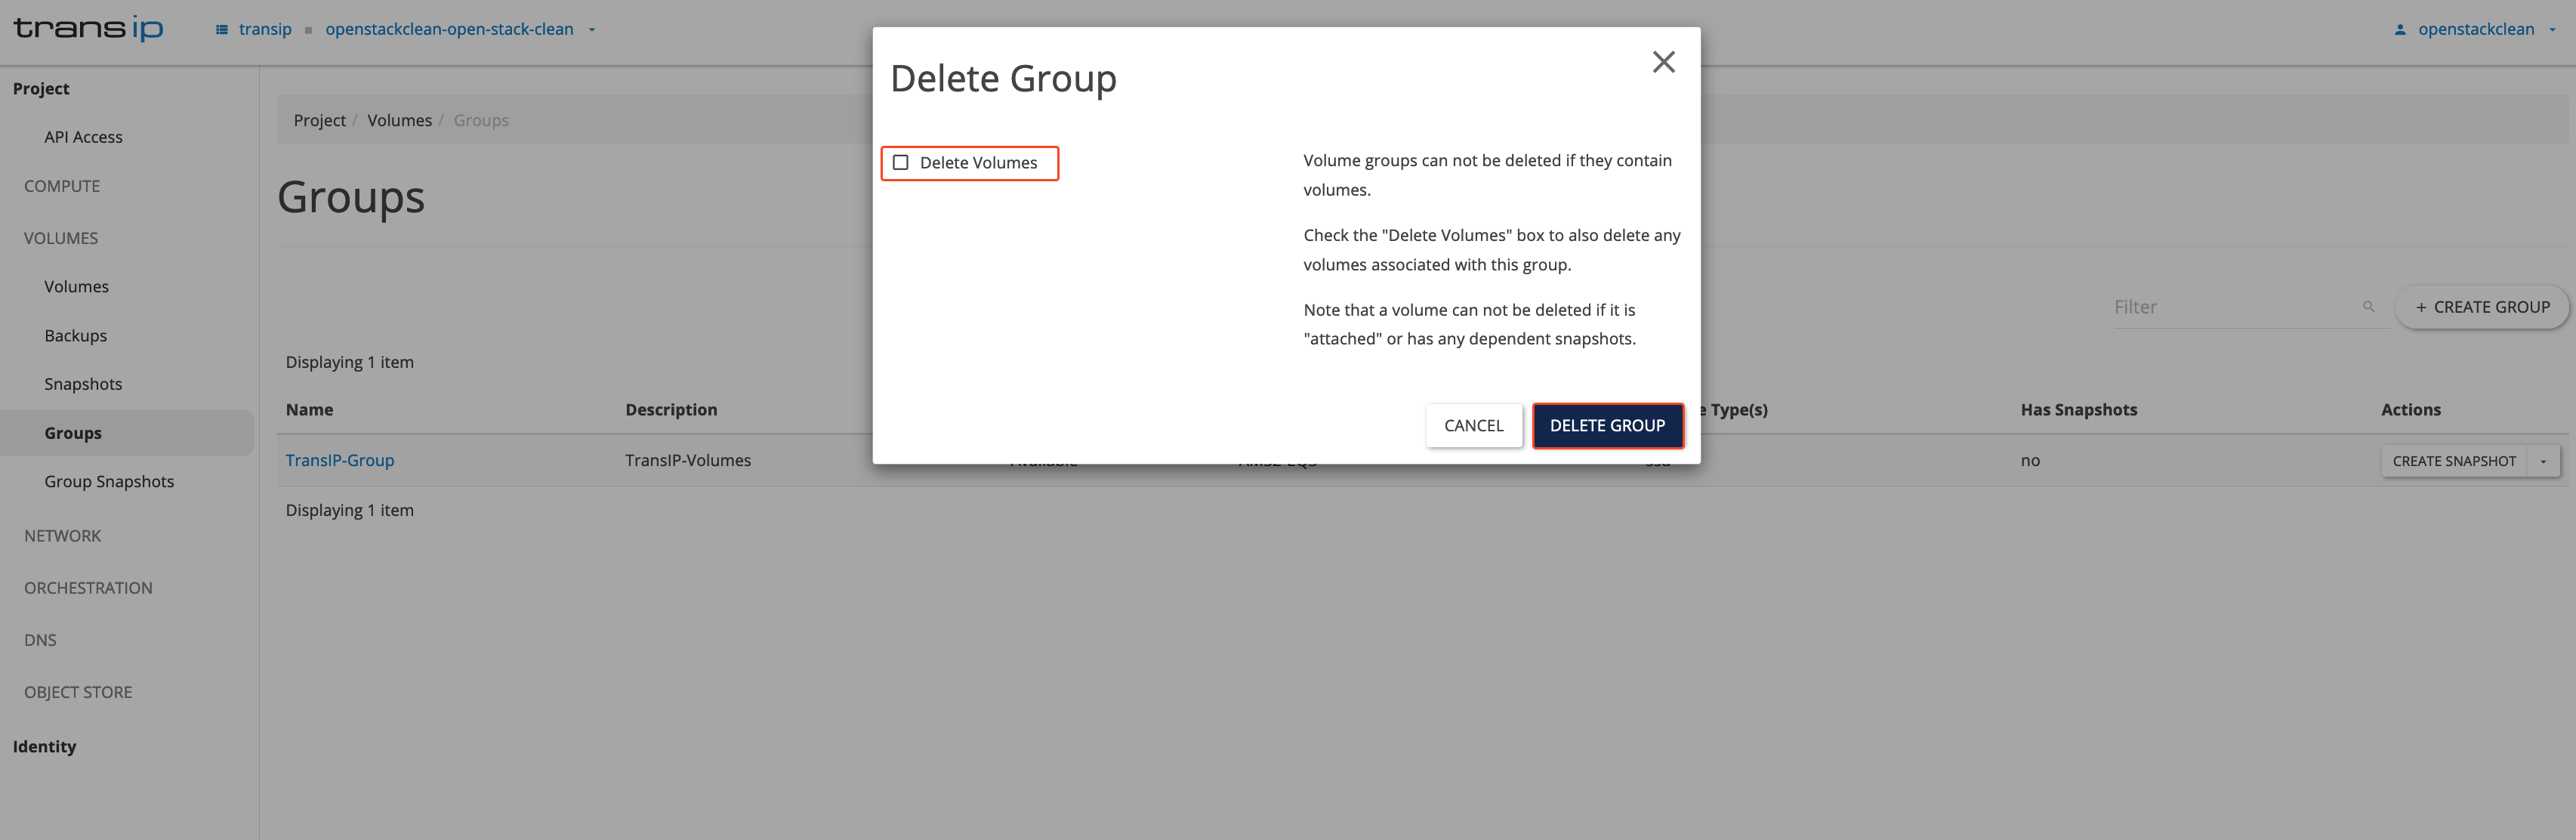
Find the Volume Group you want to delete and click the arrow next to 'Create snapshot' on the right side, as shown in the image below. Then click ‘Delete Group’.
Step 3
After choosing 'Delete group', you must confirm this action. In this screen, you can also specify whether you want to delete the volumes in the group. Check this box if the group contains volumes; otherwise, you cannot delete the group.
Clone a Volume Group
Step 1
Log in to the OpenStack Dashboard ‘Horizon’.
Step 2
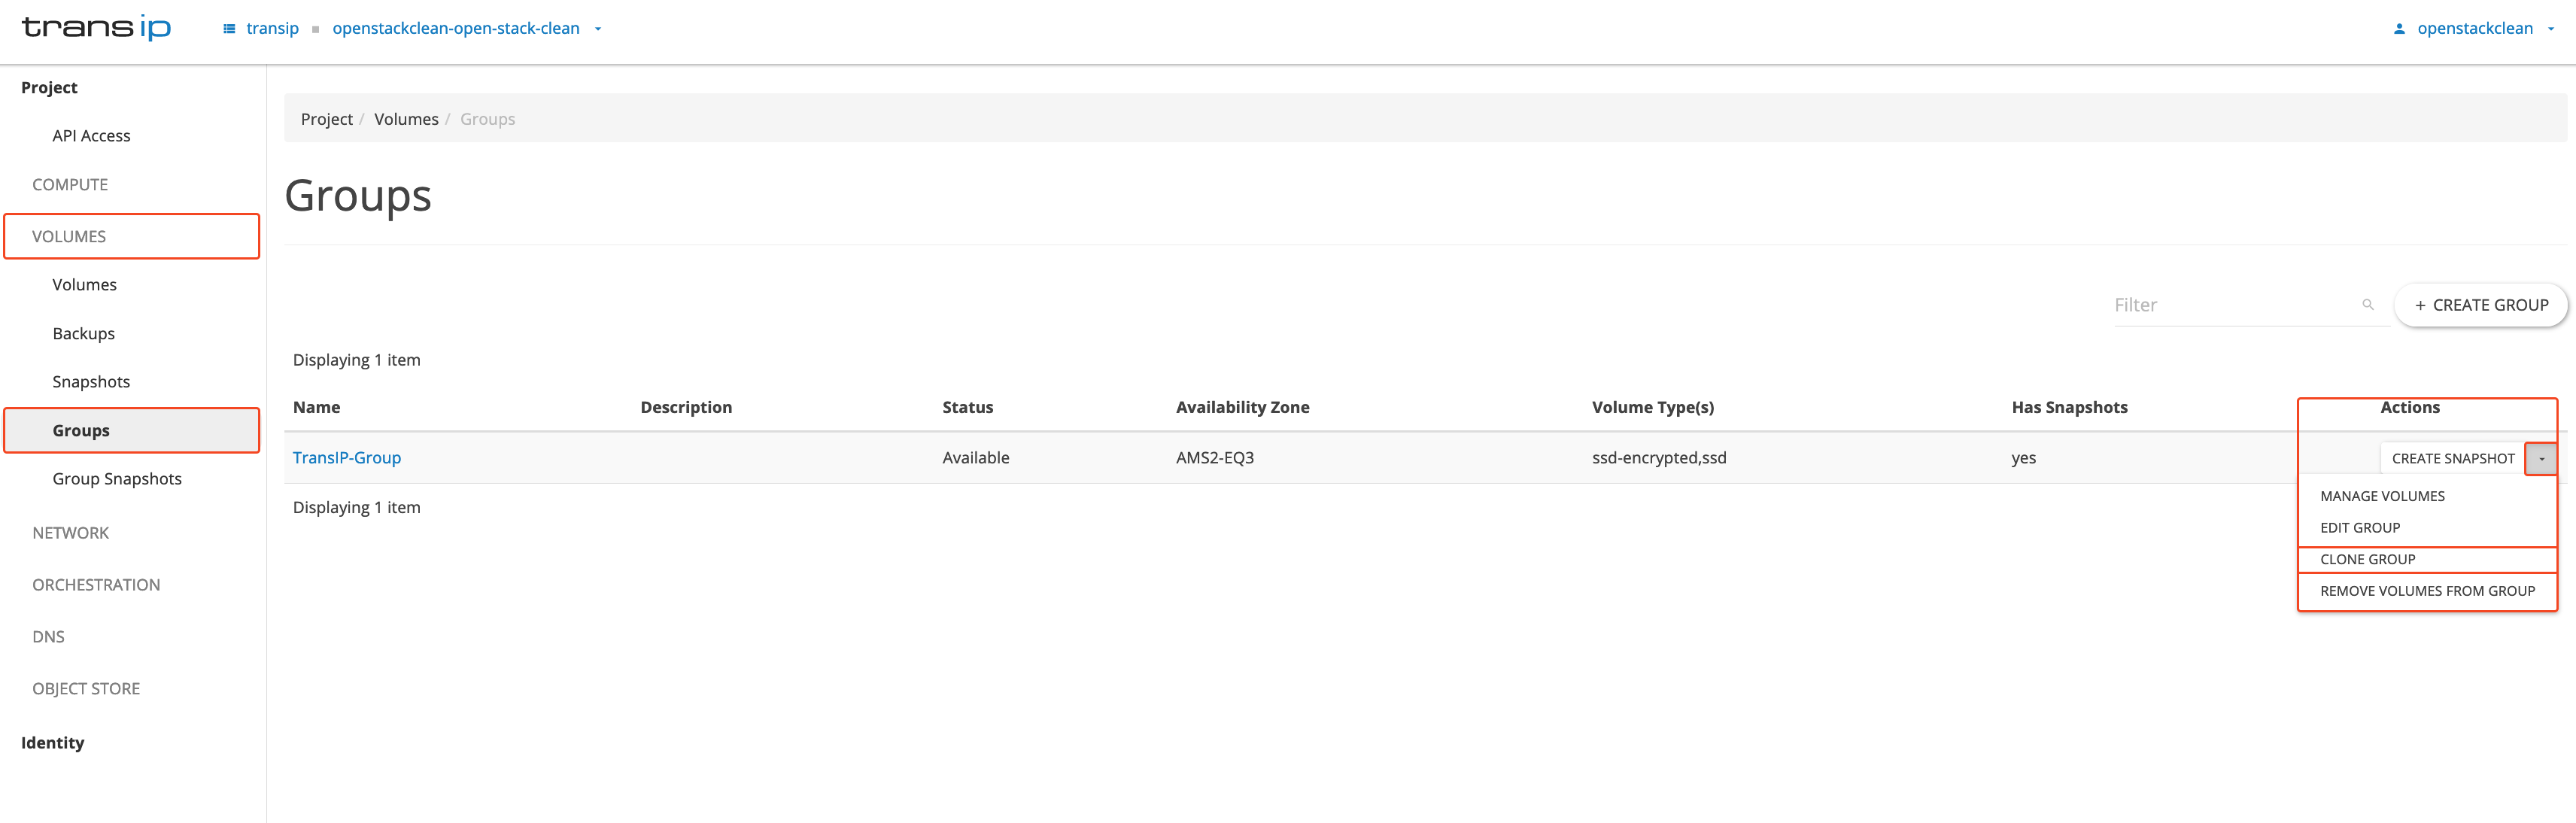
In the left menu, navigate to 'Volumes' and click 'Groups' in the submenu.
On the right side, next to ‘Create Snapshot’, click the arrow to open the menu. Select ‘Clone Group’ from the menu.
Step 3
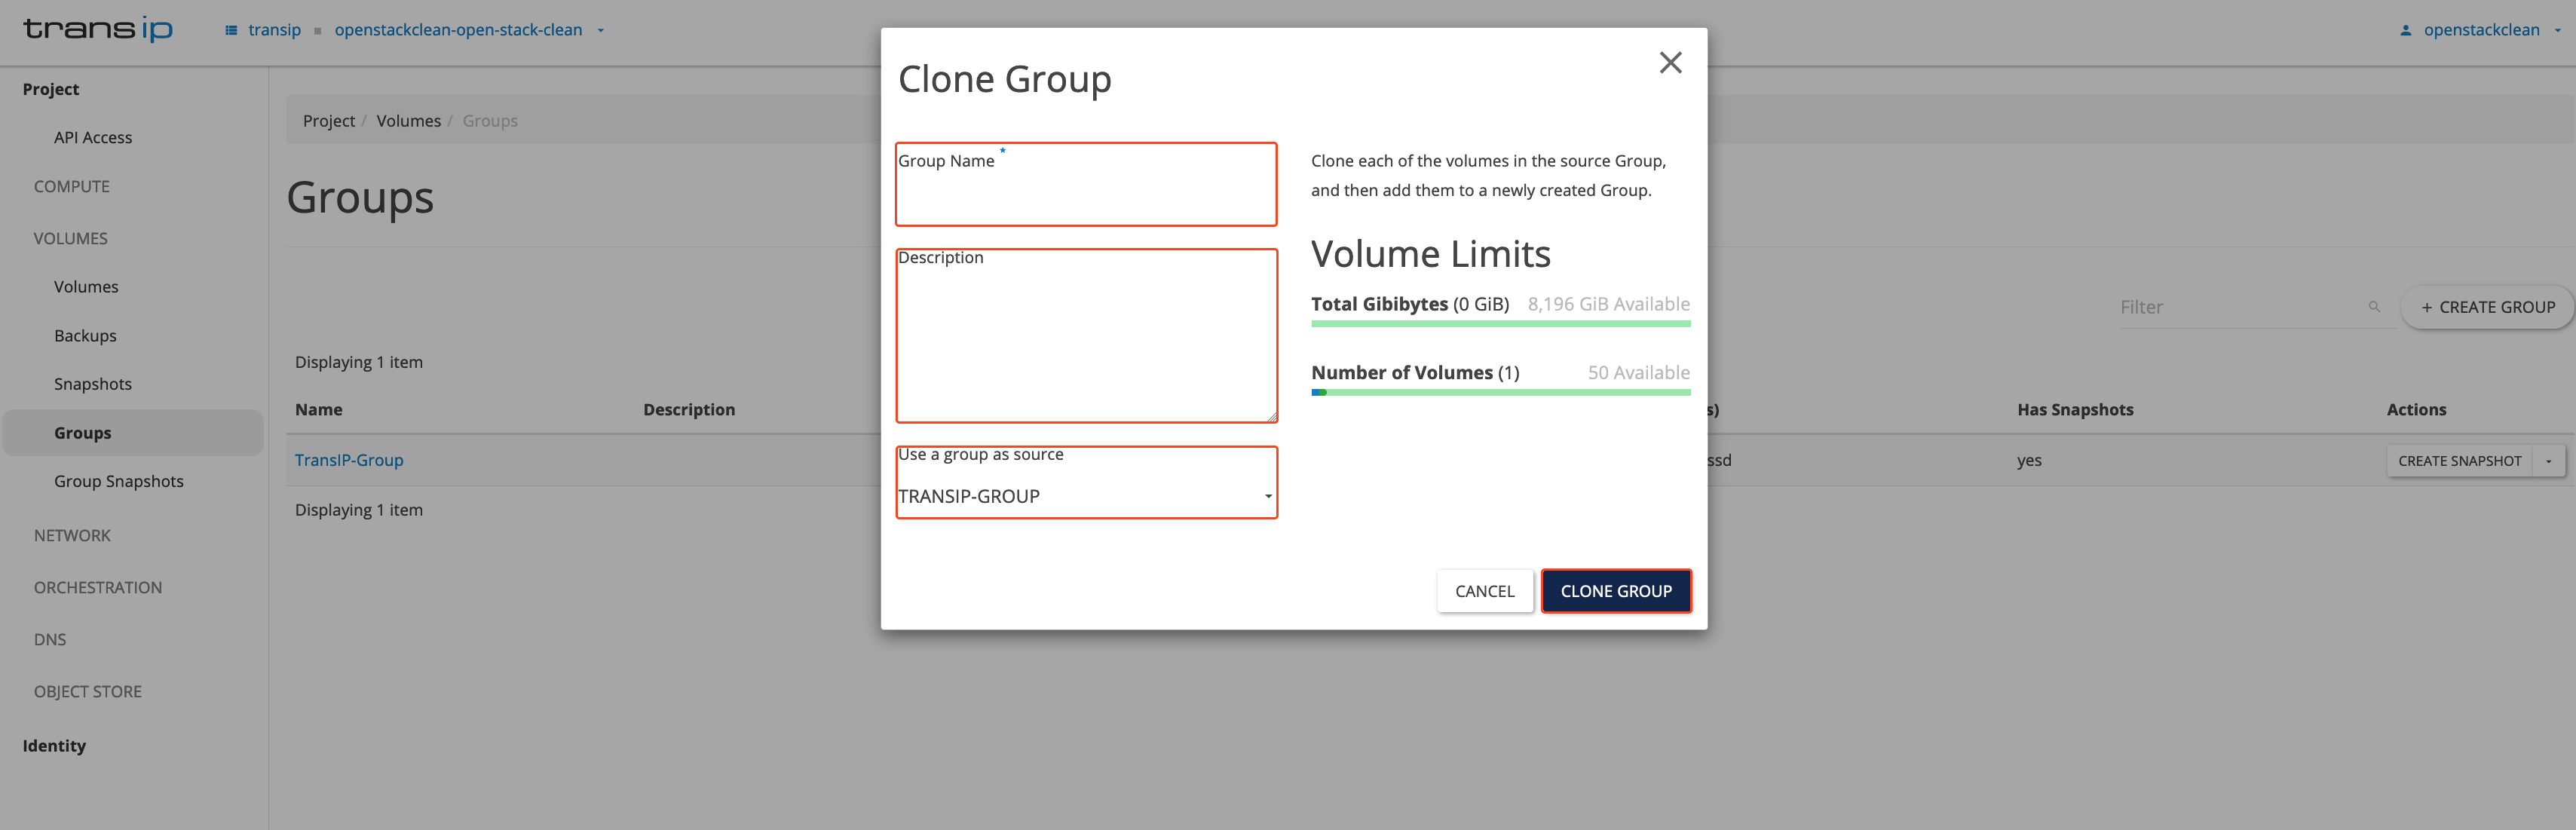
After clicking ‘Clone Group’, the Clone Group pop-up will appear. In this screen you can:
- Give a name to the cloned group.
- Provide a description for the cloned group, such as the type of volumes it contains or their purpose.
- Under ‘Use a group as source’, the group you are cloning will automatically be selected.
On the right, under ‘Volume Limits’, you can see the number of volumes the group contains and the total size of the volumes in the cloned group.
Once you have filled in this information, click ‘Clone Group’ and the group will be cloned. You can find the cloned group in the same screen as your ‘Volume Group’.
This concludes our guide on creating Volume Groups in OpenStack.