


Create a Load Balancer with web servers in OpenStack in AMS2 within your OpenStack project, you have the option to create a load balancer. A load balancer distributes network traffic over multiple servers within OpenStack, also known as Instances. This ensures that even under high load, your application does not become overloaded. It also improves reliability, as if a server fails, the load balancer can distribute traffic to the servers that are still available.
In this guide, we will explain how to create a load balancer with three web servers in the connected pool. A load balancing pool is a collection of devices, such as web servers, that you group to receive and process traffic.
If you have already configured a network, router, and multiple web servers, you can proceed directly to the section 'Creating the Load Balancer'. The steps for creating a load balancer come down to:
- Create an internal/private network
- Create the web servers
- Create the load balancer
The load balancer can be delivered in one availability zone. To make the load balancer highly available, an additional load balancer must be created in one of the other zones. Octavia (and similar tools) allow you to use the load balancer in the other zone in case of unavailability of the first load balancer.
Create an Internal Network
Before creating a load balancer, you need an internal or private OpenStack network. In this guide, we will call the network 'webserver-network'. Feel free to assign your own name to the network.
After creating the network, you will connect it to your web servers.
In our 'private network tutorial, you will find a step-by-step guide on how to create an internal network. Replace the network name with 'webserver-network' and the subnet name with 'webserver-subnet'.
Create the Web Servers
In this paragraph, you will configure three identical web servers. We recommend always configuring the instances connected to a load balancer identically. The idea is that the end-user always reaches the same result, regardless of which server they are referred to by the load balancer. Creating, for example, one instance and putting it behind a load balancer makes little sense because the load cannot be distributed across multiple instances. All numbers of instances, from two to more, will have an effect, just make sure to place them in unique availability zones for redundancy. You are free to use another use case, such as a database or custom application.
If you don't know how to create an instance, you can use our 'OpenStack getting started' guide. The steps you follow in the getting started guide at step 2 will be replaced by the steps below:
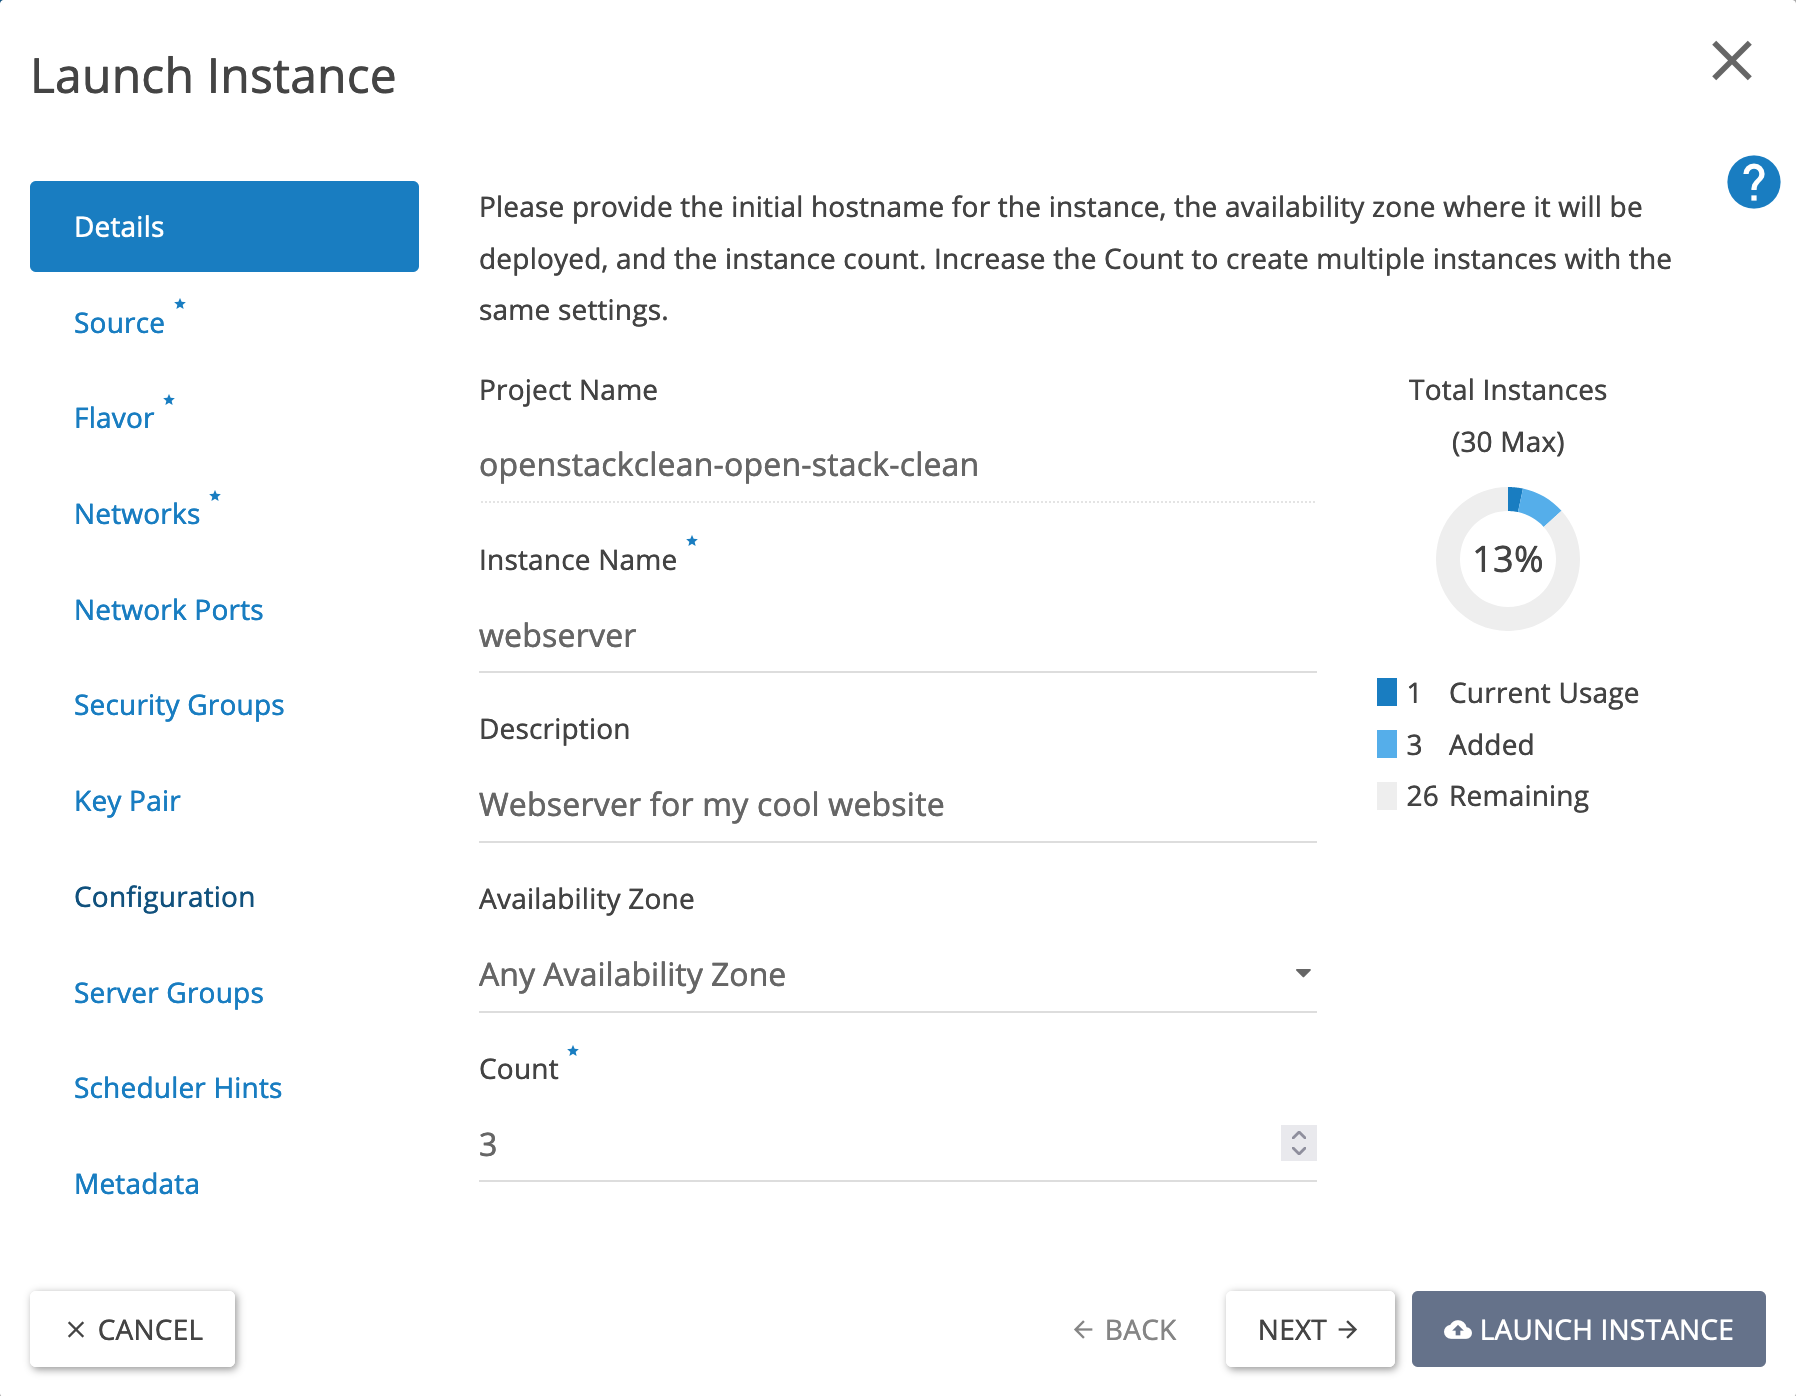
Step 1
By clicking on the 'Details' button in the left menu, you will see the settings below. These settings serve as an example; make sure the configuration you choose fits the purpose of your load balancer.
In this tutorial, we will only use one availability zone, but in a production environment, it is recommended to distribute your instances across zones to have a redundant setup.
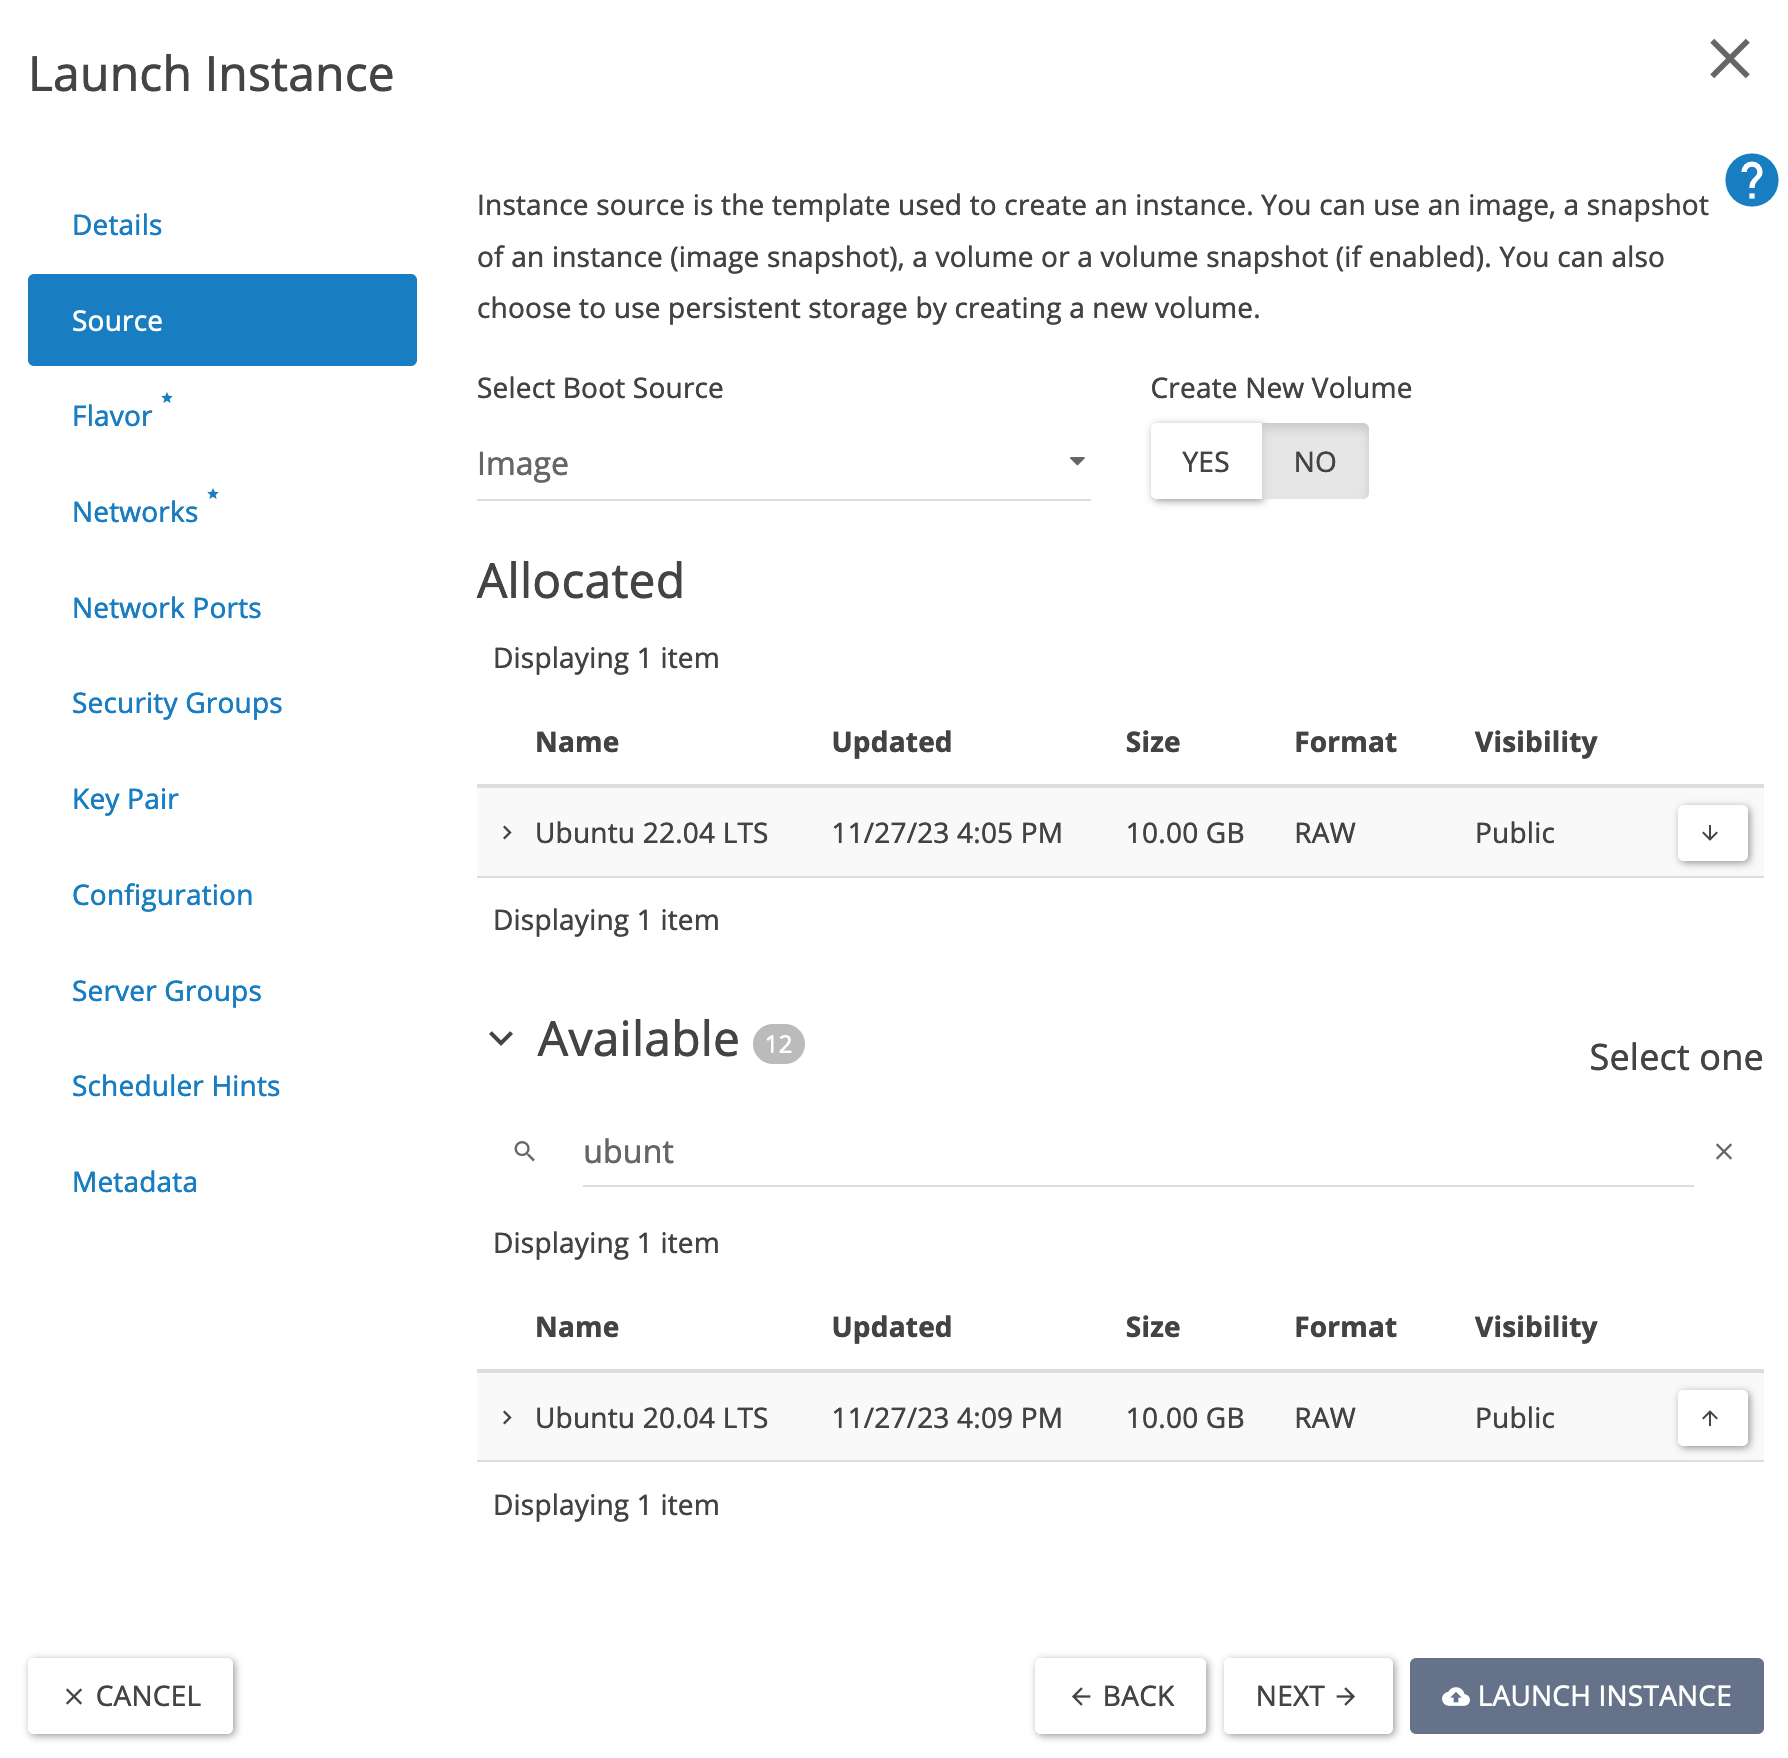
Step 2
In the 'Source' tab, we will use the image: Ubuntu 22.04 LTS in this guide. When choosing an image for your web servers, make a choice that fits your application.
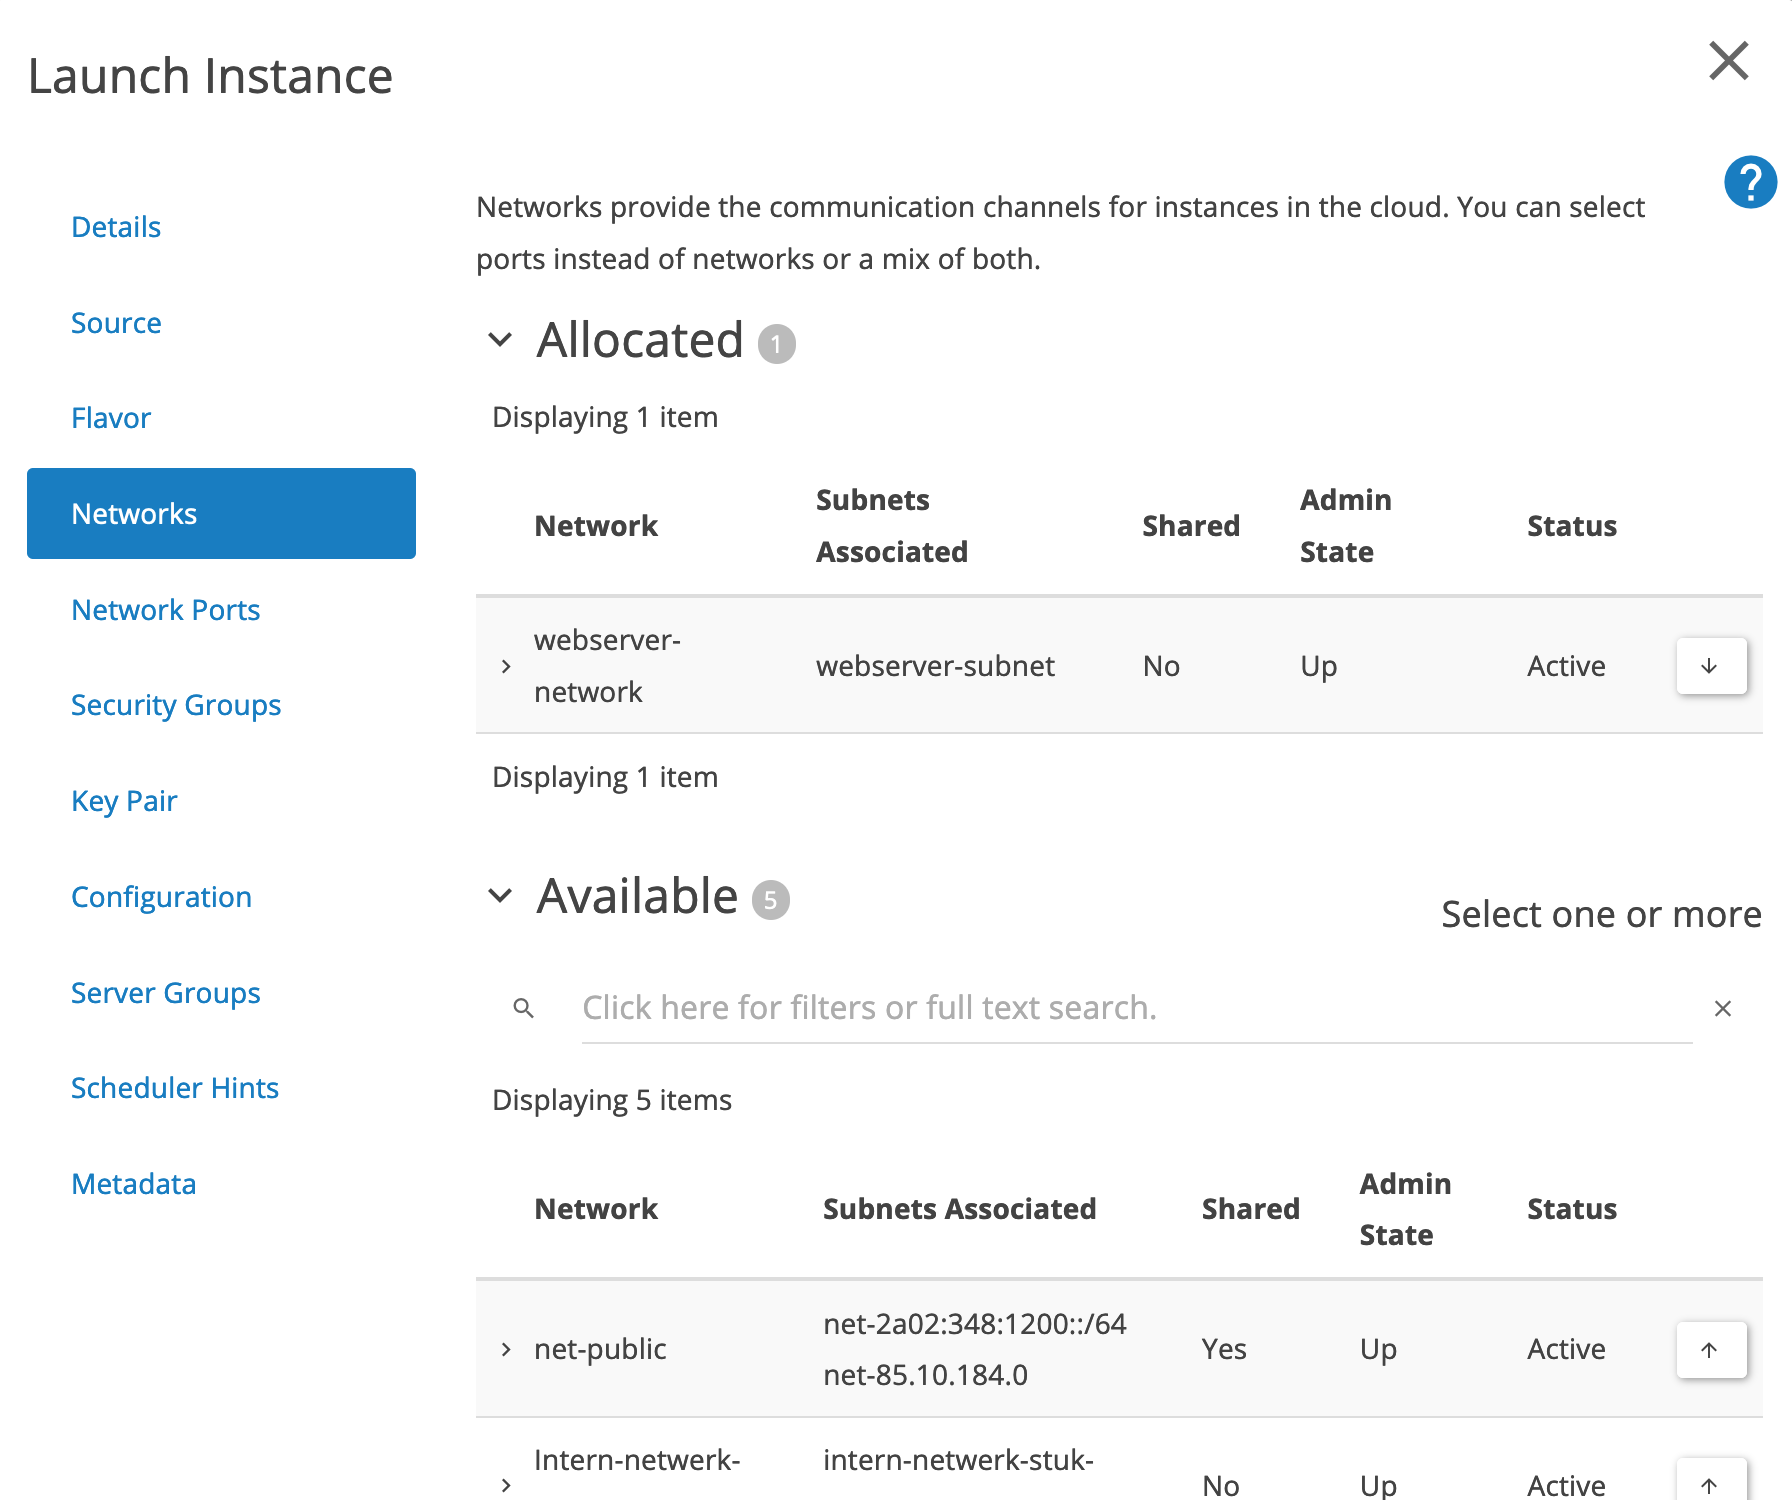
Step 3
To create the web servers, use the private/internal network you created earlier in this tutorial.
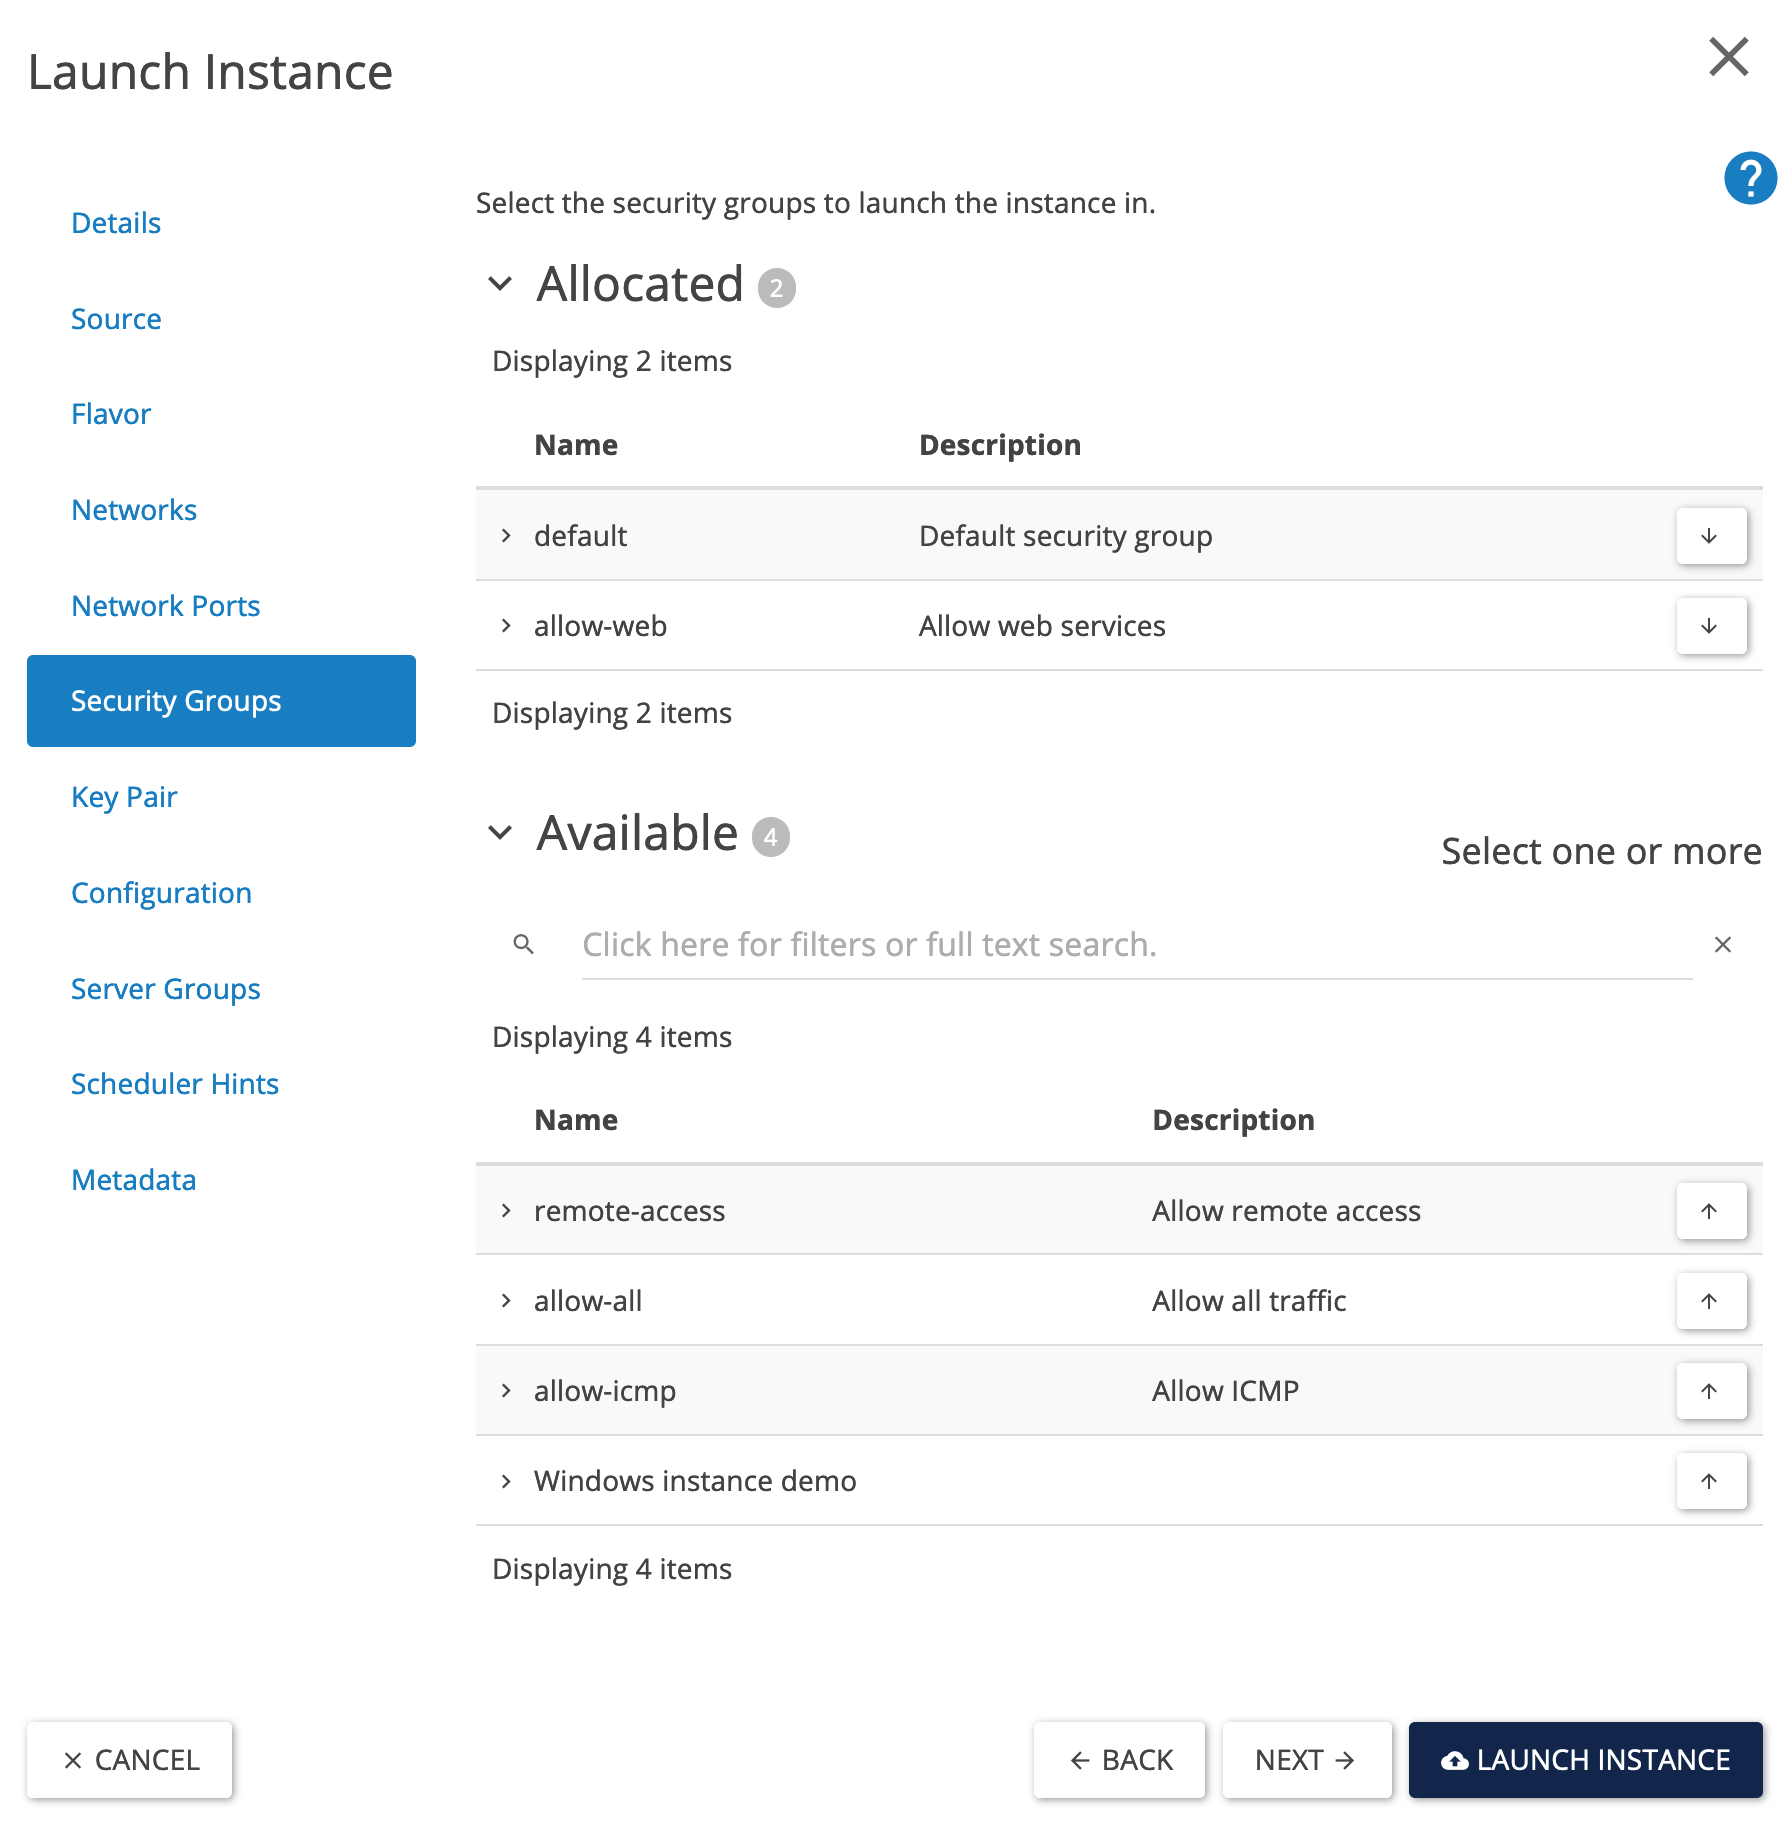
Step 4
Assign the security group 'allow-web' to the servers. You are free to assign other security groups as well.
Step 5
To access your instances, you can add one or more key pairs. To add a key pair, you can use the paragraph 'Create an (SSH) key pair' from the Getting Started guide.
Step 6
For the configuration of the instances, you can use a cloud-config file. A cloud-config file is a file for initializing a Linux-based cloud instance. You can use it to initialize disks, assign SSH access, and perform other server tasks before you log in to the server for the first time.
Within OpenStack, you can also use a cloud-init file, which you can do when creating your instance under the 'Configuration' menu item. In this tutorial, we will use the cloud-init file below. Paste the 'cloud-config' configuration under the 'Customization script' field. The file in this tutorial serves only as an example; do not use it in a production environment.
#cloud-config
package_upgrade: true
packages:
  - apache2
  - php
  - libapache2-mod-php
write_files:
  - path: /var/www/html/index.php
    content: |
      <!DOCTYPE html>
      <html lang='en'>
      <head>
          <meta charset='UTF-8'>
          <meta name='viewport' content='width=device-width, initial-scale=1.0'>
          <title>load balancer Tutorial</title>
          <link href='https://cdn.jsdelivr.net/npm/bootstrap@5.1.3/dist/css/bootstrap.min.css' rel='stylesheet'>
      </head>
      <body>
          <div class='container mt-5'>
              <div class='card'>
                  <div class='card-header'>
                      Hostname Information
                  </div>
                  <div class='card-body'>
                      <h5 class='card-title'>Server Hostname</h5>
                      <p class='card-text'><?php echo gethostname(); ?></p>
                  </div>
              </div>
          </div>
      </body>
      </html>
runcmd:
  - systemctl restart apache2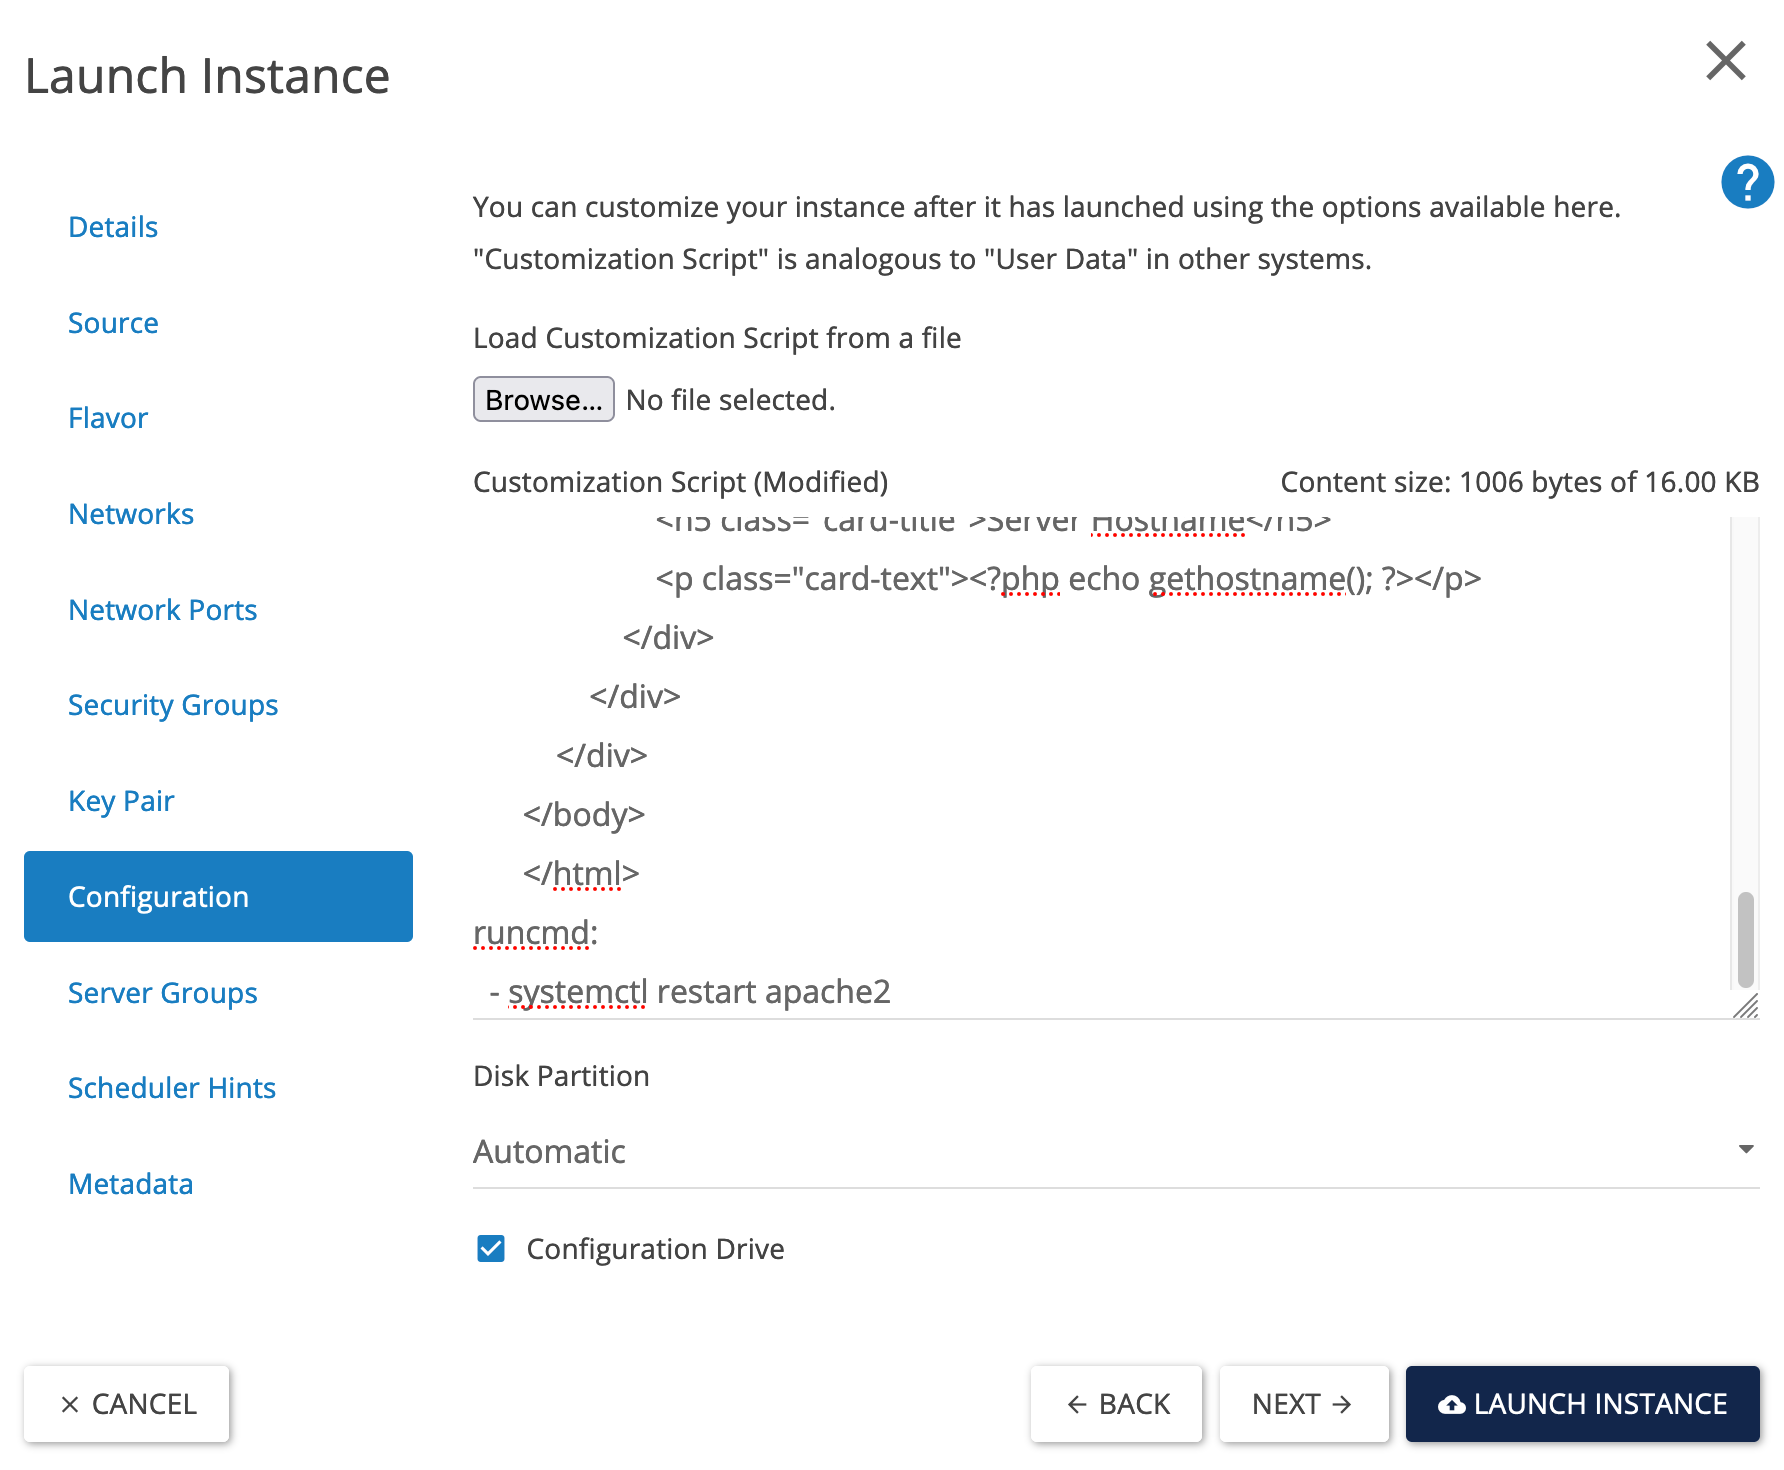
When you have taken over the settings and click on 'LAUNCH INSTANCE', the number of instances you specified under 'count' in step 1 will be created.
Step 7
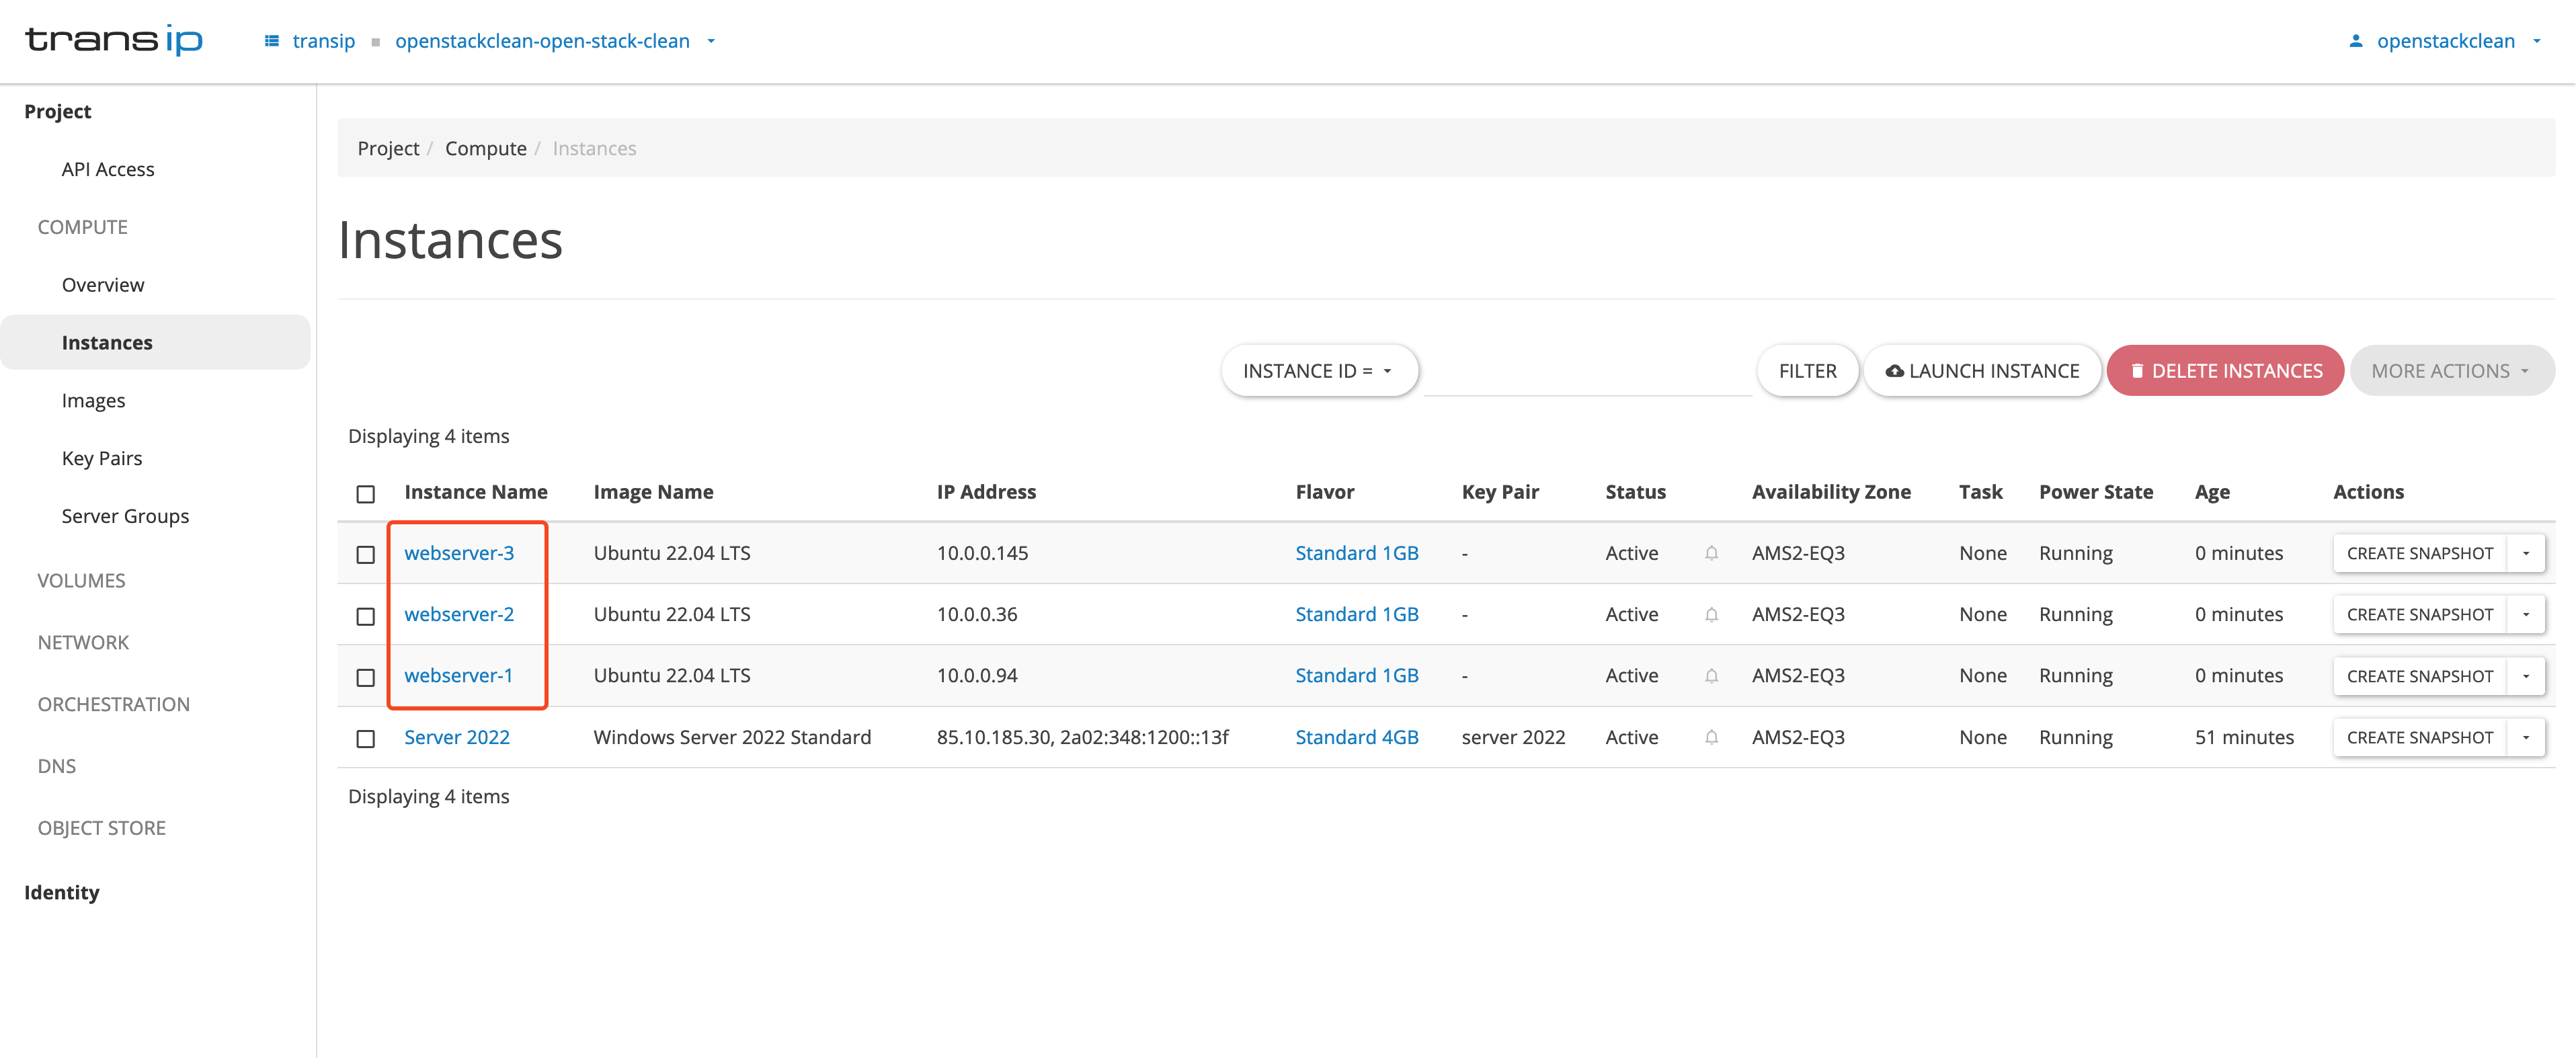
You can view the instances you just created by clicking on 'Compute' in the left menu and then on 'Instances' in the submenu.
Create the Load Balancer
The next step is to create the load balancer. You will create a load balancer with a 'listener', 'pool', and a 'health monitor'. These components do the following:
- listener: The listener is a process responsible for checking incoming connection requests. The listener refers to the front-end (client to load balancer) to the back-end (load balancer to back-end).
- pool: A load balancing pool is a collection of devices, such as web servers, that you group to receive and process traffic.
- health monitor: A health monitor checks the status of the members of the 'pool' to determine which members can or cannot have traffic forwarded to them.
Step 1
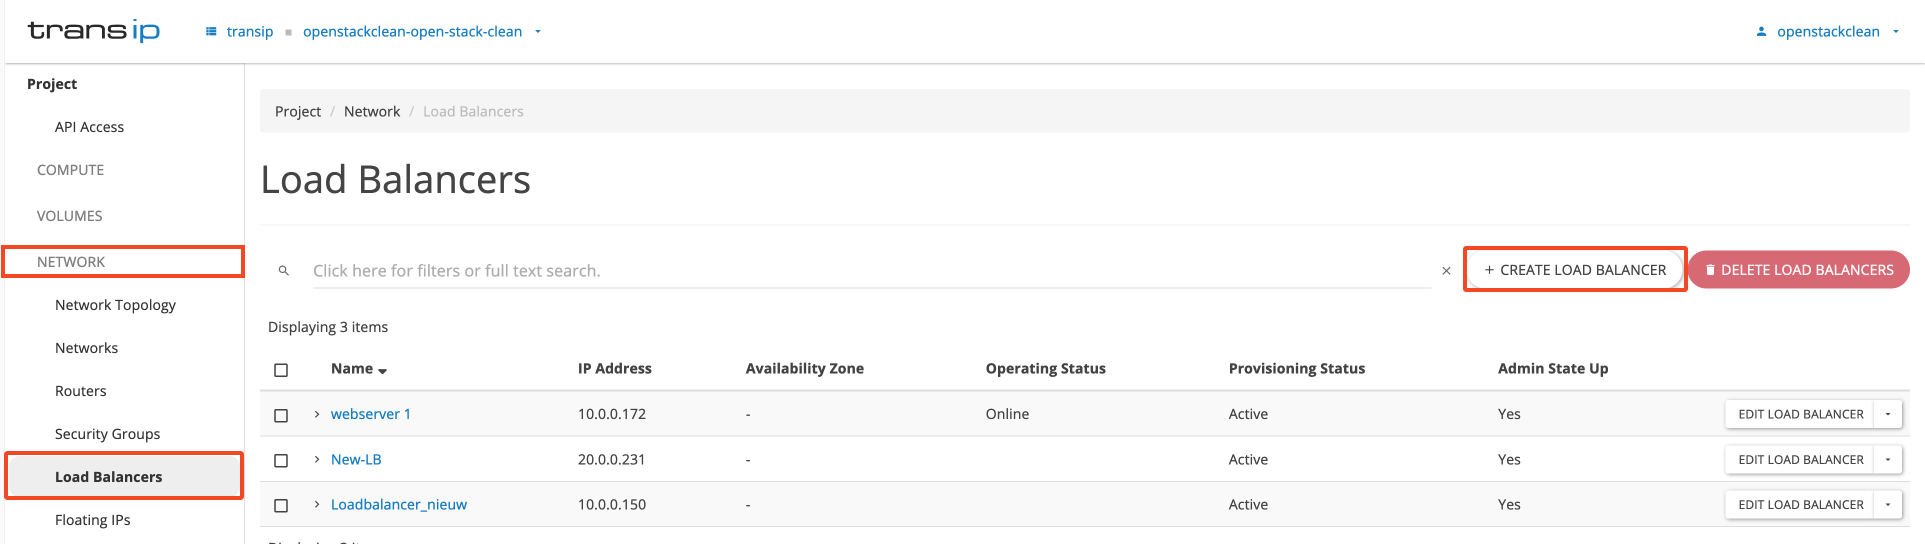
Go to the 'Network' tab and select 'Load Balancers', then click on the 'create load balancer' button.
Step 2
Fill in the fields below. For an explanation of the points in the image, please refer to the list below the screenshot.
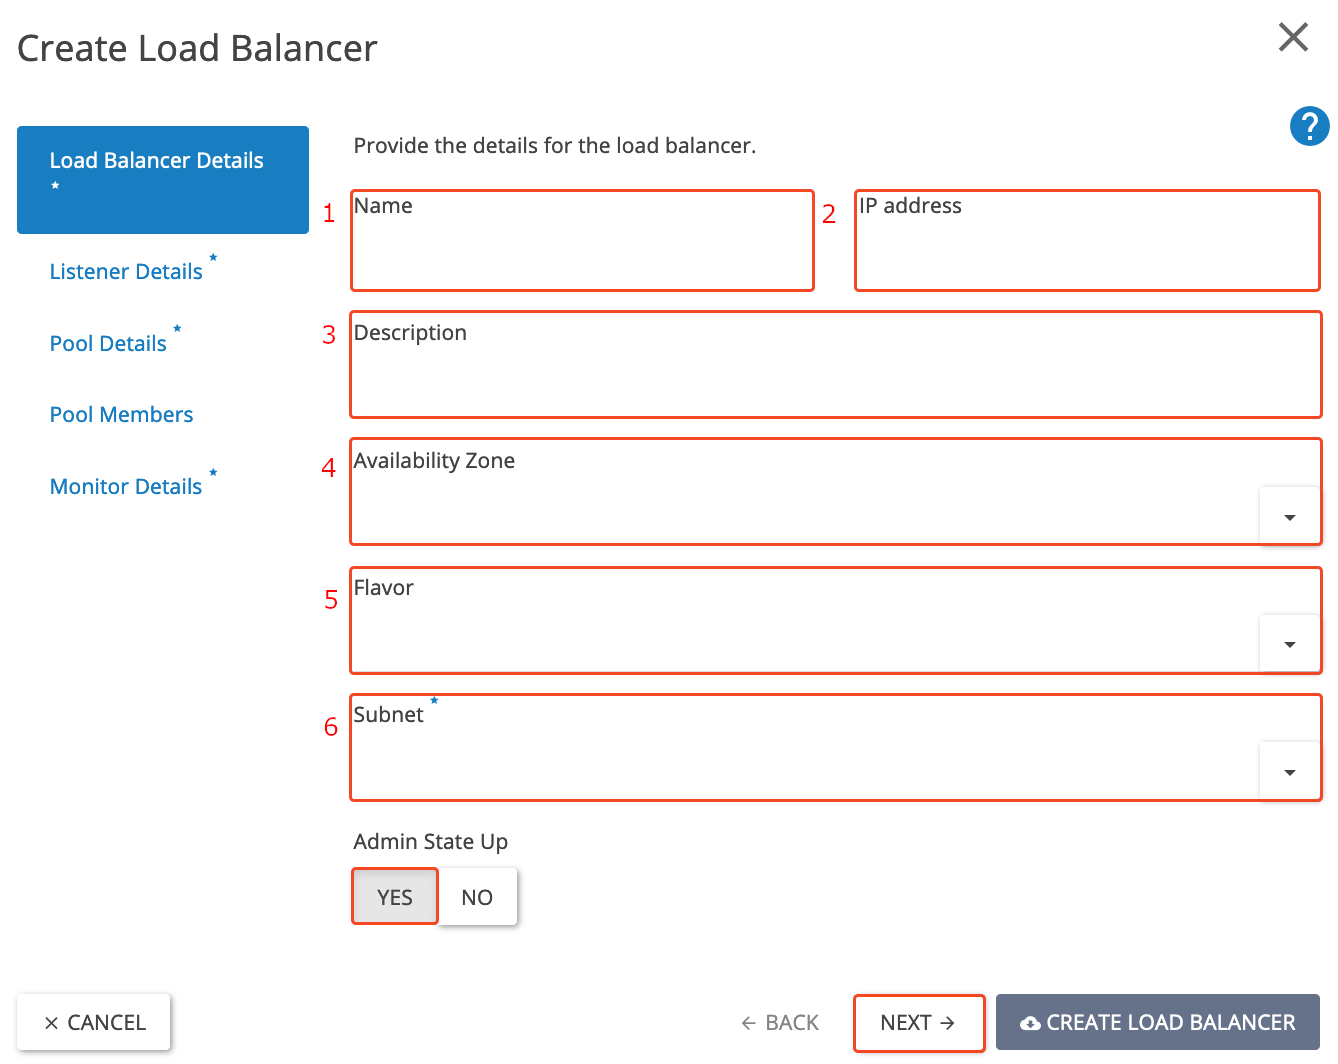
- Name: webserver-load balancer (you can also use a different name).
- IP address: In this guide, we will leave the 'IP address' field blank. This will assign a random IP address to the load balancer from the connected subnet. In a production environment, we recommend assigning a floating IP address so that your load balancer continues to forward traffic.
- Description: Load balancer for our web servers (you can fill in your own description).
- Availability Zone: Leave blank or choose an availability zone of your choice (AMS2-EQ3, AMS2-EU4, or AMS2-GS5).
- Flavor: Choose a flavor of your choice; for this tutorial, we will use the Medium flavor. We recommend starting with the Medium flavor, and if the workload increases, you can always scale up.
- Subnet: webserver-subnet (as created in the "Create an internal network" paragraph).
Step 3
Click on the 'Next' button to go to the 'Listener Details' tab. Fill in the following fields:
- Name: webserver-listener-https
- Description: HTTPS listener for our web servers (fill in what's best for you)
- Protocol: HTTPS
- Port: 443
- Admin state up: Yes (if the admin state is 'YES', the load balancer distributes incoming traffic between the backend servers. If it's 'NO', it's inactive and doesn't process traffic.)
Leave all other options as they are.
At TERMINATED_HTTPS, the load balancer performs TLS termination: it decrypts the traffic and sends it unencrypted to the backend servers. In this case, it is mandatory to upload an SSL certificate, which can only be done via the OpenStack CLI (not via the web interface). See: Upload an SSL certificate
At HTTPS without TLS termination (i.e., no TERMINATED_HTTPS), the traffic remains encrypted until it reaches the backend servers. In this case, the traffic is simply forwarded without decryption, and uploading a certificate to the load balancer is not necessary.
Note: If you don't want TLS offloading (termination), you can simply use HTTPS, as long as you don't select TERMINATED_HTTPS. You also don't need to upload a certificate.
Choose TCP protocol only if you want a fully transparent passthrough without any inspection or processing of TLS traffic. This is usually not necessary if you configure HTTPS correctly without termination.
Step 4
Navigate to the 'Pool Details' tab.
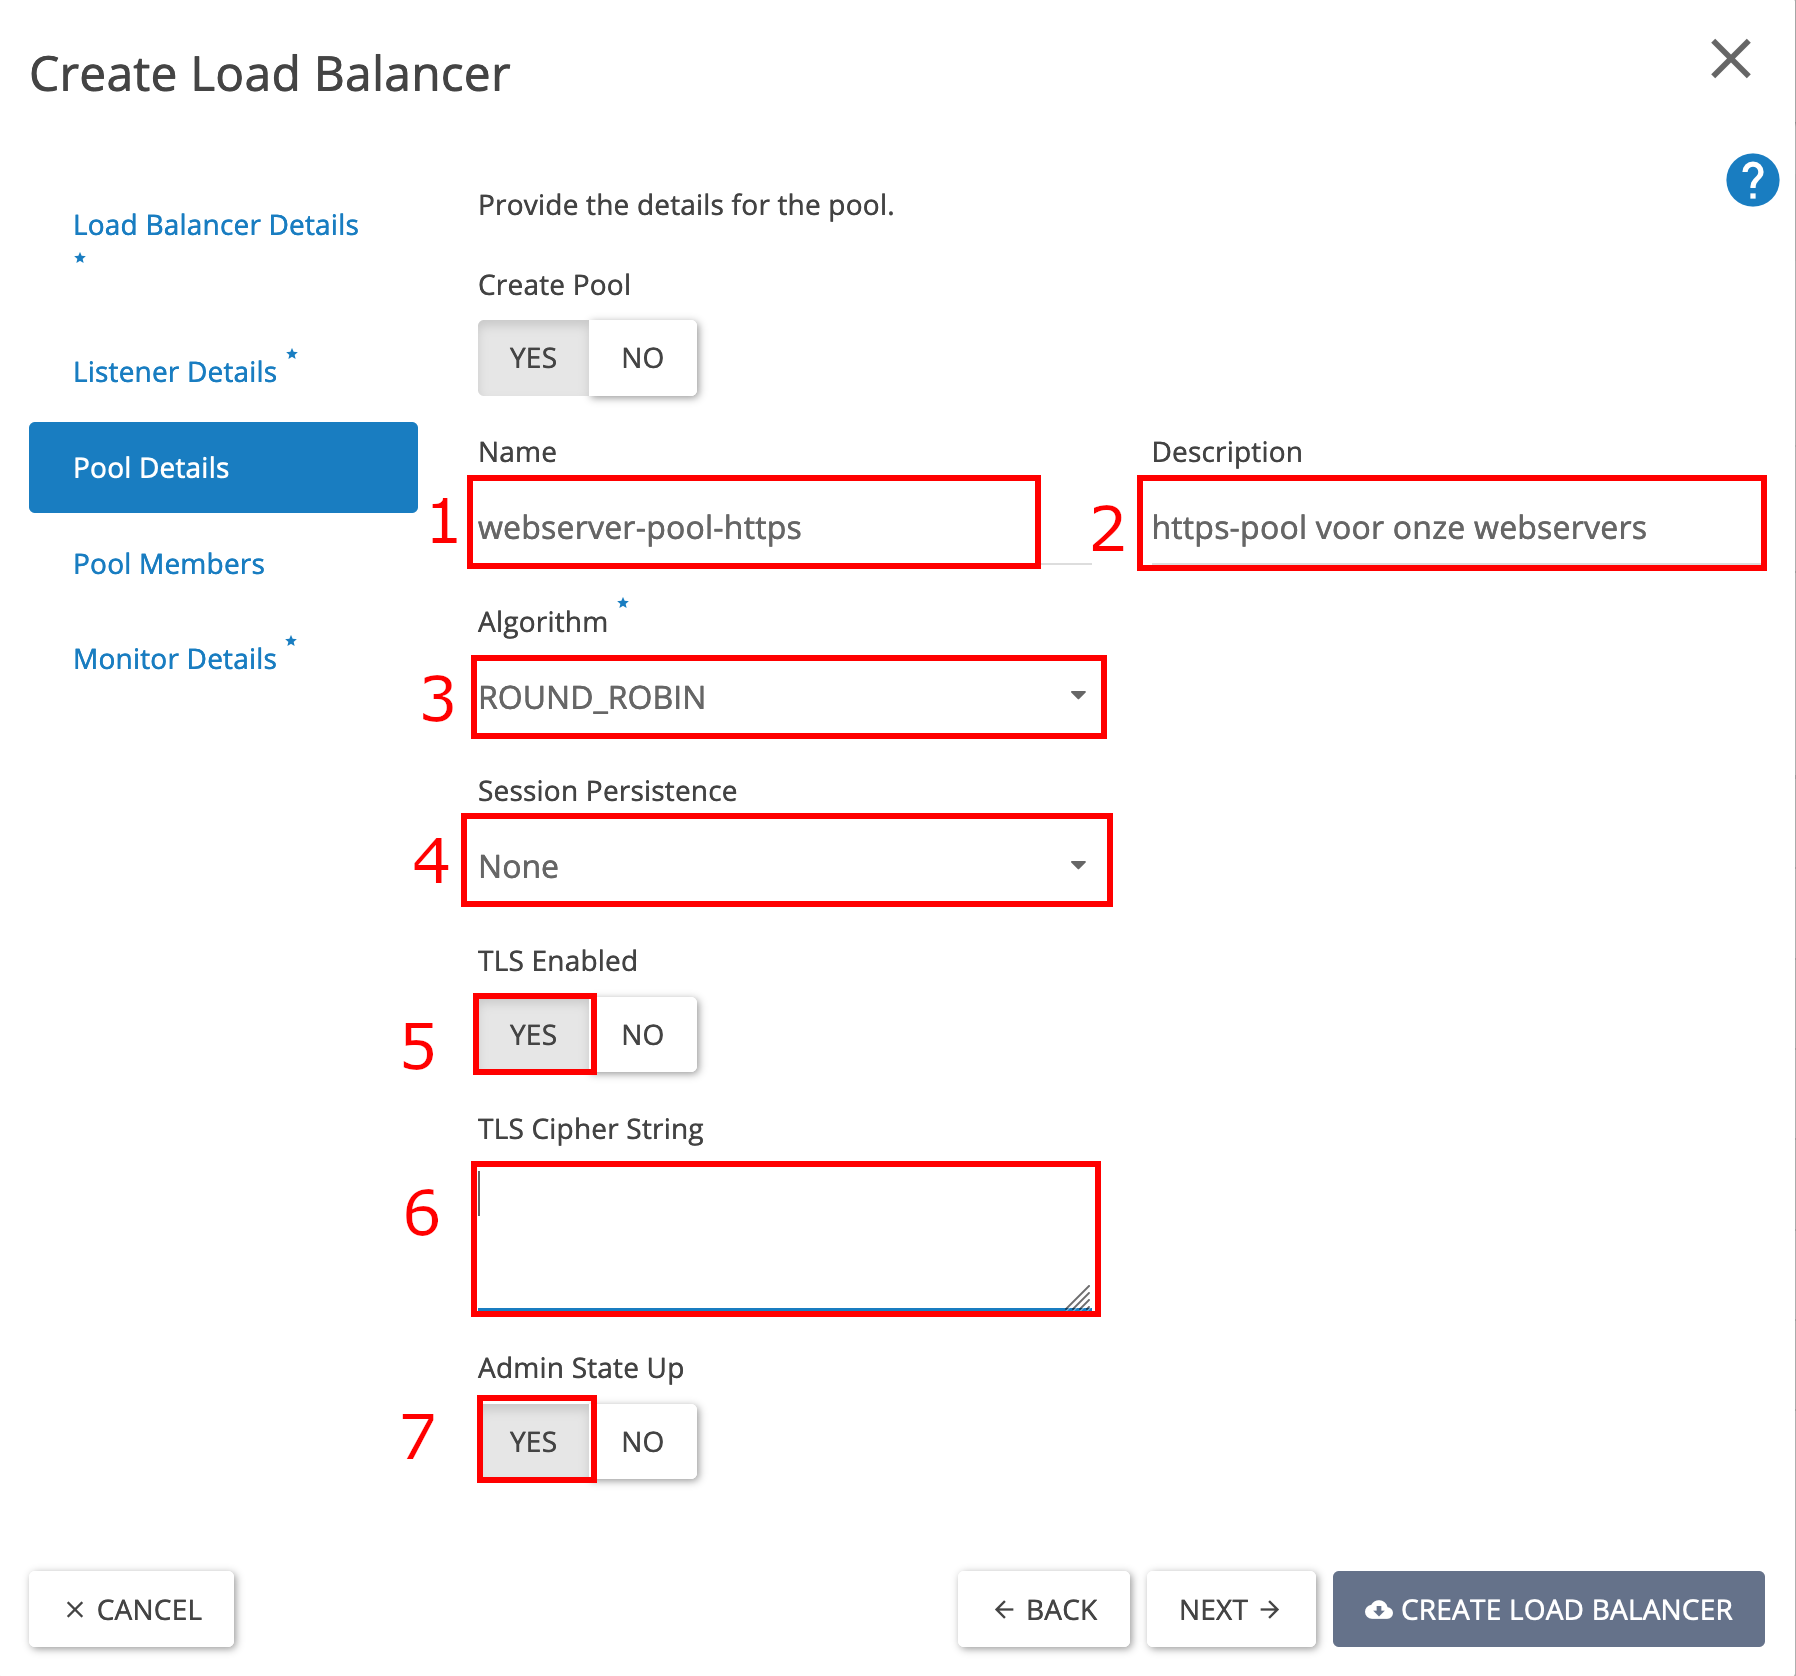
Fill in the fields with the following information:
- Name: webserver-pool-https.
- Description: HTTPS pool for our web servers.
- Algorithm: least connections (more information about the different types of algorithms and what they do can be found here).
- Session Persistence: This option ensures that all requests from a client remain connected to the same instance during the session. This option must be enabled for applications that use 'state information', such as shopping carts in web shops.
- TLS Enabled: yes (to use the most up-to-date SSL standard).
- TLS Cipher String: Fill in your TLS Cipher String, for example, ECDHE-RSA-AES128-GCM-SHA256:ECDHE-RSA-AES256-GCM-SHA384 for a combination of security and compatibility, or ECDHE-ECDSA-AES256-GCM-SHA384 for strong encryption.
- Admin State up: yes.
Step 5
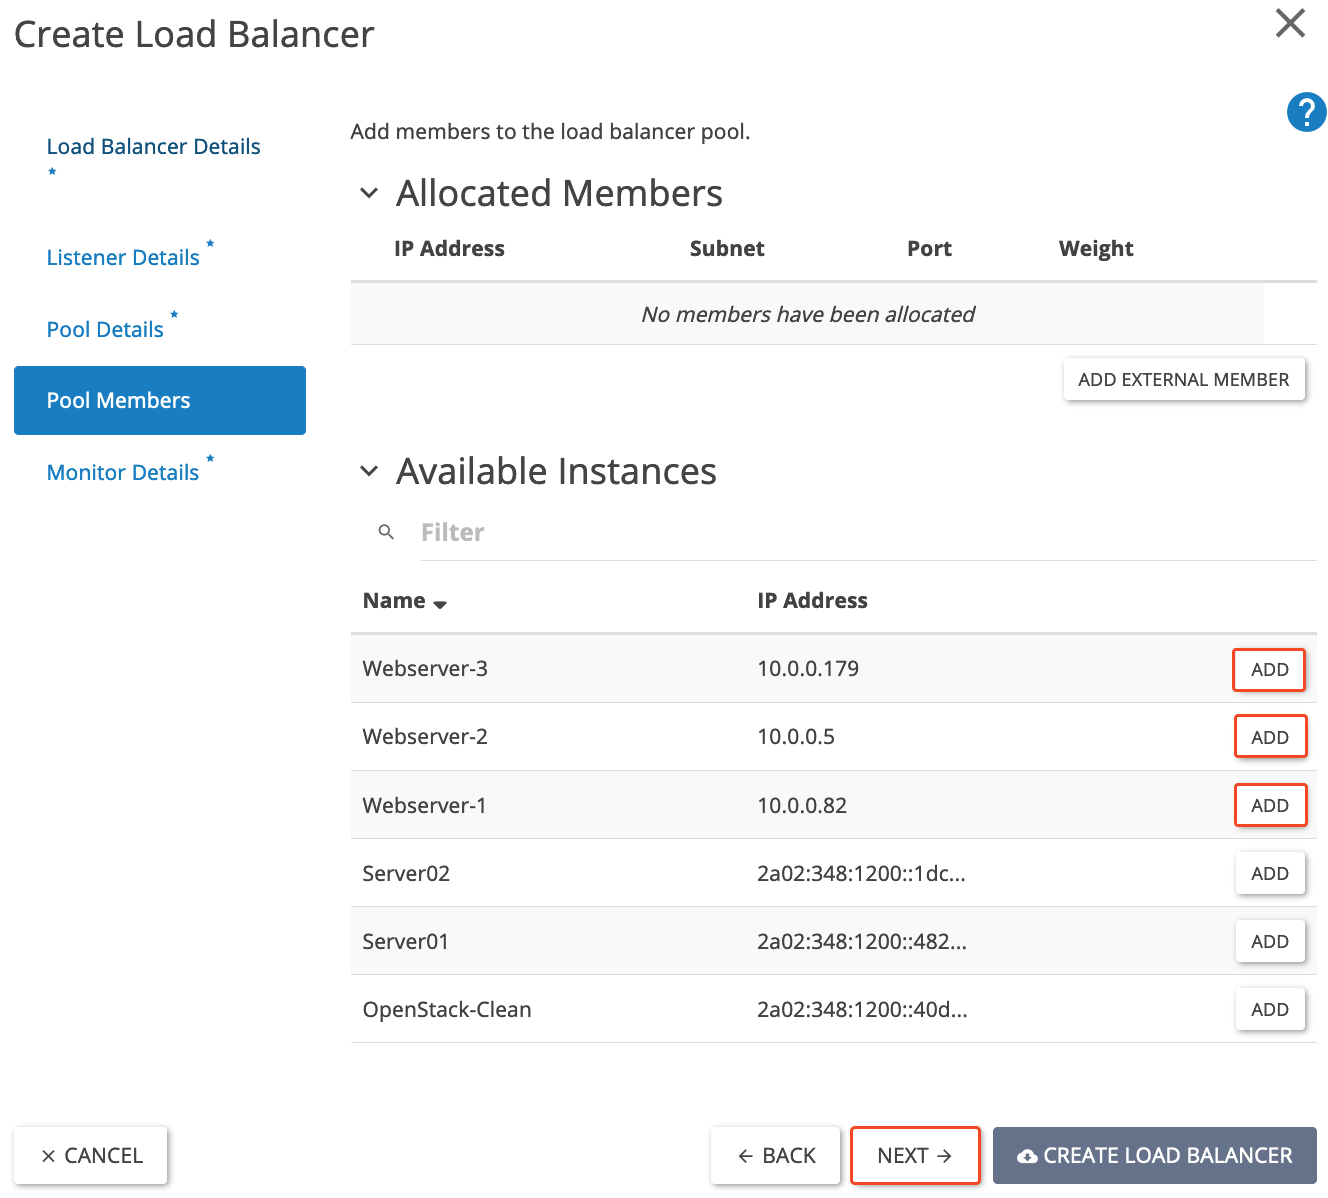
Now open the 'Pool Members' tab. Search for the instances you want to include in the load balancer pool (allocated members) and click on 'ADD' for each instance.
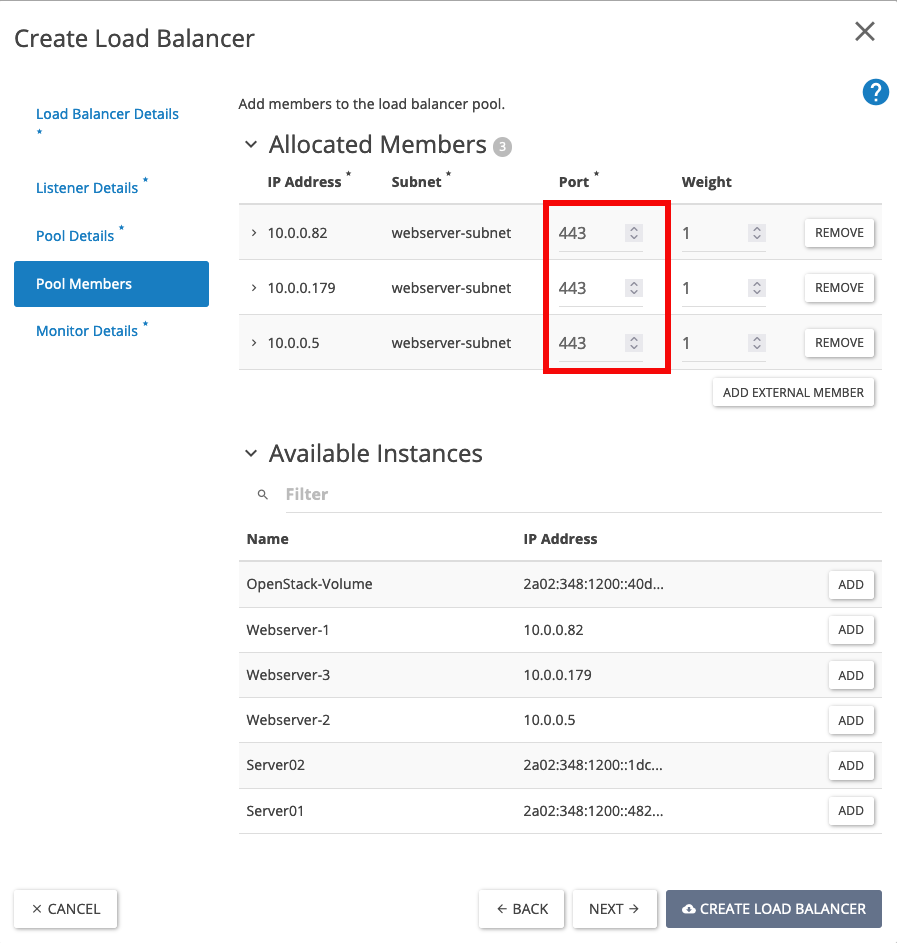
Step 6
Enter the designated 'Port' for the host (443) and set the 'Weight' to (1). The weight determines which server is assigned a connection first. The higher you set the weight, the sooner a connection is forwarded to this instance. Repeat this step for all web servers you add. In the example below, all web servers have the same 'Weight', resulting in an equal distribution of all incoming connections to the load balancer across the underlying web servers (round robin). The pool 'algorithm' you set in step 4 also affects the course of the connections, so keep that in mind.
Click on 'Next' to proceed to the 'Monitor Details' tab.
Go to the 'Monitor Details' tab by clicking on 'Next'.
Step 7
Only change the following fields in the 'Monitor Details' screen:
1. Name: webserver-health-monitor-https.
2. Type: HTTPS.
3. Admin state up: Yes.
Finally, create the load balancer by clicking on (4) 'Create Load balancer'.

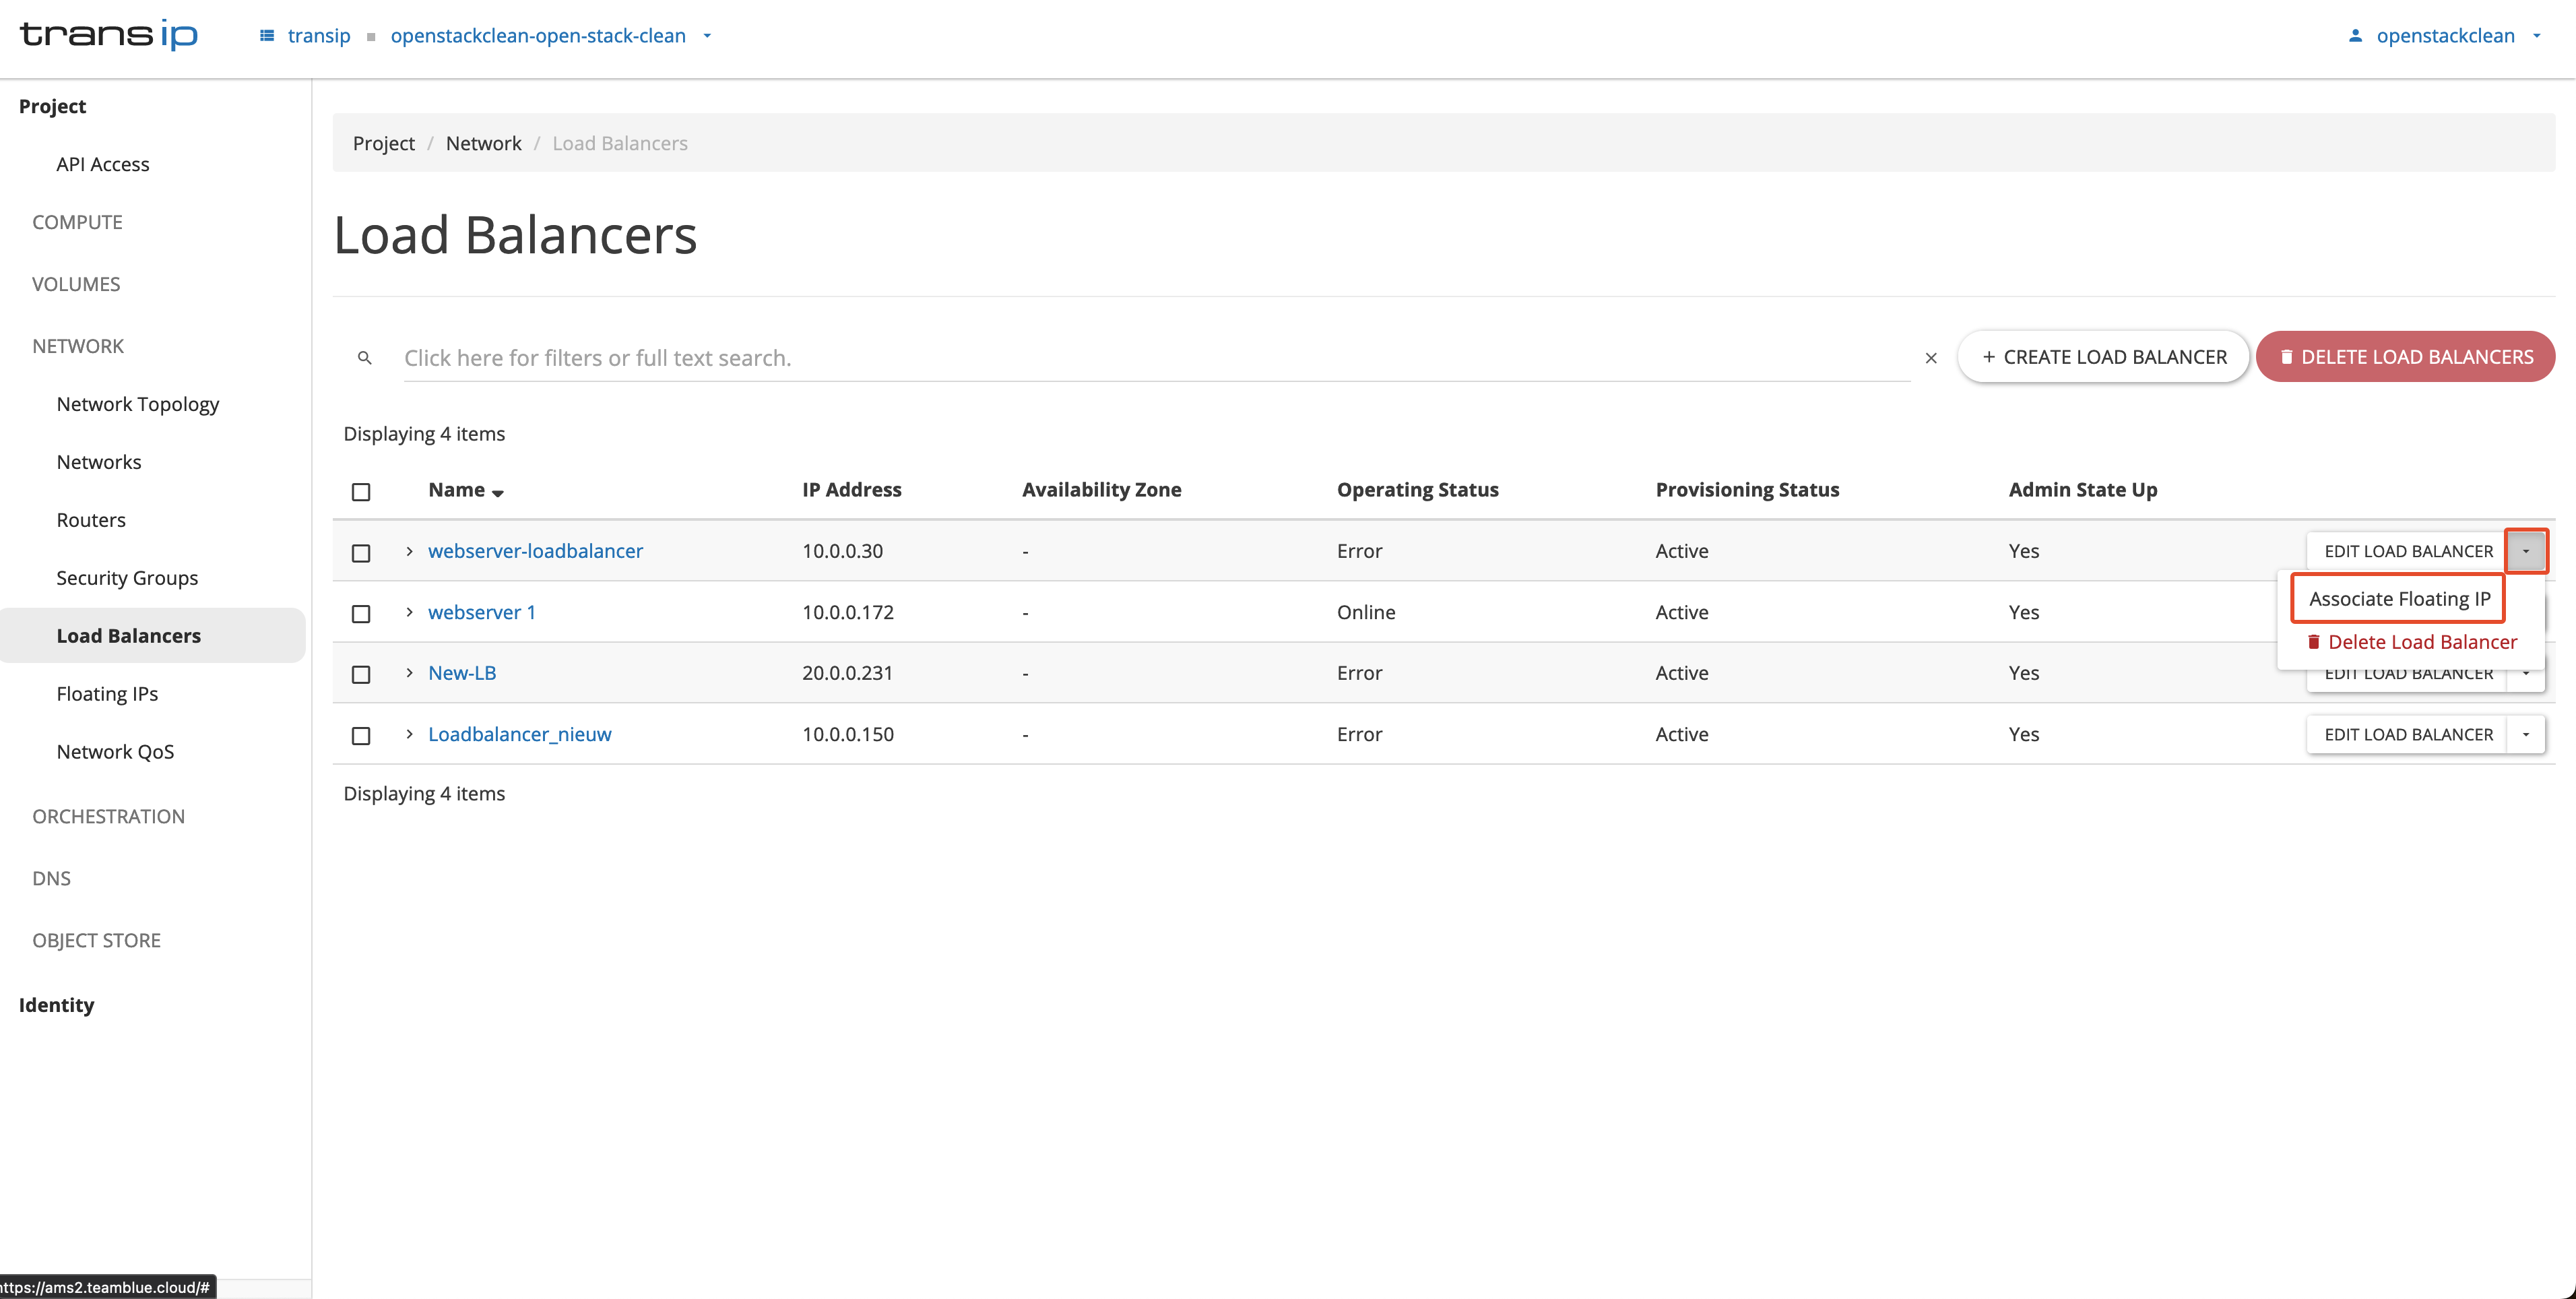
Step 8
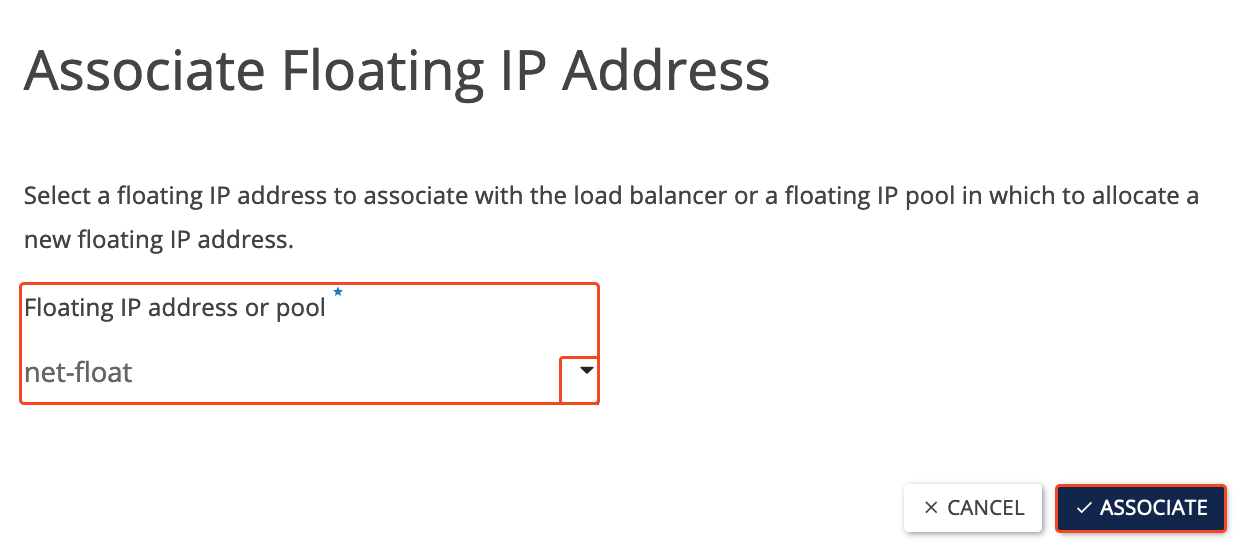
Find the load balancer you just set up and click on the small arrow next to it. Select 'Associate Floating IP' from the dropdown menu.
Step 9
Choose a available Floating IP or select the net-float-pool to automatically assign a new Floating IP address. Confirm your choice by clicking on Associate.
Step 10
Wait until the operating status in the 'Load Balancers' overview window changes to 'ONLINE'. After this status has changed, you can navigate to http://<floating-ip> to see your load balancer in action.
You have just created a load balancer in OpenStack. If you are interested in further customizing your load balancer, we recommend checking out the OpenStack Octavia load balancer documentation.