


To connect to a Linux server via SSH, you can use SSH keys, also known as SSH key pair. Connecting to SSH keys is a very secure way to connect to a VPS. For more general information on SSH keys, see our article 'What are SSH keys?'
In this article we show you how to generate SSH keys and then use them.
Generating and using an SSH key in Windows 10 or 11
In Windows (10 or 11), you have two options at your disposal to generate an SSH key: the Windows Subsystem for Linux (WSL) and Putty gene. Which option you use depends on how you use SSH: WSL or Putty.
- WSL allows you to use the command-line variant of a Linux distro such as Ubuntu locally on your Windows computer / laptop. You can then connect to a remote Linux server via command line.
- Putty allows you to connect remotely via SSH to a Linux VPS. For more information on Putty, see our guide 'what is command-line / SSH?'
The experience is almost the same for both of them as working through the command line of a Linux distro.
Generate SSH keys in WSL.
Don't have Windows Subsystem for Linux installed on your Windows computer or laptop yet? First go through Microsoft's installation manual and install, for example, Ubuntu 22.04.
Step 1
Start the Windows Subsystem for Linux (Windows Start button> search for the name of the installed distro, for example 'Ubuntu').
Step 2
Generate a public and private key with the ssh-keygen command:
ssh-keygen -t ed25519
While generating the SSH key pair, you will see output that looks something like this:
Generating public/private ed25519 key pair.
Enter passphrase (empty for no passphrase):
Enter same passphrase again:
Your identification has been saved in /home/transip/.ssh/id_ed25519.
Your public key has been saved in /home/transip/.ssh/id_ed25519.pub.
The key fingerprint is:
SHA256:1xCxkwjQLjz9CsL98GoTVmdmxO40zQqa5uxlE18zGcs transip@LAPTOP-DHLQLNU
The key's randomart image is:
+--[ED25519 256]--+
|                 |
|.                |
|o     o .        |
| + . = *         |
|o + + B S        |
|.o o X oo        |
| oX=B Oo..       |
|+.E+.+.*..       |
|+*+o++o +o.      |
+----[SHA256]-----+
Your key pair has now been generated. To be able to use it, copy the public key to the server you want to connect to via SSH. We explain this procedure in this section and it works the same for WSL, MacOS and Linux.
Generating and using an SSH key with Putty
Putty automatically comes with a program called Puttygen. This allows you to generate and use SSH keys to connect to your VPS using the steps below.
Step 1
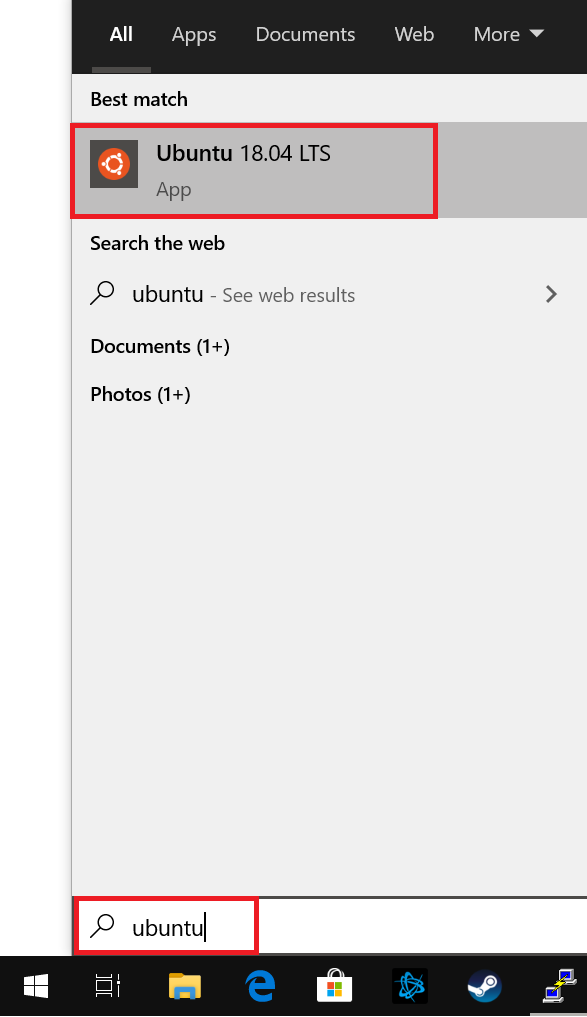
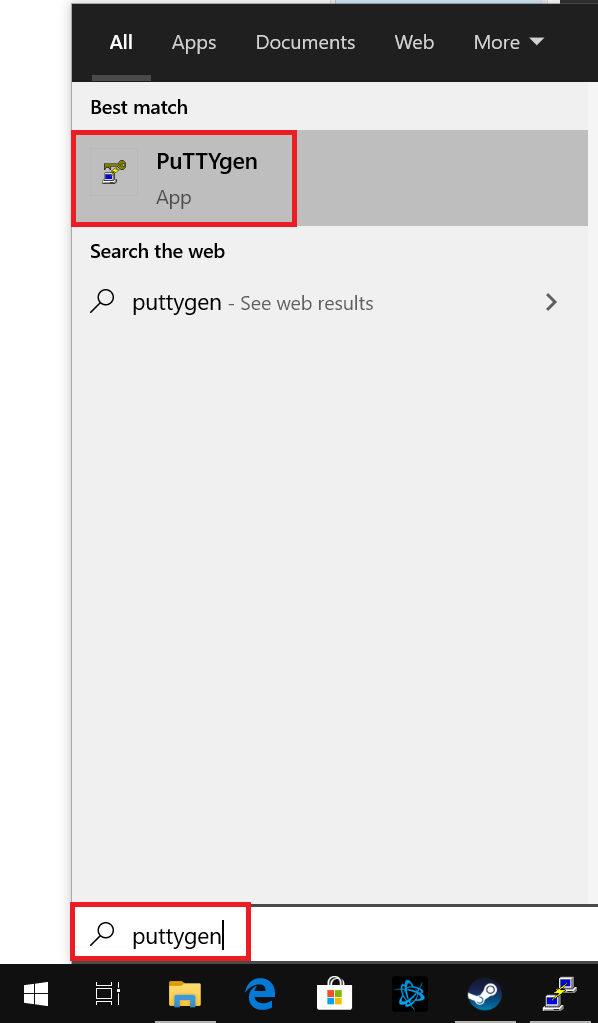
Click on the Windows Start button and search for 'Puttygen'.
Step 2
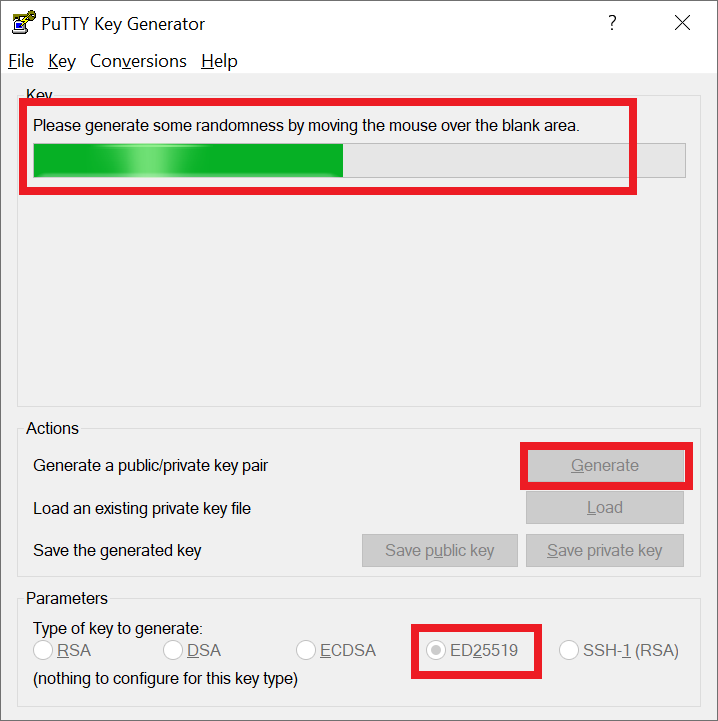
You can generate different types of keys and are free to adjust the number of bits. We recommend generating an ed25519 key as it's the safest option (at the time of writing).
Click 'Generate' when you have set this and then move your mouse over the gray box as indicated under 'Key' in the example below.
Step 3
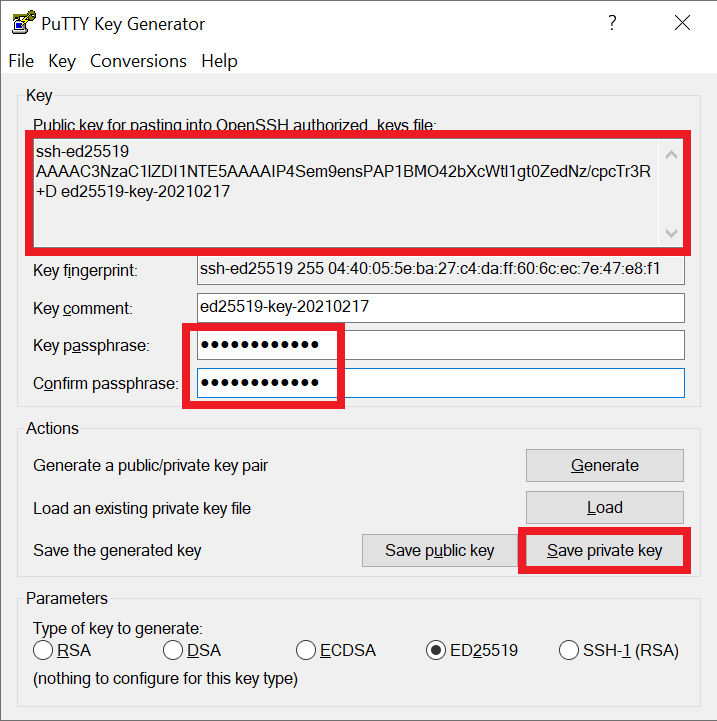
When the keys are generated, you will see your public key plus some additional options as in the example below.
-
Set a passphrase: a passphrase encrypts your private key and protects it with a password. Suppose a hacker manages to get your private key, he will not be able to do that without the passphrase.
- Save the private key via 'Save private key'.
- Copy the public key (select ssh-ed25519 by clicking and dragging with the mouse and copying with ctrl + c), for example paste it into Notepad (ctrl + v) and save the file with the name id_ed25519.pub.
The reason for this is that the option 'Save public key' uses a slightly different format that does not work immediately when you use it to authenticate yourself.
Finally, close Puttygen and open Putty.
Step 4
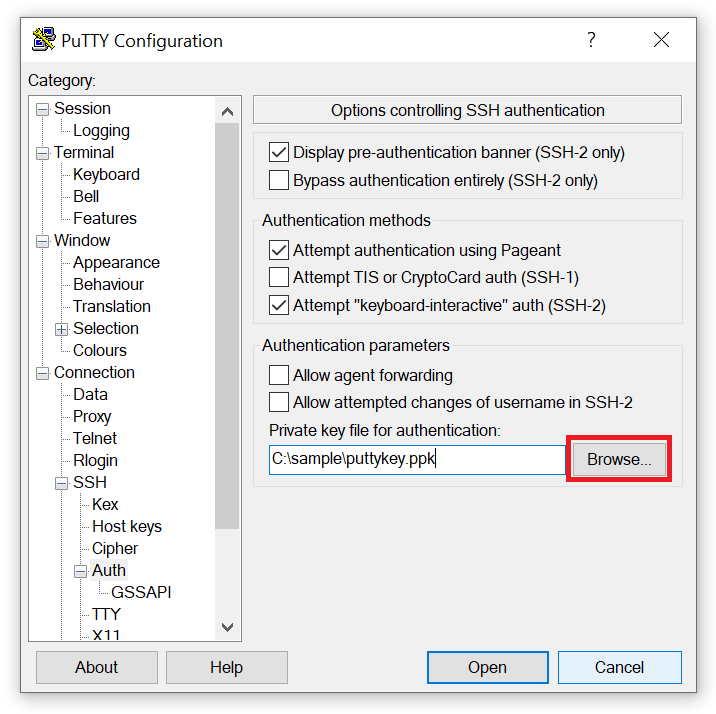
In Putty, enter the Host Name or IP address of your VPS and your SSH port used (or load a saved session), then click 'Connection'> 'SSH'> 'Auth'.

Step 5
Click on 'Browse' and select your private key in the folder where you saved it in step 3.
Optional - username
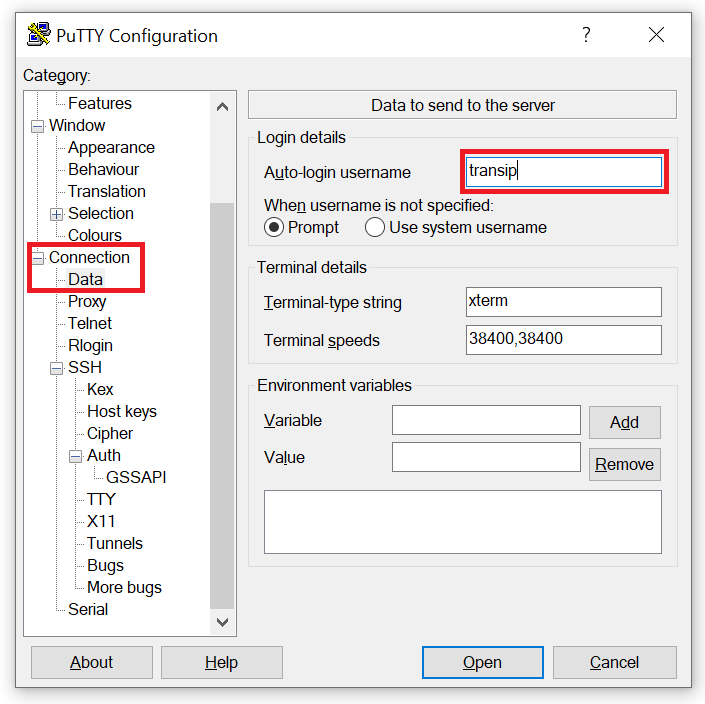
To automatically enter your username, click on 'Data' under 'Connection' in Putty and enter the username of your VPS under 'Auto-login username'.
Optional - Save session
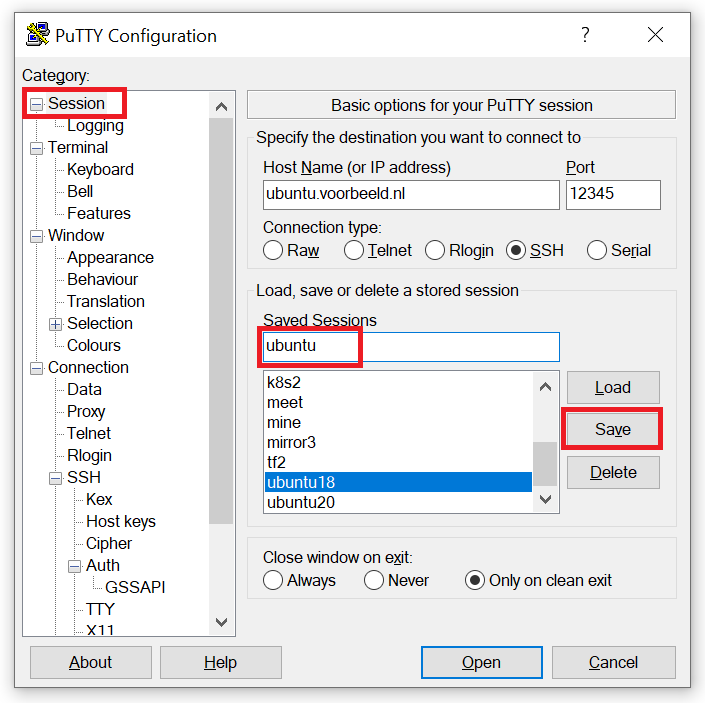
Click 'Session' > name your session under 'Saved Sessions' > click 'Save' to save the settings. In the future, you only have to select the saved session and click on 'Load' to connect directly to your VPS.
You have now created a private key with Puttygen and linked it to a session in Putty. To use it, the public key must be added to your VPS. Follow the steps under 'Adding a public-key directly on a VPS'.
Generating an SSH key in MacOS / Linux
Step 1
Start a terminal.
Step 2
Generate a public and private key with the ssh-keygen command:
ssh-keygen -t ed25519
While generating the SSH key pair, you will see output that looks something like this:
Generating public/private ed25519 key pair.
Enter passphrase (empty for no passphrase):
Enter same passphrase again:
Your identification has been saved in /home/transip/.ssh/id_ed25519.
Your public key has been saved in /home/transip/.ssh/id_ed25519.pub.
The key fingerprint is:
SHA256:1xCxkwjQLjz9CsL98GoTVmdmxO40zQqa5uxlE18zGcs transip@LAPTOP-DHLQLNU
The key's randomart image is:
+--[ED25519 256]--+
|                 |
|.                |
|o     o .        |
| + . = *         |
|o + + B S        |
|.o o X oo        |
| oX=B Oo..       |
|+.E+.+.*..       |
|+*+o++o +o.      |
+----[SHA256]-----+
Your key pair has now been generated. To be able to use it, copy the public key to the server you want to connect to via SSH. We explain this procedure in the next section and it works the same for WSL, MacOS and Linux
Adding a public SSH key to your VPS
After generating an SSH key pair, copy your public key to your VPS. When you subsequently connect to your server via SSH, it is automatically checked whether the public key on your VPS belongs to the private key on your computer. If yes, the connection is made without the need for a password. Adding the public key works the same for WSL, MacOS and Linux.
There are two options to add the public key to your VPS:
Add a public key via ssh-copy-id
Step 1
If you have not previously added a public key to your Linux server, the file and folder where the public keys are stored does not usually exist yet and you must create it manually. In that case, first connect to your server via SSH with the command:
ssh user@123.123.123.123
- Replace user with the name of the user you want to connect to via SSH. This user must exist on your server.
- Replace 123.123.123.123 with the IP address of your VPS.
- Optionally, use the suffix -p 1234 (ssh -p 1234 user@123.123.123.123) to specify a different SSH port. More information on changing your SSH port can be found here.
Step 2
Use the following command to create the ~ / .ssh folder if it doesn't already exist, and add the authorized_keys file in it.
mkdir ~ / .ssh && touch ~ / .ssh / authorized_keys
Close the SSH connection to your VPS with the command:
exit
Step 3
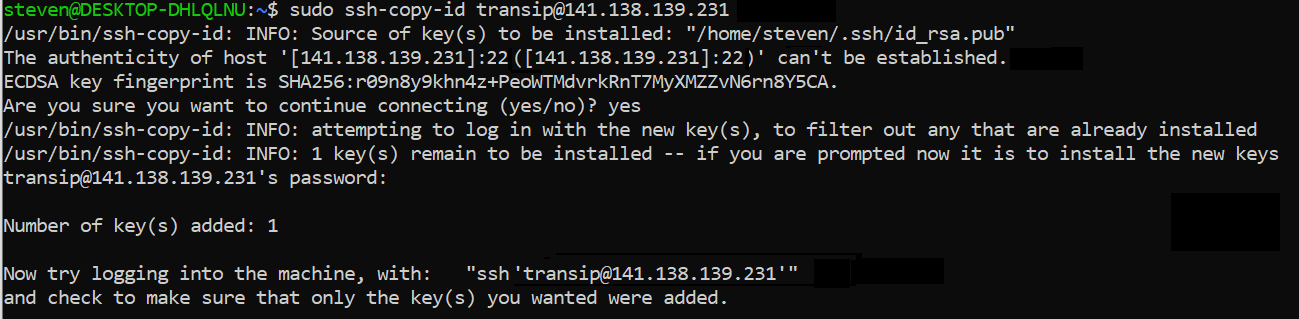
Copy the public key from your computer to the authorized_keys file on your VPS with the ssh-copy-id command.
In the example below, replace user with the username of your VPS and 123.123.123.123 with the IP address of your VPS.
sudo ssh-copy-id user@123.123.123.123
Optionally, you can specify another SSH port with the suffix -p 1234. In that case, replace 1234 with your SSH port number.
The output will look like this (type yes if asked for confirmation):
Are you getting an error 'ERROR: no identities found'? This message is the result of id_rsa.pub not being in ~/.ssh/id_rsa.pub. ~ defaults to your current user's home directory, for example /home/transip/.ssh/id_rsa.pub. This can for example happen if you've switched to the root user to generate the key and later switch to a regular user and try to copy the key.
Check if the key is generated on the correct computer, in which directory it's located, and specify where id_rsa.pub can be found with the addition -i. A couple of examples are:
sudo ssh-copy-id -i ~/.ssh/id_rsa.pub user@123.123.123.123
sudo ssh-copy-id -i /etc/keys/id_rsa.pub user@123.123.123.123
sudo ssh-copy-id -i /home/root/id_rsa.pub user@123.123.123.123
Step 4
At the end of the output in step 3, you will see how to use your SSH keys, with the same command as in step 1:
ssh user@123.123.123.123
Optionally, specify the SSH port again with the suffix -p 1234. In that case, replace 1234 with the SSH port number of your VPS.
Step 5
SSH keys have the main purpose of securing your SSH connection. If you use SSH keys, it is wise to no longer allow authentication via passwords (i.e. without SSH key). To do this, open your SSH configuration:
sudo nano / etc / ssh / sshd_config
Step 6
Adjust the value of PasswordAuthentication to 'No':
PasswordAuthentication no
Then save the changes and close the file (ctrl + x > y > enter).
Step 7
Finally, restart the SSH server to process the changes:
sudo systemctl restart sshd
Adding a public key directly to a VPS
Step 1
Connect to your server via SSH.
- To connect via SSH with Putty, see this tutorial.
- For WSL, MacOS and Linux (via a terminal) you use the command:
ssh user@123.123.123.123
- Replace user with the name of the user you want to connect to via SSH. This user must exist on your server.
- Replace 123.123.123.123 with the IP address of your VPS.
- Optionally, use the suffix -p 1234 (ssh -p 1234 user@123.123.123.123) to specify a different SSH port. More information on changing your SSH port can be found here.
Step 2
If you have not previously added a public key on your Linux server, the file where the public keys are stored does not usually exist yet.
Use the following command to create the ~ / .ssh folder if it doesn't already exist, and add the authorized_keys file in it.
mkdir ~ / .ssh / && touch ~ / .ssh / authorized_keys
Step 3
Earlier in this tutorial you generated a public key on your computer / laptop. Open the public key (the file containing your public key is called id_ed25519.pub by default) with a text editor and copy it. In Windows you can use notepad for this, or in MacOS / Linux the program 'Texteditor'.
Step 4
Open the authorized_keys file, for example with:
nano ~ / .ssh / authorized_keys
Step 5
Paste your public key from step 3 into the file by clicking with the right mouse button. The result looks something like this:
ssh-ed25519 AAAAC3NzaC1lZBI1NTE5AAAAIT5Sem9ensPAP1BMO32bXcWtl1gt0ZedNz/cpcTr3R+D ed25519-key-20210217
Then save the changes and close the file (ctrl + x > y > enter).
Step 6
SSH keys have the main purpose of securing your SSH connection. If you use SSH keys, it is wise to no longer allow authentication via passwords (i.e. without SSH key). To do this, open your SSH configuration:
sudo nano / etc / ssh / sshd_config
Step 7
Adjust the value of PasswordAuthentication to 'No':
PasswordAuthentication no
Then save the changes and close the file (ctrl + x > y > enter).
Step 8
Finally, restart the SSH server to process the changes:
sudo systemctl restart sshd
Using a public key when ordering a VPS
Step 1
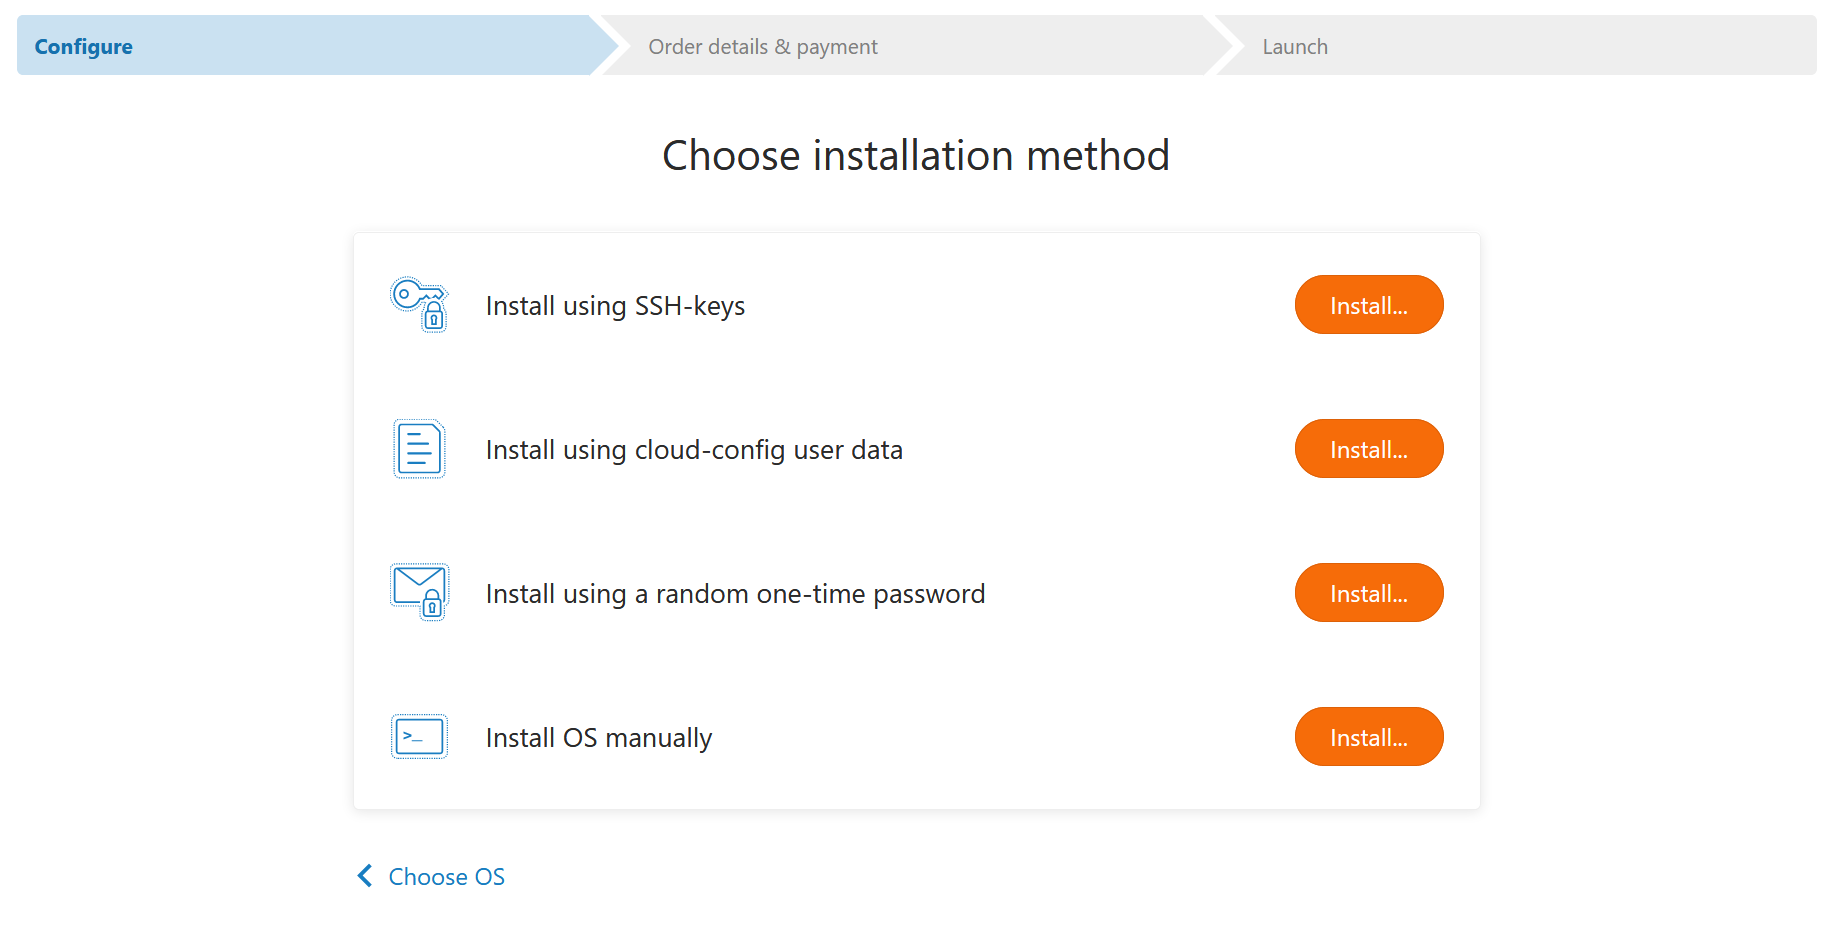
If you are logged in to your TransIP account, you will automatically see the SSH installation option during the ordering process as shown below. Have you not yet added an SSH key in your TransIP account? Then proceed to step 3, else proceed to step 2.
Are you not logged in to your TransIP account? Then either log in first, or click on 'Choose another installation method'.
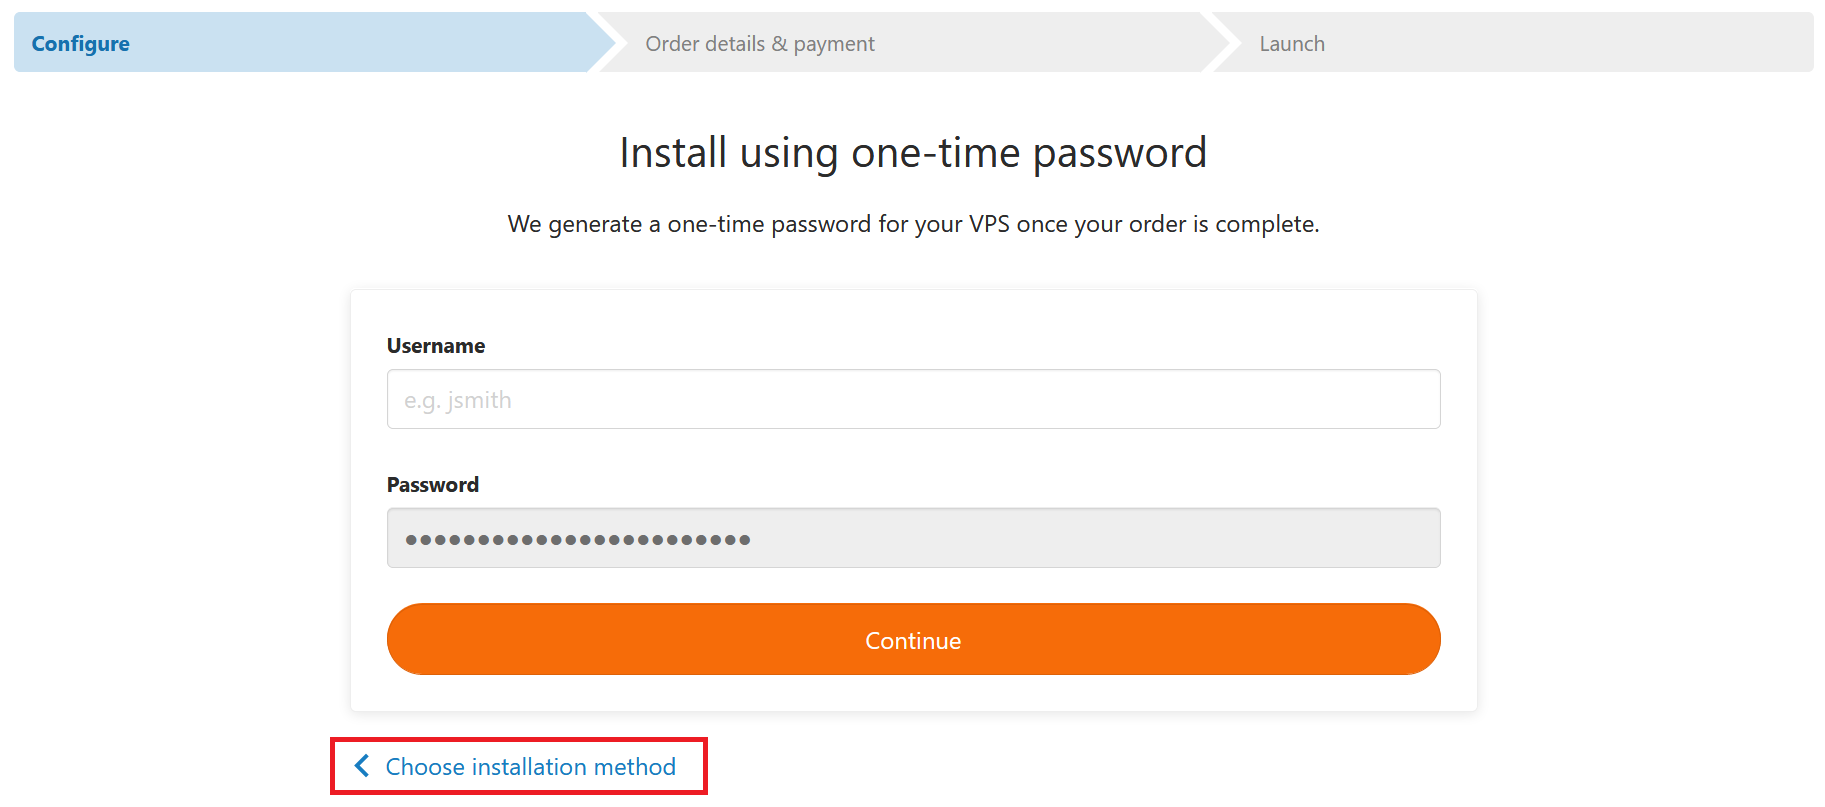
Then, click 'Install via SSH keys'.
Step 2
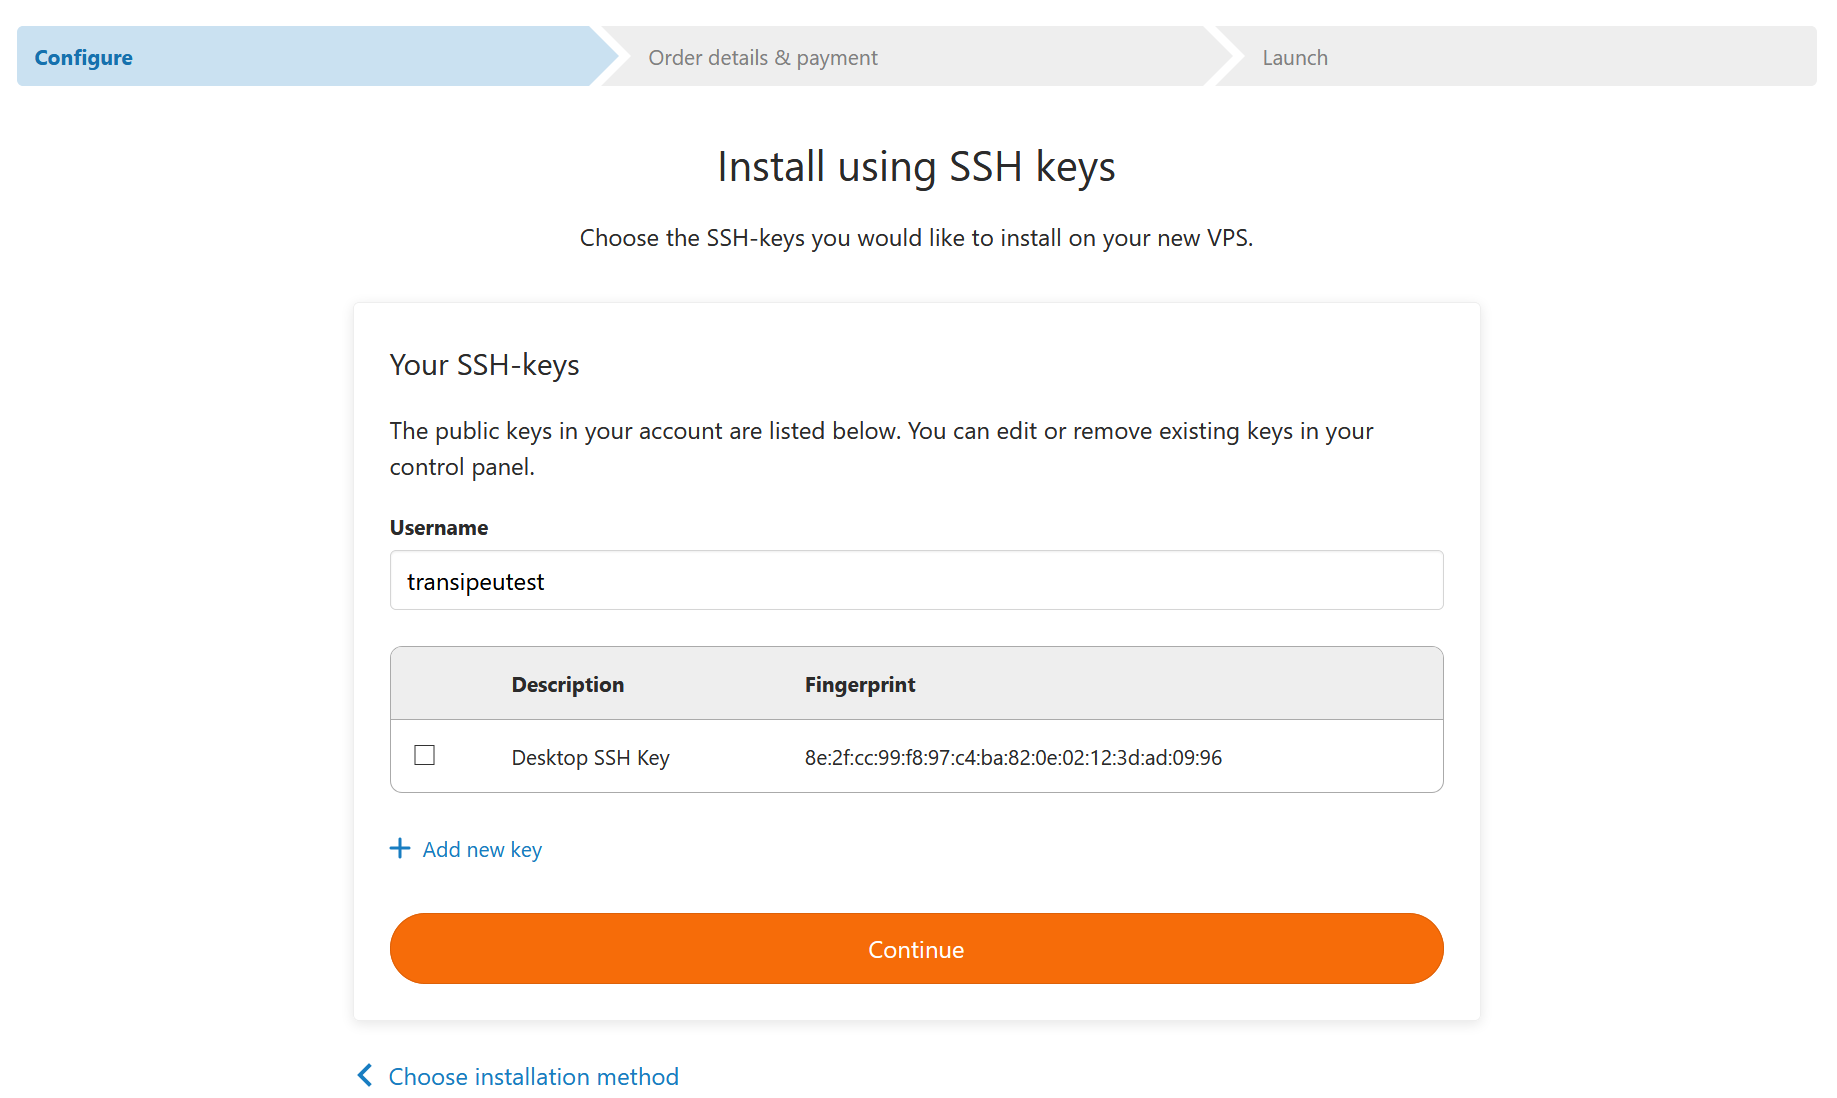
Have you added an SSH key before? Then select the desired key (s) and click on 'Continue'. The ordering process will then continue and after delivery of your VPS, you can directly connect to your VPS via SSH using your SSH key.
If you're adding a new key, proceed to step 3.
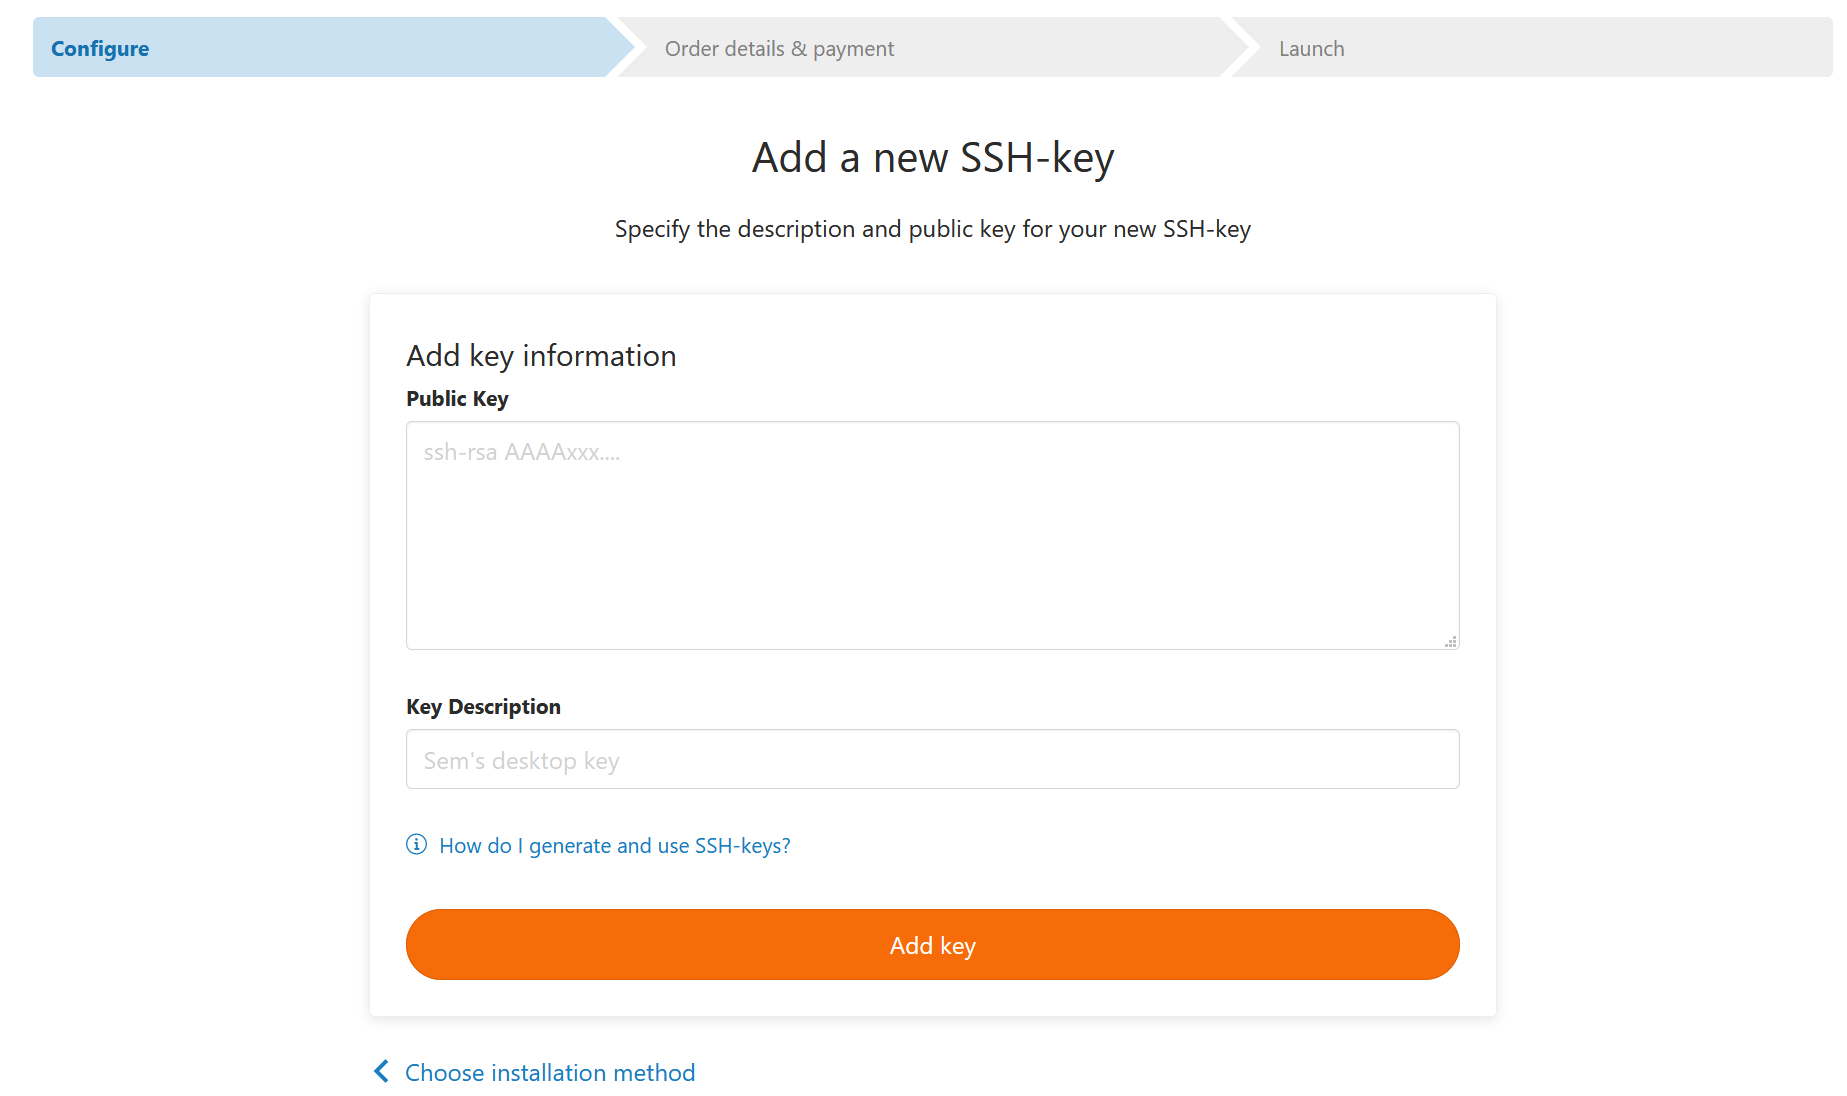
Enter the contents of your public key and a description (for example the name of your computer) and click on 'Add key'.
This brings us to the end of this tutorial. If you have any questions regarding this article, do not hesitate to contact our support department. You can reach them via the 'Contact us' button at the bottom of this page.
Do you want to discuss this article with other users? Please leave a message under 'Comments'.