SSH stands for Secure Shell, it is a network protocol that offers a (relatively) safe way to connect to a computer or server remotely. Connecting over SSH allows you do make changes to your webhosting package via the command line.
Command line is an interface in an operating system or program, in which you give a command to an operating system or program by typing commands on specific lines. This allows you to (for instance) edit a (config) file on your webhosting package, or execute commands.
In this article we will explain how to connect using SSH, and how to generate and add an SSH key to your webhosting package.
Connect using SSH
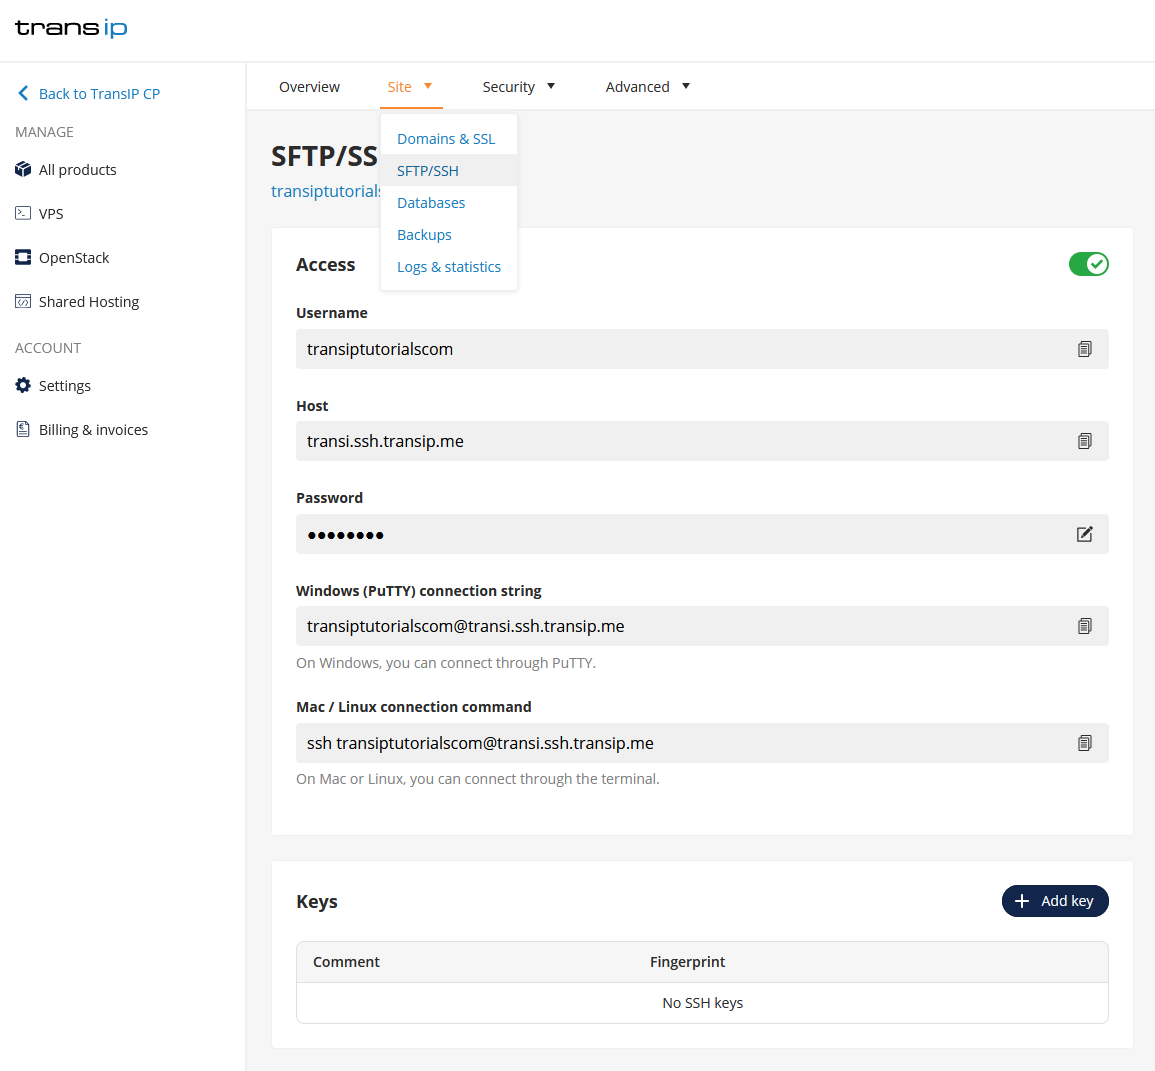
Look op your SSH details first in the control panel. To do so, log in to the control panel and navigate to your domainname via the 'Domain & Hosting' tab. Click 'Manage webhosting' next to 'Webhosting' to manage your website on the webhosting package.

Click 'Site' at the top, followed by 'SFTP/SSH'. The SFTP and SSH details are the same.
To make connecting easy, you can use the connection strings for Windows (PuTTY) or Mac/Linux in the overview. The string contains your SFTP/SSH Username and Host.
SSH in Windows
We recommend PuTTY for windows users. You can download PuTTY here. When you open PuTTY, you will be greeted by the following window:
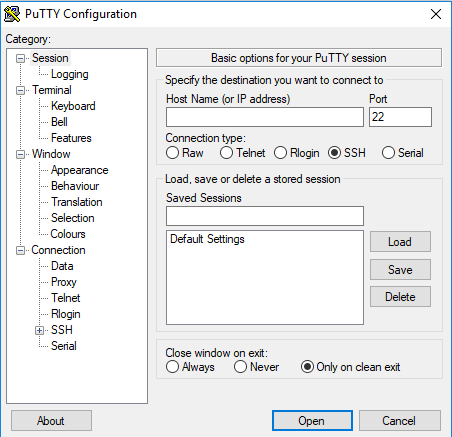
Fill in the following fields:
- Host Name: Enter your 'Windows (PuTTY) connection string' here, which can be found in your control panel.
- Port: The port is 22.
- Saved Sessions: Enter a name for your webhosting package.
- Save: Click 'Save' to save your settings. This means you can hereafter always select the name of your webhosting package and connect to it by selecting 'Load' > 'Open'.
- Open: This starts the SSH connection to your webhosting package.
After a connection is made, you are first asked to log in. Your password will remain hidden as you type it (but it will work). This means you will have enter your SFTP/SSH password eventhough you can not see it on screen, and press 'enter'.
SSH in MacOS / Linux
MacOS and Linux already have an SSH client build into the respective OS. You can use SSH by making use of the terminal. You can find the terminal in 'finder' > 'applications' > 'utilities' (support tools), or at the bottom in your Dock. You can connect to your webhosting package by using the following command:
ssh <username>@<host>
Replace the example above with the 'Mac / Linux connection command' in your control panel.
Generating and adding an SSH Key
Je hebt met het webhostingpakket de optie om een beveiligde verbinding op te zetten met een SSH-key. Deze bestaat uit een public en een private key. De private key bewaar je op je eigen computer en is dus geheim. De public key voeg je toe aan je webhostingpakket en verifieert wat er in de private key staat en maakt zo een beveiligde verbinding.
You can generate an SSH key by using the steps from this Knowledge Base article: 'How do I generate and use SSH keys?'. The steps for a webhosting package are almost identical. Just make sure you do not save the public key (key type ED25519 of RSA) locally during step 3, but copy it and paste it in your control panel.
Once you have made a private and public key, you can add the public key to your webhosting package by clicking '+ Add key' in the SSH/SFTP overview. Paste the public key in the empty field and click 'Add'.

SSH commands
lscd www
cd ..cat error.logvi .htaccess
cd www
wp core version
wp core update
wp core update --version=6.2 --force
wp plugin list
wp theme list
wp plugin update --all
wp theme update --all
wp plugin update wordfence
wp theme update twentytwentytwo
wp plugin deactivate akismet wp plugin activate akismet wp theme deactivate twentysixteen wp theme activate twentytwentytwo
wp plugin delete/install: Delete or install plugins with this. Specify which plugin you want to delete or install by adding the name of the plugin after the command. The same goes for themes.
wp plugin install wordfence
wp plugin delete
wp theme install twentytwentythree
wp theme delete twentytwentyone