This article explains how to configure your email address at TransIP using Outlook 2010, 2013 and 2016 for Windows.
Take note: We use Outlook 2016 to display the steps in this article; the steps for Outlook 2010 and 2013 are almost identical. Any differences between the Outlook versions are highlighted.
Versions older than Outlook 2010 are not supported. If you're not sure which version of Outlook you're using, visit Microsoft's page 'What version of Outlook do I have?'.
Haven't created an email address yet? Get started right away with our Web Hosting and Email Only services. Read the article 'Creating a new email address' for more information.
To use email with our Web Hosting and Email Only services, your domain name needs to use the correct DNS records.
If your domain name uses the TransIP settings, we will automatically take care of the DNS for you. If you want to configure the DNS yourself, make sure to add the MX, TXT and CNAME records for your Web Hosting or Email Only service.
- The article 'The DNS settings of my Web Hosting' shows you which DNS records you need to add.
- The article 'Entering DNS records and nameservers via the control panel' shows you how to add these DNS records.
Configuring your email address in Outlook 2010, 2013 and 2016
How to get started depends on the version of Outlook, if you're opening Outlook for the first time and if you've configured an email address in Outlook before.
Use these steps if you've already configured an email address in Outlook 2010, 2013 and 2016 before.
In the top of Outlook, click 'File' > 'Info'. Next, click '+ Add Account'.
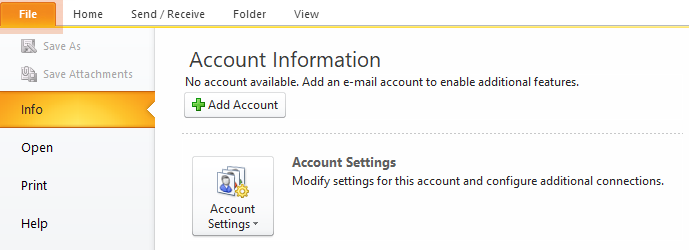
If you're using Outlook 2013 or 2016, continue to Step 1.If you're using Outlook 2010, you will see the window 'Account settings'. Click on 'New...' below the tab 'Email' and continue to Step 1.
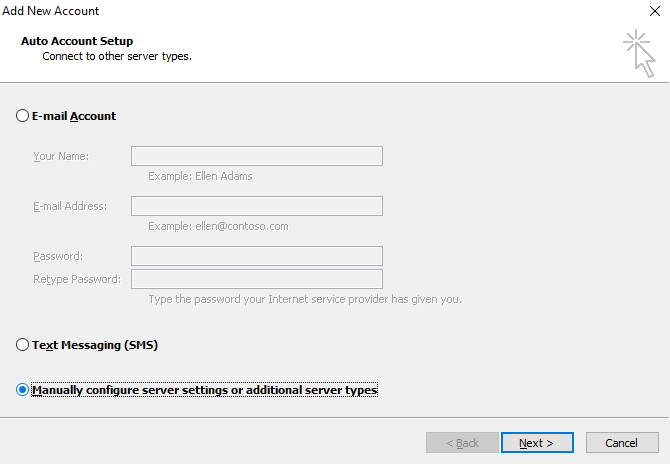
Step 1
The window 'Add new account' will be shown.
In order to add your email address, select 'Manually configure server settings or additional server types' (Outlook 2010) or 'Manual setup or additional server types' (Outlook 2013 and 2016) and click 'Next'.
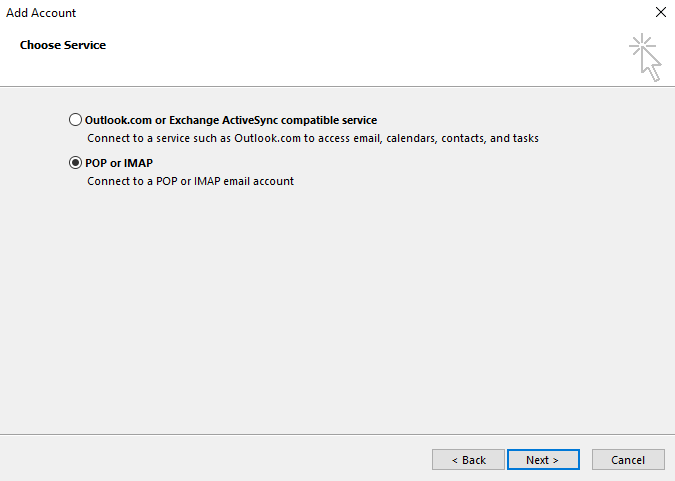
Step 2
Select 'Internet E-mail' (Outlook 2010) or 'POP or IMAP' (Outlook 2013 and 2016) and click 'Next'.
Step 3
It's now time to enter the bulk of the email settings for your email address. Keep in mind that the image below shows an example of email settings.
Use the information below the image as a guideline to enter the settings for your own email address.
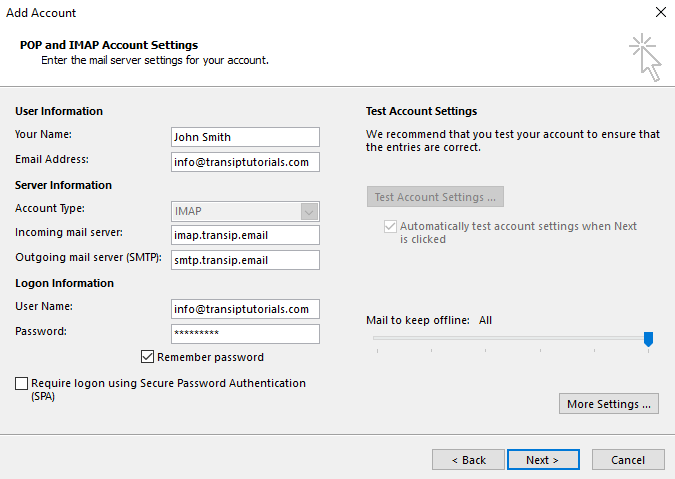
User Information
- Your name: Enter the name you wish to send email with.
- E-mail address: Enter your email address.
Server Information
- Account type: IMAP
- Incoming mail server: imap.transip.email
- Outgoing mail server (SMTP): smtp.transip.email
Logon Information
- User Name: Enter your email address
- Password: Enter the password for your email address.
Can't remember your password? Use the steps in the article 'Changing the password of your email address' to set a new password.
Once you've entered the email settings, it's time to configure the email servers. Click on 'More settings' to continue.
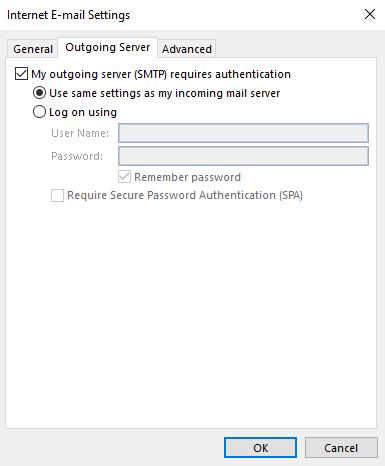
Step 4
In the next window, select the tab 'Outgoing server'.
Check the box next to 'My outgoing server (SMTP) requires authentication' and make sure 'Use same settings as my incoming mail server' is selected.
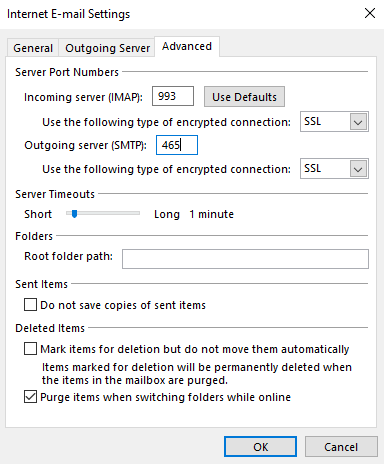
Step 5
Click on the tab 'Advanced' to enter additional information for the incoming and outgoing email servers.
- Incoming server (IMAP): 993
- Use the following type of encrypted connection: SSL
- Outgoing server (SMTP): 465
- Use the following type of encrypted connection: SSL
Click 'OK'.
Step 6
You will now return to the window 'Add new account'.
If you want to test if the email account is configured correctly, click 'Test account settings...'. Outlook will then run two tests to verify if email can be sent and received.
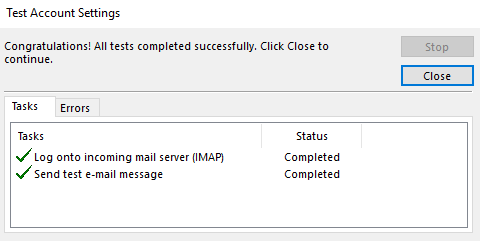
If the account is configured correctly, two green checks will appear. If an error message appears, check your email settings again to see if they are entered correctly.
If you're still seeing an error message, please contact our support team. Make sure to attach a screenshot of your email settings and the error message.
To complete the configuration of your email address, click 'Close' in the test window.
If you're using Outlook 2010, clicking 'Close' will return you to the 'Add New Account' window. In that window, click 'Next' to complete the configuration of your email address.
Your email address will now be succesfully configured. Click 'Finish' to start using your email address right away!
In this article we explained how to configure your email address in Outlook 2010, 2013 and 2016 for Windows.
If you have any questions regarding this article, please contact our support team. You can reach them using the 'Contact us' button below or via the 'Contact' button inside your control panel.
If you wish to discuss this article with other users, feel free to leave a comment below.