When you order an extra IPv4 address or add an extra IPv6 address to your IP addresses via the TransIP control panel, these cannot be automatically added to your VPS via DHCP. Additional IP addresses are added manually to the network interfaces.
In this article, we explain how you can statically add an extra IPv4 or IPv6 address to your CentOS 6.x VPS. For this, an extra IPv4 and/or IPv6 address is required (depending on which you'd like to add / configure). Don't have an extra address yet? The following articles explain how you can get one:
- Ordering an extra IPv4 address in the control panel
- Creating an extra IPv6 address in the control panel
Click here for a complete overview of all our tutorials for adding an extra or static IPv4 or IPv6 address to various Linux distros. For adding an IPv4 or IPv6 address to a Windows VPS, see this article.
- This manual is about public IP addresses. In this manual, you will find more information about setting up internal addresses (for your private network).
A VPS includes 1 IPv4 address by default, but you can expand this to a maximum of 10 IPv4 addresses via the control panel. A maximum limit of 20 IPv4 addresses applies to the VPSs of the PRO series.
Each VPS has a /64 IPv6 range at its disposal by default, where IP addresses can be added as desired. A /64 IPv6 range contains a total of 18,446,744,073,709,551,616 IP addresses, so the likeliness that you will not have enough is quite small! The default gateway falls outside of the /64 range so as netmask you always use a /48 range.
Adding an IPv4 address in CentOS 6.x
Step 1
Connect to the VPS via the VPS console or via SSH.
Step 2
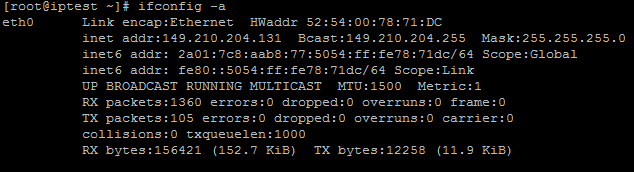
Once logged in you see the current network interfaces and the set IPs by means of the command:
ifconfig -aCheck whether an extra IP address has already been configured on eth0:1 and verify the name of the adapter. In this example this is eth0.
Step 3
Now add the extra IPv4 address in the network interfaces. First, open the network configuration file:
sudo nano /etc/sysconfig/network-scripts/ifcfg-eth0:1
Please note that if you have already set an extra IP address to eth0:1, that you use the next interface (ie eth0:2).
An empty configuration file opens. Enter the following:
DEVICE=eth0:1
BOOTPROTO=static
IPADDR=149.210.202.105
GATEWAY=149.210.202.1
NETMASK=255.255.255.0
ONBOOT=yes
IPADDR is the IP address that you want to set and GATEWAY the gateway, which for your IP address can be found in the control panel. You need to leave the (sub) NETMASK at 255.255.255.0.
Save the changes and exit nano (ctrl + x> y> enter).
Step 4
To be able to use the new IP address you will have to reset the network interfaces via the following command:
sudo /etc/init.d/network restart
Step 5
If you run ifconfig -a again you will see the newly added IPv4 address. You can test this IP address by performing a ping test from another computer / IP.
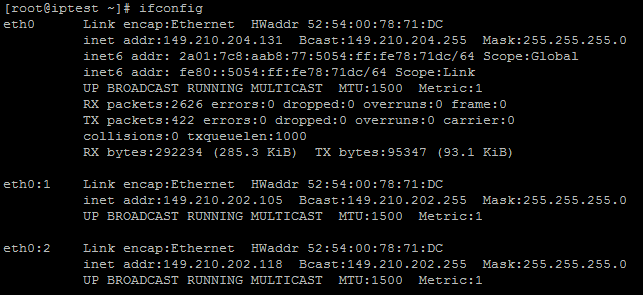
Repeat the above steps if you want to add more IP addresses. In addition, it is not mandatory to add the gateway if the extra IP address is in the same /24 range. If this is not the case then you will have to add this, because otherwise, you will have trouble reaching other IPs within the TransIP network.
Adding an IPv6 address in CentOS 6.x
Step 1
Connect to the VPS via the VPS console or via SSH.
Step 2
Once logged in you see the current network interfaces and the set IPs by means of the command:
ifconfig -aFor the next steps, it is especially important that you are aware of the correct adapter name. Which is eth0 in this example.
Step 3
Now add the extra IPv6 address in the network interfaces by executing the following commands (you can use another editor such as vim of course):
sudo nano /etc/sysconfig/network-scripts/ifcfg-eth0You will see a file which looks like the screenshot below.
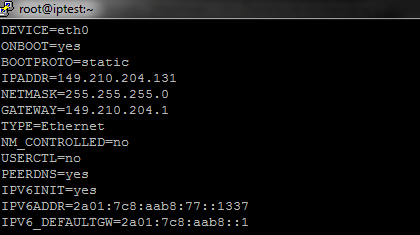
In the opened configuration file, add the following lines:
IPV6INIT=yes
IPV6ADDR=2a01:7c8:aab8:77::1337
IPV6_DEFAULTGW=2a01:7c8:aab8::1
Save the changes and exit nano (ctrl + x > y > enter). If you want to add more IPv6 addresses, add the following line:
IPV6ADDR_SECONDARIES="2a01:7c8:aab9:77::1338 2a01:7c8:aab8:77::1339" (etc)
Step 4
Reset your network interfaces with the following command to use the new IP address:
sudo /etc/init.d/network restartIf you run ifconfig -a again you will see the newly added IPv6 address. You can test this IP address by performing a ping test from another computer / IP.
Repeat the above steps if you want to add more IP addresses.
Should you have any questions left regarding this article, do not hesitate to contact our support department. You can reach them via the ‘Contact Us’ button at the bottom of this page.
If you want to discuss this article with other users, please leave a message under 'Comments'.