All our PerformanceVPSs and BladeVPS packages from the BladeVPS X2 and larger have one snapshot by default. For BladeVPS XS or in case you want more snapshots, a snapshot can be ordered for €5,99 ex VAT (€7,25 inc VAT).
You can create a snapshot of your VPS in the control panel (and put it back on your VPS) by following the steps in this tutorial. Before creating a snapshot, there are some important points to keep in mind:
- Depending on the size of your VPS it can take some time before the creation of the snapshot is finished. During this time other actions such as restoring a backup are not possible.
- It is strongly recommended to save your work and shut down the VPS (through the OS) before you create a Snapshot. This prevents that data which was still stored in the RAM and data that is still written during the snapshot is not included in the snapshot (with possible corruption as a result).
- If you use VPS monitoring, you'll likely receive messages from it while your VPS is turned off to make the snapshot.
- It is currently not possible to create "automatic" snapshots via the control panel (for example every day at 12 o'clock in the afternoon). However, you can create this option yourself using our API (https://api.transip.eu/docs/transip.nl/class-Transip_VpsService.html), but this does require some programming knowledge.
- You can also restore a snapshot on another VPS (of equivalent or better specifications), see this article for more information.
- Any VPS-firewall settings in the control panel remain intact. The settings at the time the snapshot was made, are not used.
- The difference between a snapshot and an automatic backup is described here.
- A VPS can save a maximum of twenty snapshots.
Creating a snapshot of your VPS
Step 1
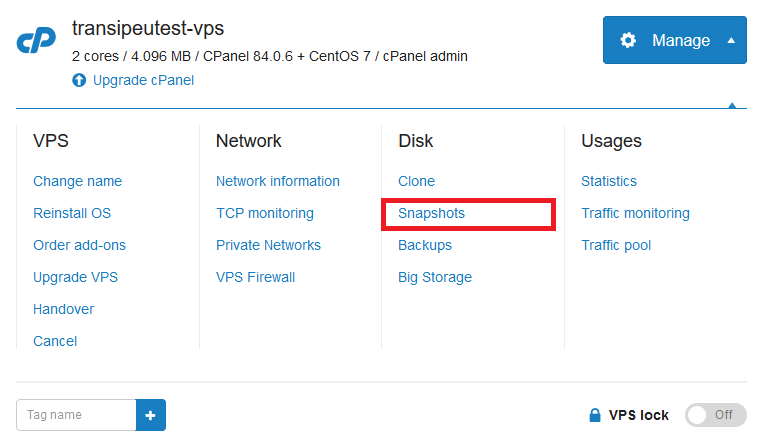
Go to the 'BladeVPS' page in the control panel and click the name of the VPS on the left of which you want to take a snapshot.
Step 2
Click 'Manage' > 'Snapshots' on the top right.
Step 3
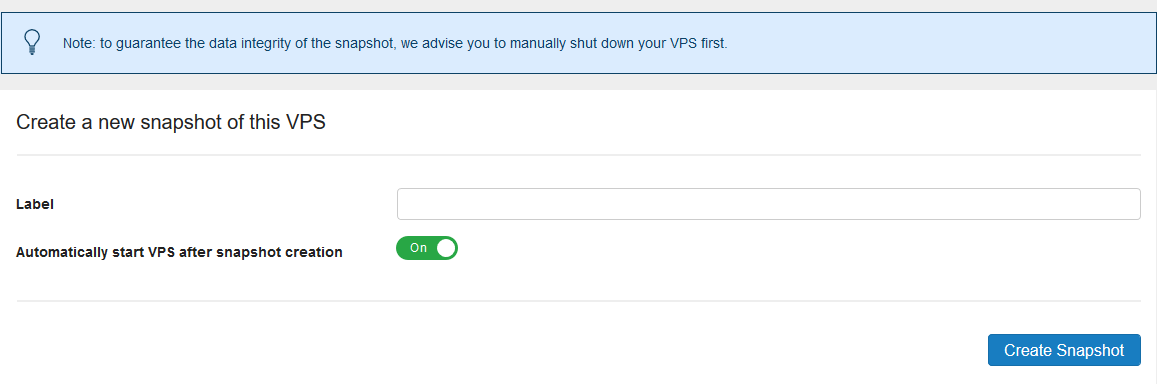
If you have not yet made a Snapshot, you can create a Snapshot here by clicking on the blue 'Create' button.

Step 4
You will then be given the opportunity to assign a label / name to the snapshot (especially useful if you want to use multiple snapshots). Depending on the size of the VPS and the associated disk space, it may take some time before the snapshot is created.
When you take a Snapshot in the switched off state, your VPS will automatically restart after this process is complete. In order to keep your VPS switched off, flip the switch so it reads 'Off'.
Once the snapshot has been created, you can restore it with the 'Restore' button. Note that if you only have the default snapshot, you will first have to remove the old snapshot before you can create a new one.
This concludes this tutorial about creating a snapshot of your VPS.
Should you have any questions left regarding this article, do not hesitate to contact our support department. You can reach them via the ‘Contact Us’ button at the bottom of this page.
If you want to discuss this article with other users, please leave a message under 'Comments'.