In this Plex Media Server guide, you can read how to install Plex on a CentOS 7VPS and use Big Storage as extra storage space for your media files.
Installing Plex Media Server in CentOS 7
First, copy the most current download link on the Plex download page before you begin the installation:
Select 'Linux'> 'Choose Distribution' and then right-click 'Fedora (27+) / CentOS (7+) / SUSE (15+) Intel / AMD 64-bit' > 'Copy link location'.
Step 2
Connect to your VPS via SSH or the VPS console in your control panel.
Step 3
In this step of the Plex Media Server manual you download the latest version of Plex on your VPS with the wget command. The syntax for this is 'wget url', where you replace url with the link from step 1, for example:
wget https://downloads.plex.tv/plex-media-server-new/1.15.1.791-8bec0f76c/redhat/plexmediaserver-1.15.1.791-8bec0f76c.x86_64.rpm
Step 4
Once the Plex download is complete, install the media server with the command:
yum -y install plexmediaserver-1.15.1.791-8bec0f76c.x86_64.rpmReplace the name plex media server-1.15.1.791-8bec0f76c.x86_64.rpm with the name of the Plex installation file that you downloaded in step 3. Plex starts automatically after installation.
Tip: Type yum -y install plex and press the tab key. The full name of the installation file is then automatically entered.
Step 5
Delete the installation file using the command:
rm -f plexmediaserver-1.15.1.791-8bec0f76c.x86_64.rpmAgain, replace the name of the file with the name that you used in step 4.
Tip: Type rm -f plex and press the tab key. The full name of the installation file is then automatically entered as in the previous step.
Before you can reach the Plex interface for the first time, set up an SSH tunnel to your VPS. Use the steps below for the operating system from which you want to connect to your Plex Media Server.
Step 1
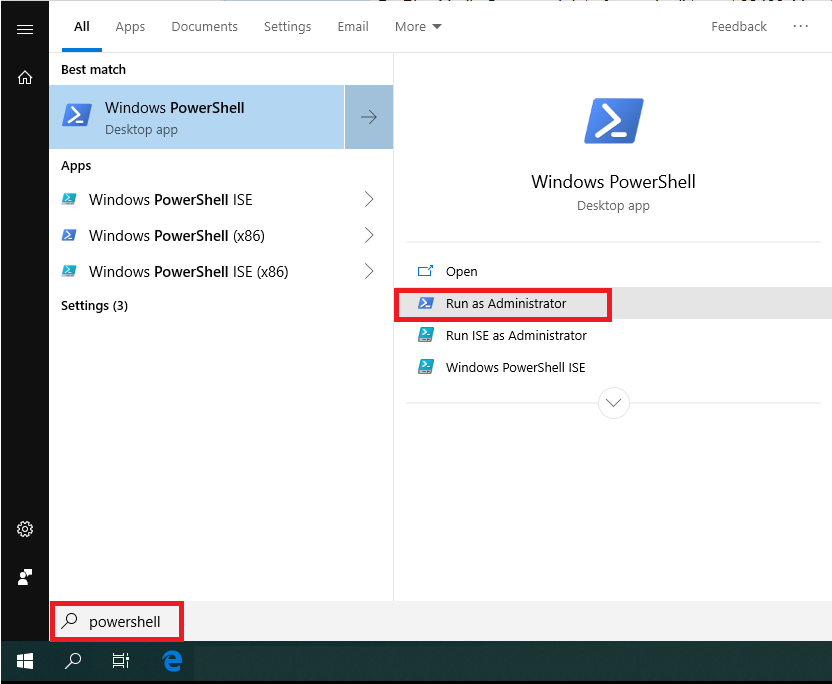
PowerShell in Windows 10 has an SSH-client built into it (it's absent in older Windows versions). Click the Windows start button (bottom left) and type 'Powershell'. In the results, click on 'Run as Administrator'.
Step 2
Set up an SSH tunnel using the command:
ssh -p 22 user@123.123.123.123 -L 8888:localhost:32400
Replace:
- 22 with your actual SSH port number,
- user with the user name which you use to connect to your VPS
- 123.123.123.123 by your VPS' public IPv4 address.
Proceed to step 7, but do not close PowerShell!
Now start a browser on your PC / laptop (not on your VPS) and go to the address http:localhost:8888/web. You will then be taken to https://app.plex.tv. Choose one of the three options to sign up for a Plex account.
Please note: Do you get to see an endless turning circle? In that case, try a different browser. Not every browser seems to work equally well with Plex.
Step 8
After logging in, you will see a welcome screen with a brief explanation of how Plex works. Click "GOT IT!" to proceed.
Plex will now offer you a premium subscription. Click the cross in the top right to close it. You can always use this offer later.
Step 9
Name your Plex server and click 'NEXT'. Your hostname is entered by default, but if you are going to share your Plex server with others, it is of course more fun to give a more personal name.
Leave 'Allow me to access my media outside my home' checked. If you turn this option off, you can only access Plex from your VPS.
Step 10
Before you proceed with actually adding your videos, music and / or photos to your Plex server, via FTP for example, it is advisable to read the Plex Media Preparation manual first. This manual explains how to organize your folder structure and which names (i.e. name conventions) you need to give your files so that Plex can optimally recognize and index them. Failure to follow these guidelines can adversely affect the operation of your Plex server.
Click 'Add Library' once you have set up your files and folders for Plex.
Step 11
Choose a library type, give it a name, and choose a language. Make sure you accurately choose the library type. This ensures that your files can actually be found in Plex under the categories where they belong and, for example, that there are no series in your movie list.
Step 12
Click 'Browse for Media folder' to search your VPS for folders with media files.
Step 13
Navigate to the folder that you want to add and click 'Add'.
In the example above, this is a folder on the linked Big Storage. Later in this article, you can read how you use Big Storage together with Plex (spoiler: it is very simple).
Step 14
Click 'Next' if you no longer want to add folders (this can always be done later). You are now done with the installation of Plex Media Server!
Close the SSH tunnel from Step 6 and install the Plex app on all devices on which you want to use Plex (telephone, tablet, TV, etc.).
Step 15
The final step of the Plex Media Server manual for CentOS 7 is to open the Plex port 32400 in your firewall. In CentOS 7, Firewalld blocks all ports by default. You open the port with the commands:
firewall-cmd --zone=public --permanent --add-port=32400/tcp
firewall-cmd --reload
Pro tip: Alternatively, only allow specific IP addresses to the Plex web interface by opening port 32400 per specific IP address. You use the following syntax for this:
firewall-cmd --permanent --zone=public --add-rich-rule='
rule family="ipv4"
source address="123.123.123.123"
port protocol="tcp" port="32400" accept'
Replace 123.123.123.123 with your own IP address. You can find this on this website, for example.
Please note: some providers work with dynamic IP addresses. This means that the IP address of your internet connection at home changes regularly.
The installation of your Plex server is now complete! You can now continue to install the Plex app on your mobile devices / television or access your computer via a browser from 123.123.123.123:32400 (replace 123.123.123.123 with the IPv4 address of your VPS).
Using Big Storage with Plex
With Big Storage, you can easily add a lot of extra storage capacity to your Plex Media Server (minimum 2TB to maximum 400TB). All you have to do to be able to use your Big Storage in Plex is to connect your Big Storage to your VPS. The folder in which you mount your Big Storage in this process (/mnt/bigstorage in our manual) will then automatically be available in Plex when you add a new media library.
Please note: Plex scans the folders that you add to your library before they can be used. Depending on the amount of data, this may take some time.
Uploading files to Plex
Now that your Plex server is up and running, you of course need a method for getting media on your Plex Media Server. A relatively easy method to achieve this is to make use of SFTP or FTPS. For this, you can use one of our tutorials:
Should you have any questions left regarding this article, do not hesitate to contact our support department. You can reach them via the ‘ContactUs’ button at the bottom of this page.
If you want to discuss this article with other users, please leave a message under 'Comments'.