Firewalld is the go to firewall for CentOS and supports network / firewall zones, in order to establish the trust level of network connections / interfaces (see the zones paragraph). In addition to the ability to specifically manage ports, it also supports the ability to add services / applications directly.
- Connect to your VPS via SSH or the VPS console in your control panel, and use sudo or follow the steps in this article as a root user.
- Do you use a Plesk VPS? The default zone in recent Plesk versions is not public, but plesk (--zone=plesk).
- Our Plesk, DirectAdmin and cPanel installations come with Firewalld preinstalled.
Installing Firewalld
Firewalld is easily installed using the following commands:
yum -y install firewalld
systemctl enable firewalld
Checking the status of Firewalld
Before you continue with the configuration of Firewalld, it is wise to check that it indeed works correctly. You do this with the command:
systemctl status firewalldIf there are no problems, the input will look like this:
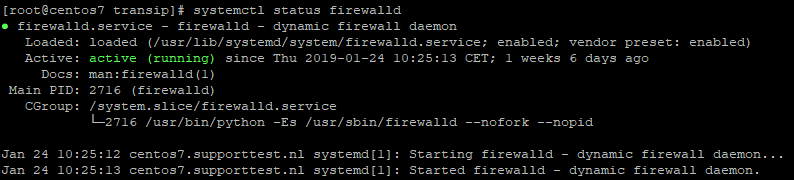
If it does not state that Firewalld is active, try to restart it with:
systemctl restart firewalldDoes Firewalld still not start? Check for possible error messages to solve the problem with:
journalctl -xe -u firewalldZones
Firewalld uses zones, but what does this mean? With a zone, you actually indicate in what kind of environment your internet connection is located and how much you trust it, for example, a public, home or work connection. This is especially useful if you use a private network, for example, or use CentOS 7 on a laptop and work from different locations. You can then configure different zones in advance, and adjust your active zone depending on where you are.
By configuring different zones, you can distinguish between which services / ports are accessible, depending on where you are and which zone you use. You often use only one zone on a VPS because the VPS does not change from home / work / public environment.
Out-of-the-box, Firewalld comes with the following zones:
- drop: All incoming connections are rejected. Outbound connections are possible.
- block: All incoming connections are denied with a default message for the source of the incoming connection. For IPv4, this is icmp-host-prohibited and for IPv6 icmp6-adm-prohibited (ICMP is a default for sending information and error messages in IP traffic). Outgoing connections are possible.
- public: Use this zone for public environments in which you do not trust other computers on the network. Only predefined connections (i.e. ports / services) are accepted.
- external: This is mainly focused on if your firewall works as a gateway and NAT masquerading is used. You do not trust other computers on the network and only preconfigured connections are accepted.
- dmz: The demilitarized zone, where the computer / server is isolated on the network and does not have access to other computers / servers. Only specific connections are accepted.
- work: For work environments. Usually, other computers are trusted on the same network. Again, only predefined connections are accepted.
- home: For home use. The same applies as in the 'work' zone. Note that connections at work are often better secured than at a home network.
- internal: For use with private networks. Computers on this network are usually trusted. Only predefined connections are accepted.
- trusted: All connections are accepted.
Managing zones
Firewalld comes with a range of useful commands to manage your zones. In this section, we explain the most important.
Checking the default zone
By default, the 'public' zone is the default zone. You check the default zone with the command:
firewall-cmd --get-default-zone
Checking the active zone
It may happen that you change the active zone, but not the default zone. You check the active zone and the network interfaces for which they are used with:
firewall-cmd --get-active-zones
Check the available zones
You check the available zones with the command:
firewall-cmd --get-zonesThis is especially useful if you want to change zones and first want to see your options.
Detailed zone information
Detailed information such as authorized services and porting, but also port forwarding etc. can be viewed with:
firewall-cmd --zone=public --list-all
Change 'public' to the desired zone, or view the output for all zones with:
firewall-cmd --list-all-zones | less
Changing the default zone
To change the default zone, you have two options: change the zone for all interfaces, or per interface. Suppose you use one network interface (and not also a private network), then the use of one zone is sufficient, and you might then just as well adjust the default zone when changing zones.
- Adjust the zone for all interfaces: Replace public with the name of the desired zone
firewall-cmd --set-default-zone=public
- Adjust the zone for specific interfaces:Replace public with the name of the desired zone, and eth0 with the name of the desired network interface. This way, you can also change the zones per interface for private networks, for example:
firewall-cmd --zone=public --change-interface=eth0firewall-cmd --zone=public --change-interface=eth0 firewall-cmd --zone=internal --change-interface=eth1
Opening ports
You can open ports in Firewalld or add services to give network access to applications. Not every application comes with a service, or maybe you changed the default port of the service (e.g. for SSH). In that case, you open one or more specific ports.
Every change in this part is only active after a restart of your VPS, or by reloading your configuration with:
firewall-cmd --reload
Opening a single port
You open a port with the command:
firewall-cmd --zone=public --permanent --add-port=1234/tcp- Replace public with the desired zone
- --permanent ensures that the change remains intact even after a restart
- Replace 1234/tcp with the desired port and the desired protocol (tcp or udp)
Opening Ranges
Would you rather open a range? Then you use the command:
firewall-cmd --zone=public --permanent --add-port=1234-1345/tcpReplace 1234-1345 with the actual port range you want to open
Access per IP
Instead of opening a port for the whole wide world, you may also open it for a specific IP only using the commands:
Replace 123.123.123.123 by the client's actual IP address and 123 by the port you'd like to open. Repeat these steps to whitelist multiple IP's and reload your configuration afterwards (firewall-cmd --reload). Don't forget to remove the general rule if the corresponding port was already opened prreviously.
Checking open ports
Over time, you may forget which ports are open. You check them with the command:
firewall-cmd --zone=public --permanent --list-ports
Closing ports
The closing of ports works almost the same as opening a port and you do it with the command:
firewall-cmd --zone=public --permanent --remove-port=1234/tcp
firewall-cmd --reload- replace 1234 with the desired port number, or use 1234-1345/tcp as syntax to delete a port range
- firewall-cmd --reload immediately updates your configuration change
Adjusting the configuration directly
In addition to the above commands, you can also directly adjust the configuration file of a specific zone. You can find the configuration files of the zones with:
ls /etc/firewalld/zonesIn a new installation, only public.xml and public.xml.old will be listed here. You can open and edit it with the command:
nano /etc/firewalld/zones/public.xmlYou can open services or ports by respectively placing the following additions in the file:
  <service name="servicenaam"/>
<port protocol="tcp" port="1234"/>- Replace service name with the actual name of the service, for example, ssh.
- Replace 1234 with the desired number and tcp with udp if you are sure you want to open the udp port.
Do you want to create a new configuration file for another zone, for example, home? Then the public.xml.old is a great starting point. You change public.xml.old to a file for another zone by copying it with:
cp /etc/firewalld/zones/public.xml.old /etc/firewalld/zones/home.xml- Replace home with the name of the desired zone.
Adding services
In addition to opening ports, you can also open specific services in Firewalld. You then add the service in Firewalld and one or more ports are then opened. There is a side note here:
Firewalld uses configuration files (see available services) in which the ports of different services are defined. These ports are opened when the service is added. For example, if you change your SSH port, if you have added the SSH service, the new port will not be automatically open unless you open the port manually or adjust the configuration of the service in Firewalld.
You open services in Firewalld with the following command, where you replace SSH with the relevant service name:
firewall-cmd --zone=public --permanent --add-service=ssh
firewall-cmd --reloadThere are two ways to see which services are available for use with Firewalld:
- With a direct command:
firewall-cmd --get-services - In more detail by viewing the relevant configuration. You can find the configuration files of the available service in the /usr/lib/firewalld folder using:
The contents of the available files can be viewed with:
ls /usr/lib/firewalld/servicesYou can optionally edit one of the configuration files with nano or vi, for example, to adjust the default port.cat /usr/lib/firewalld/services/servicenaam.xml
Removing services
You can remove a service just as easily as you add it in Firewalld:
firewall-cmd --zone=public --permanent --remove-service=ssh
firewall-cmd --reload
Blocking IPs
It can happen that your VPS is bombarded with brute-force attacks by bots. We advise you to solve this by using Fail2Ban, but you can also manually block IPs. You do this with the commands:
firewall-cmd --permanent --add-rich-rule="rule family='ipv4' source address='123.123.123.0/24' reject"
firewall-cmd --reload
Replace 123.123.123.0/24 with the specific IP range you want to block, or with a specific IP address if you want to block one IP.
Alternatively, you can also turn this principle around and block access to a port for everyone and only allow specific IPs. You first remove the relevant port:
firewall-cmd --zone=public --permanent --remove-port=1234/tcpReplace public with the relevant zone, 1234 and tcp with the desired port / protocol. Then, you can access specific IPs with the commands:
firewall-cmd --permanent --zone=public --add-rich-rule='rule family="ipv4" source address="1.2.3.4" port protocol="tcp" port="1234" accept'
firewall-cmd --reload
If necessary, replace public with the desired zone, 1.2.3.4. with the correct IP and 1234 and tcp with the correct port number / protocol.
Checking blocked ports
Suppose that an IP address has problems reaching a service on your VPS, it is then useful to exclude if it is blocked on your VPs. You do this with the command:
firewall-cmd --list-allUnblocking IPs
To unblock IPs blocked in Firewalld, can in a way, you reverse the commands from the previous section. Suppose you have blocked an IP / IP range, you then use the syntax:
firewall-cmd --permanent --remove-rich-rule="rule family='ipv4' source address='123.123.123.0/24' reject"
firewall-cmd --reload
Do not forget to adjust the IP here. Have you given a specific IP address access to a port and do you want to undo it? Then use:
firewall-cmd --permanent --zone=public --remove-rich-rule='rule family="ipv4" source address="1.2.3.4" port protocol="tcp" port="1234" accept'
firewall-cmd --reload
Do you want to know even more about Firewalld? Please let us know and also take a look at Firewalld's own documentation.
Should you have any questions left regarding this article, do not hesitate to contact our support department. You can reach them via the ‘Contact Us’ button at the bottom of this page.
If you want to discuss this article with other users, please leave a message under 'Comments'.